Replacement of electrical fixture
Include pictures of outlet or switch
1 Hour Estimated Completion Time
-
Confirm The Checklist
- Replace existing lights
- Price does NOT include switch / outlet
- Include pictures for parts pickup

 My ZIP : 39531
 Total Services:
 My Notifications
 My Messages
 My Calendar
 My Projects
 My Bookmarks
 My Profile
How to order a service
How to manage a consumer project
How to create a contractor account
How to create a service listing
HOW TO ORDER A SERVICE
Click here for instructions on “How to manage your project”
Welcome to the future of how people will get work done.
The advantages of using Hometown Workforce to book your services.
On-demand access to a variety of essential home repair and maintenance services.
Know the price before you book.
Know how long the project will take before you book.
The ability to schedule the job according to your busy schedule.
Your payment is held in a secure escrow account until the job is approved.
Easily manage multiple jobs by using our advanced status updated based project management software.
STEP 1- Signup by clicking the green “Login” button top right, then clicking “Signup”
STEP 2- Create a consumer account by filling out the form
OPTIONAL: Include your phone number and check the opt-in box to receive SMS text-based project status updates.
STEP 3- Pick your service by clicking on a listing
NOTE: You can also bookmark a listing by clicking on the heart.
NOTE: You can check the contractor's profile by clicking on the company name up top.
STEP 4- Choose a service package that best matches your project demands
NOTE: An exact match is not necessary as the contractor will have the opportunity to refund a portion of your deposit depending on the scope of the job.
NOTE: You will also have the opportunity to add additional tasks to order if necessary.
STEP 5- Choose a start date
STEP 6- Choose a start time block, then click “Book Now”
NOTE: These blocks represent when the contractor will arrive to BEGIN work. This is not a start and completion time. The nature of construction requires we give each contractor a 2 hours window to arrive.
NOTE: You will receive a 30-Minutes away notification via email or text to confirm the contractor is en route.
After that, complete your order by clicking BOOK NOW.
STEP 7- Fill out the project details form, then click “Continue to Checkout”
NOTE: Be sure to include any relevant details your contractor may need to be aware of. The more information you provide the better.
NOTE: You can also upload pictures if necessary.
STEP 8- Choose a payment method to deposit service funds into escrow, then click the “Confirm and Pay” button on the right (or below on mobile)
STEP 9- Proceed to your project management page by clicking “Track your project here”
STEP 10- Monitor your job from beginning to end via the project management page
HOW TO MANAGE A CONSUMER PROJECT
Beyond an easy way to book services we also provide all the tools you need to manage those services.
STEP 1- Access your project dashboard by clicking “Projects” on the left side menu
STEP 2- Select the project you would like to manage by clicking the corresponding blue link
NOTE: For a quick status reference you can check the gold “Status” button on the right. (Clicking this button will also take you to the project management page)
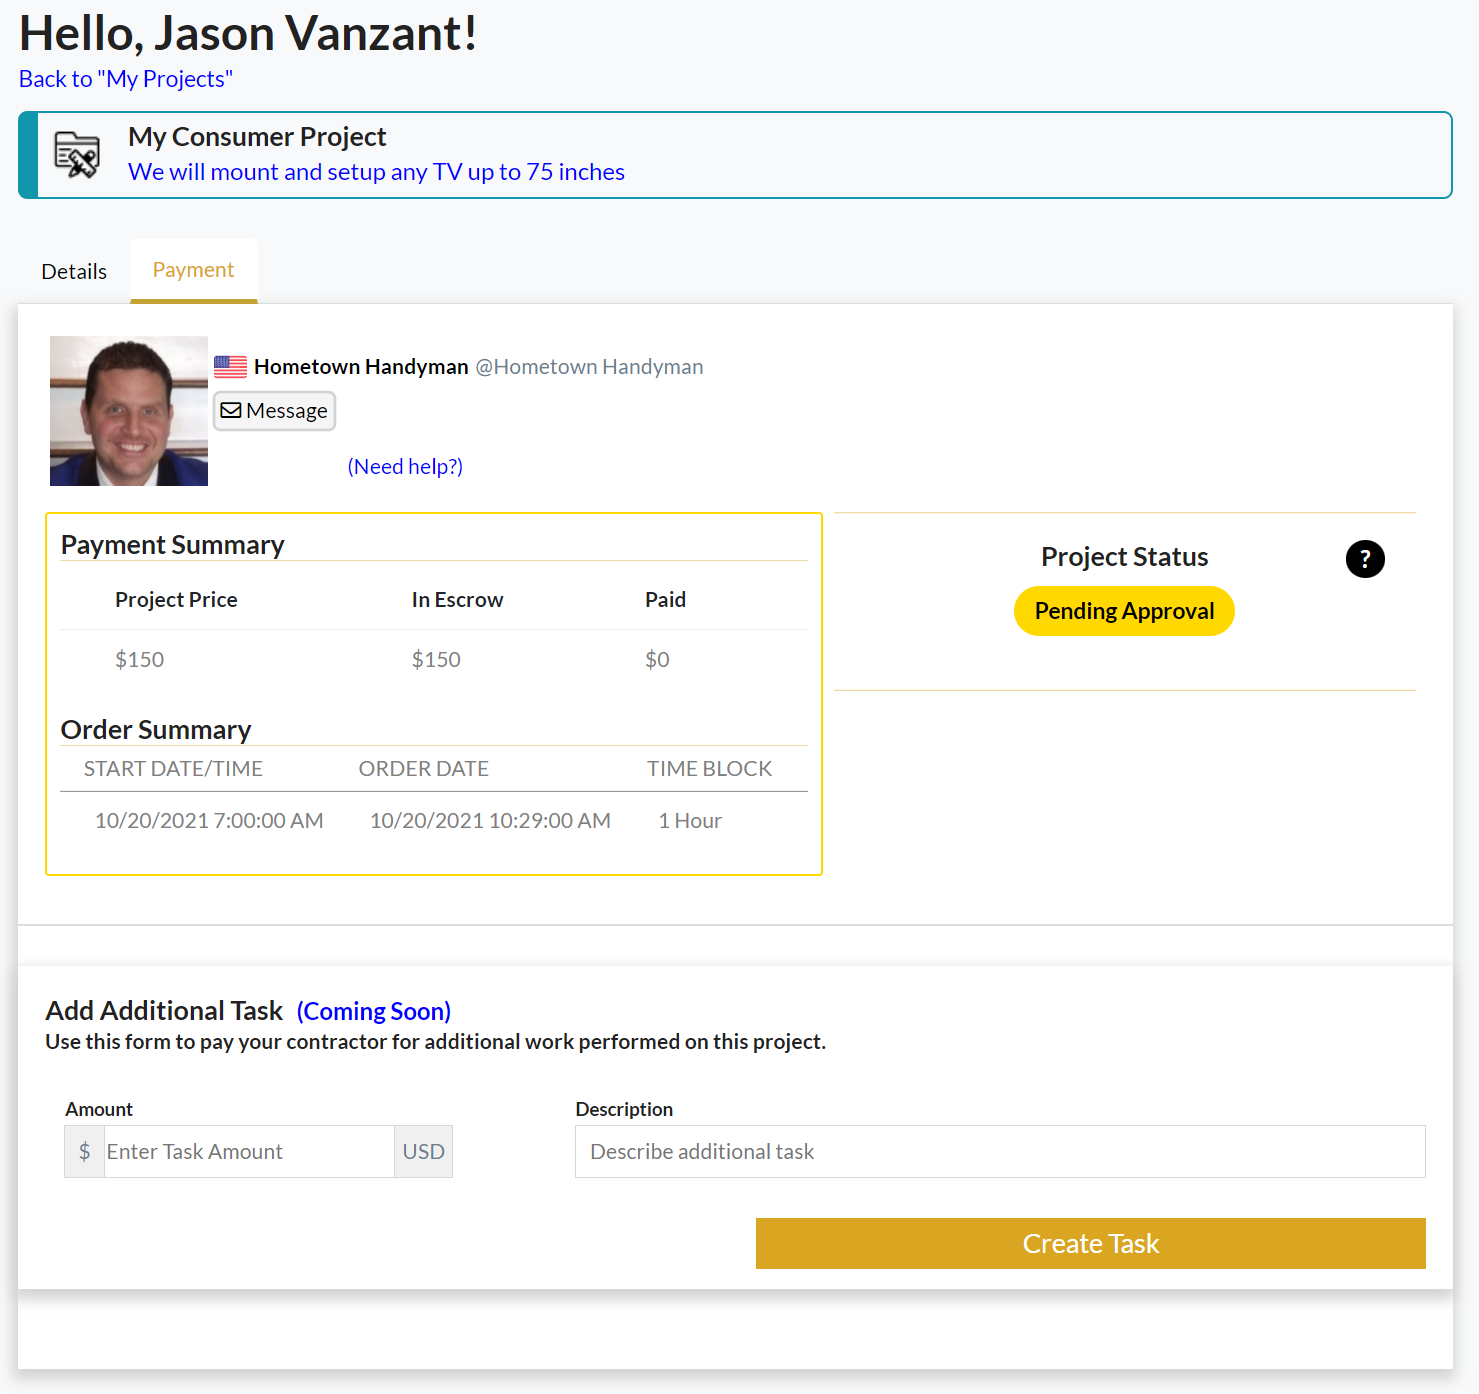
STEP 3- Manage your project
NOTE: You can message your contractor by clicking the “Message” button at the top.
NOTE: To the right, you can track your project status as your contractor sends updates.
NOTE: You can use the “Create Task” form below to add additional tasks or tip your contractor for a job well done.
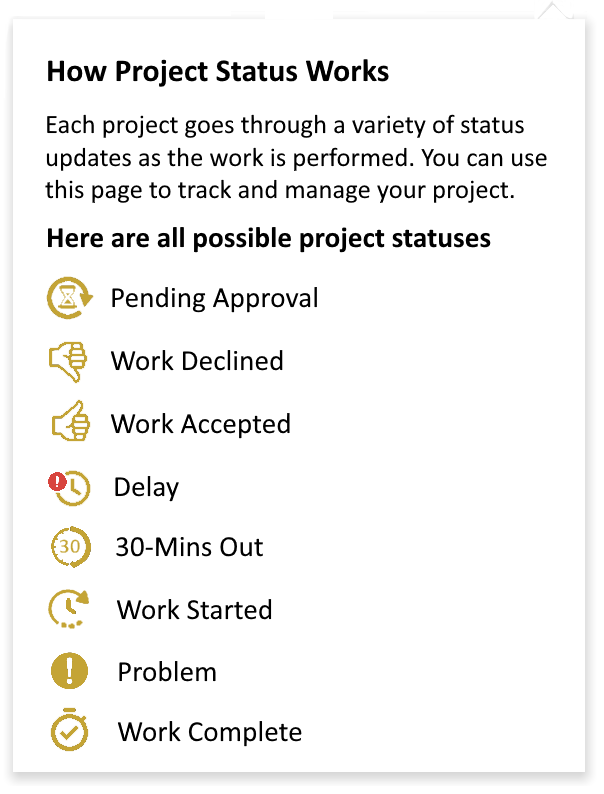
Below you will find all possible Status Updates.
HOW TO SIGN IN TO A CONSUMER ACCOUNT
STEP 1- Login by clicking the green “Login” button top right, then click the “Login” link in the dropdown

STEP 2- Enter your login credentials, then click “Sign In” at the bottom of the form

STEP 3- After pressing “Sign In” you will be redirected to the home page
HOW TO CREATE A CONSUMER ACCOUNT
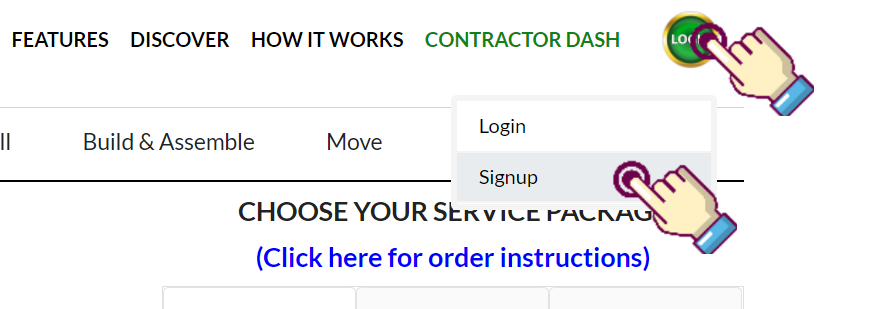
STEP 1- Sign up by clicking the green “Login” button top right, then click the “Signup” link in the dropdown
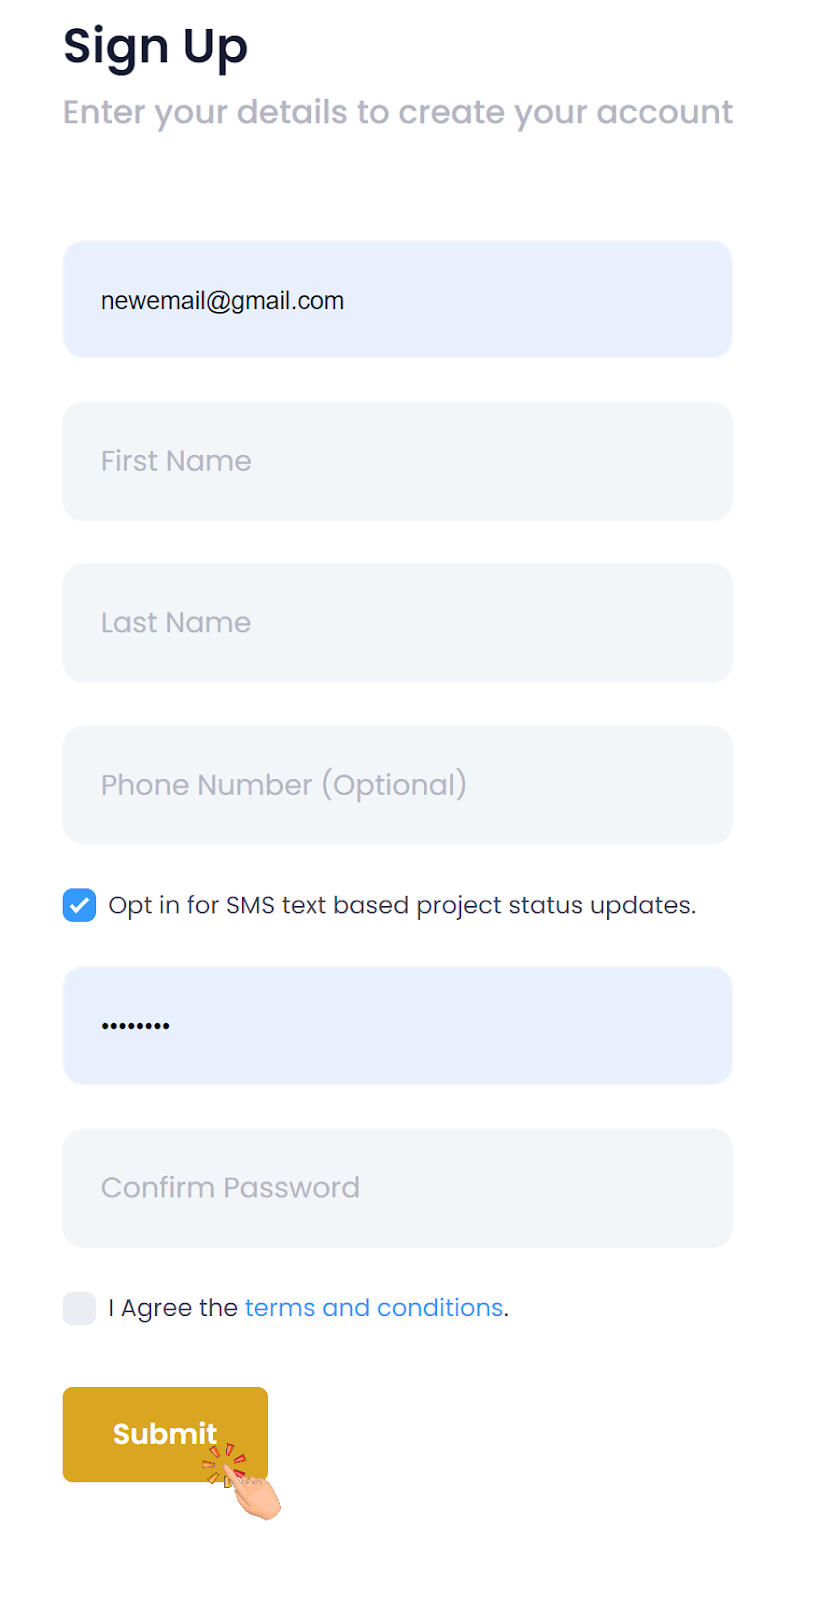
STEP 2- Fill out the sign-up form, then click the “Submit” button at the bottom
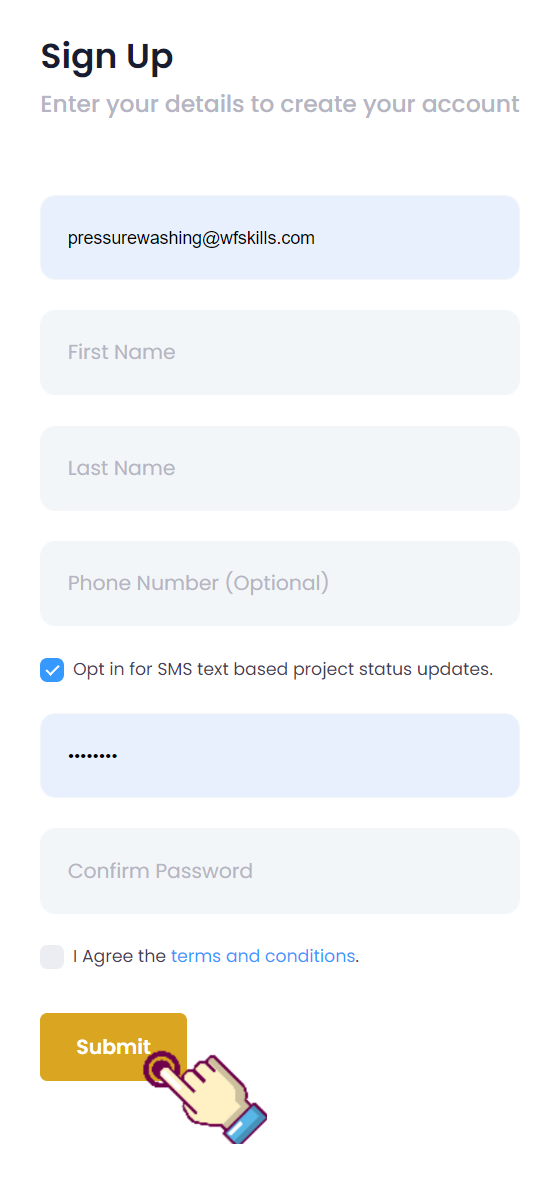
STEP 3- After pressing “Submit” you will be redirected to the home page
HOW TO ORDER A SERVICE
The advantages of using Hometown Workforce to book your services.
Our primary objective with this software is getting the contractor to your property when you schedule the appointment. Afterward, you can discuss the job in more detail. Our tools allow more tasks to be added or refunds to be issued depending on the scope of the project.
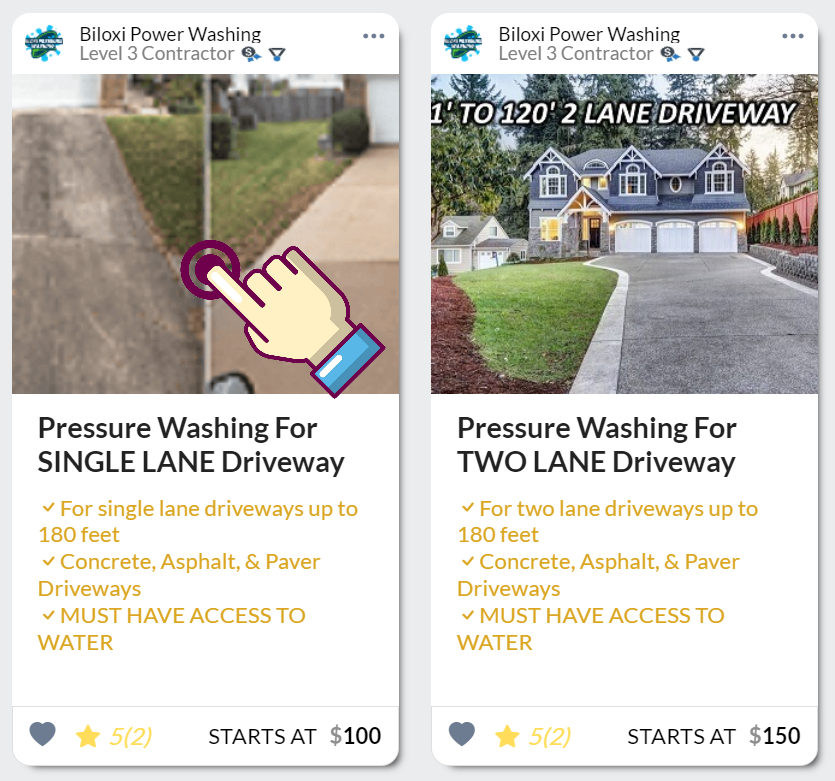
STEP 1- Pick your desired service by clicking on a listing
NOTE: You can check the contractor's profile by clicking on the company name at the top.
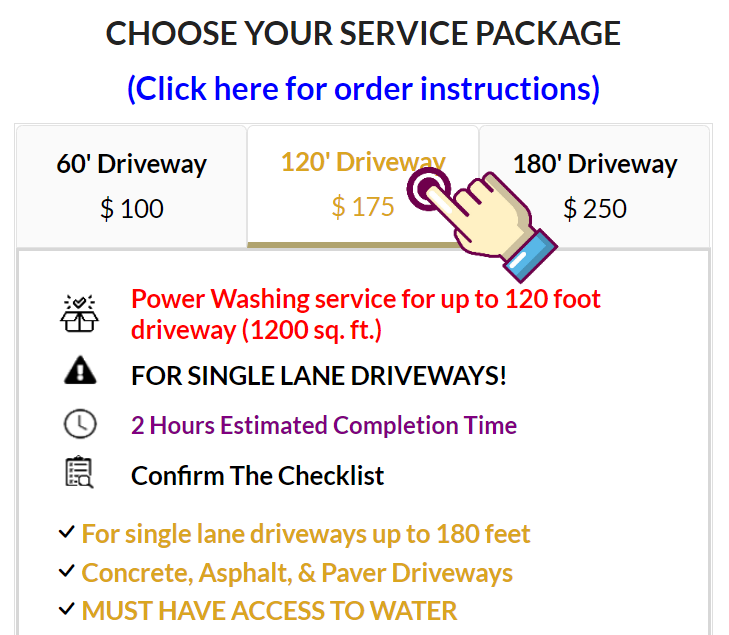
STEP 2- Using the form on the right, choose a service package that best matches your project demands
NOTE: Don’t worry about matching the package exactly with your project. An example would be if you only had a small oil stain on your driveway. In this case, simply pick the closes option available (60’ Driveway).
STEP 3- Choose a start date
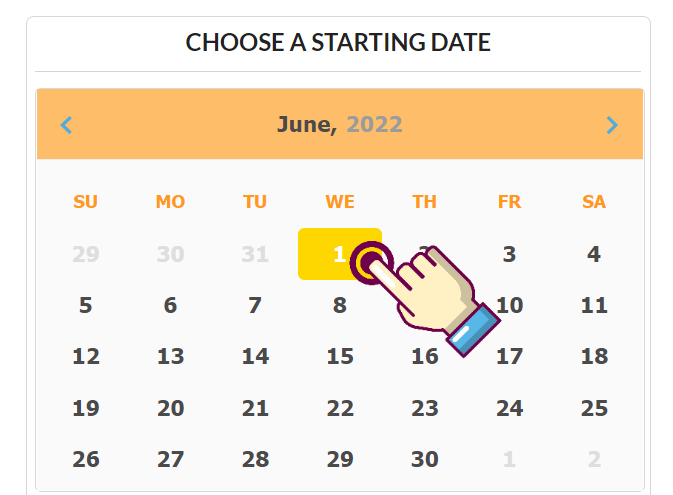
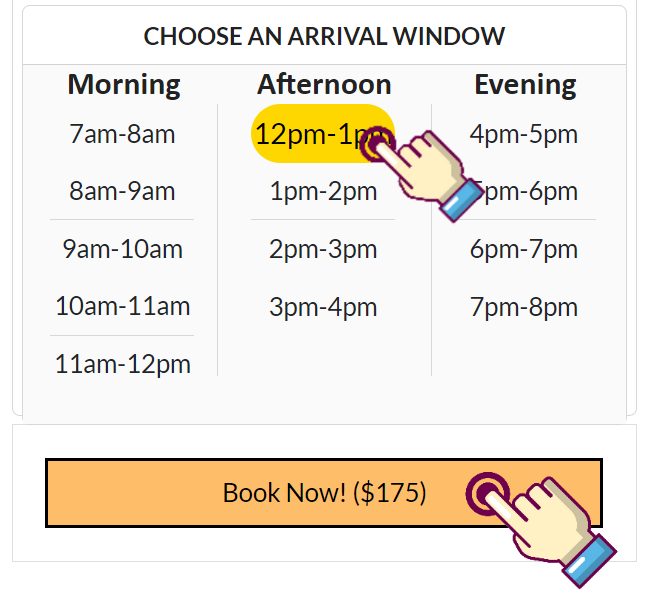
STEP 4- Choose an Arrival Window, then click “Book Now” to proceed to the project details page
NOTE: These blocks represent when the contractor will arrive to BEGIN work. This is not a start and completion time. The nature of construction requires we give each contractor a 1 hours window to arrive.
NOTE: You will receive a 30-Minutes away notification via email or text to confirm the contractor is en route.
NOTE: In the event of a delay you will receive a notification explaining the circumstances.
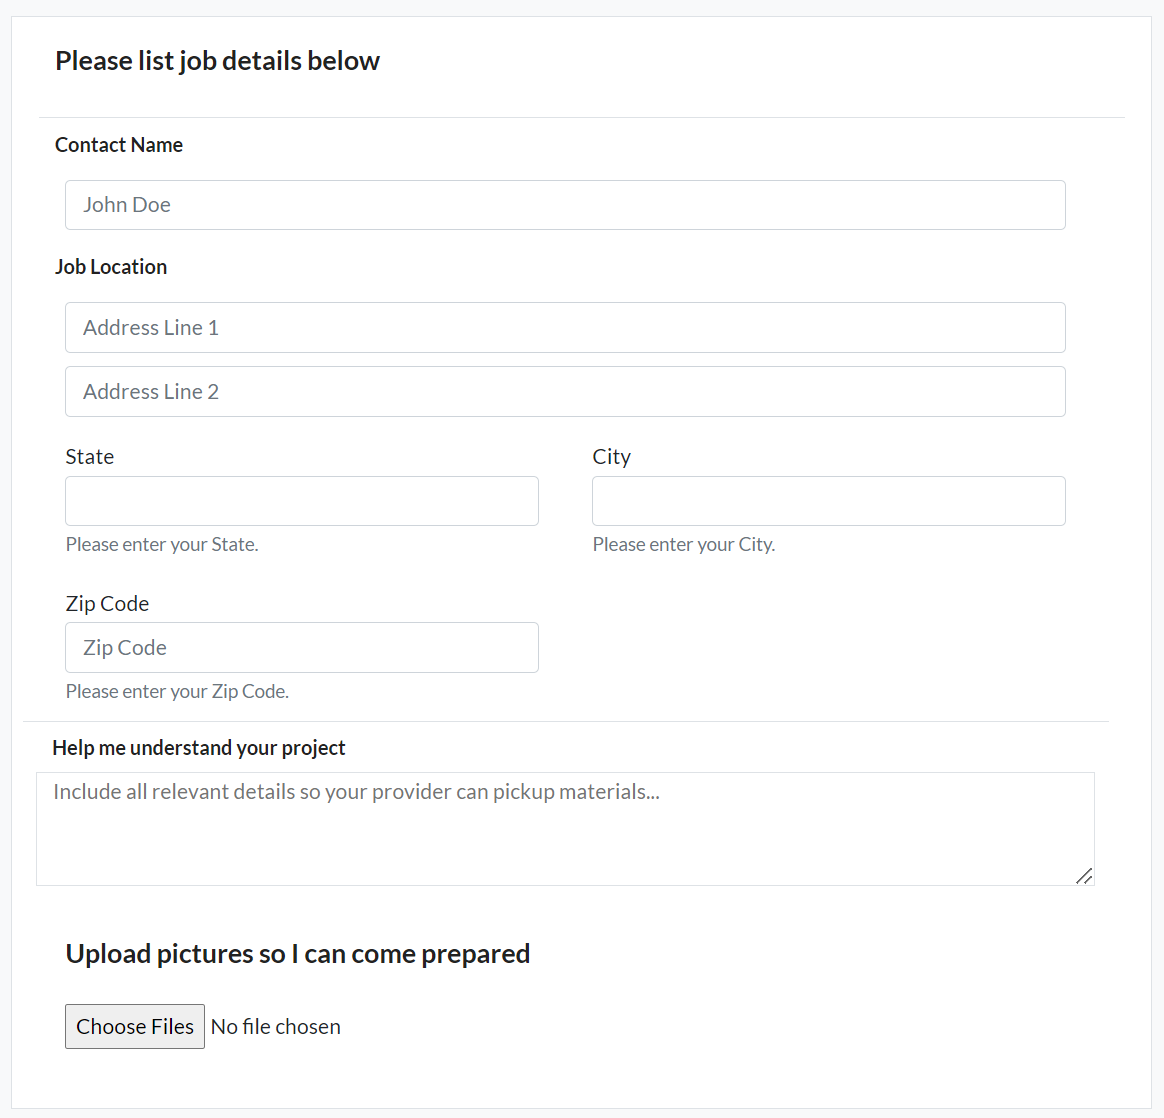
STEP 5- Fill out the project details form, then click “Continue to Checkout”
NOTE: Be sure to include any relevant details your contractor may need to prepare for your project. The more information you provide the better.
NOTE: You can also upload pictures if necessary. An example would be product images, design examples or pictures of the fixture to be replaced.
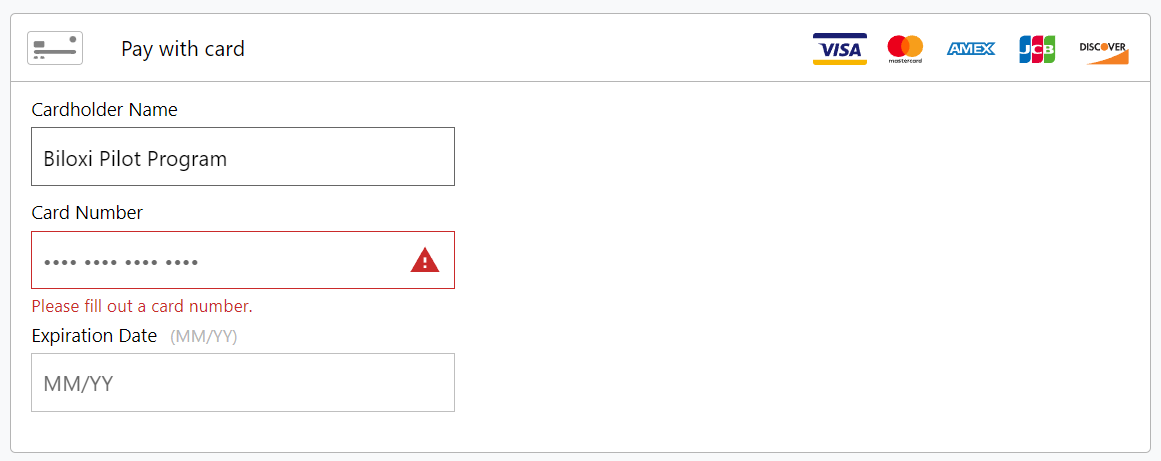
STEP 6- Choose a payment method to deposit service funds into escrow, then click the “Confirm and Pay” button on the right (or below on mobile)
STEP 7- Proceed to your project management page by clicking “Track your project here”

STEP 8- Monitor your job from beginning to end via the project manager dash
HOW TO GET A CUSTOM QUOTE
Our custom quote system is designed to streamline complicated projects. Projects that are not viable for our marketplace because they can not be accurately priced and timed prior to work beginning.
We have access to a reliable network of subcontractors and your dedicated project manager will ensure every step of the job go as smoothly as possible.
Because we use technology to reduce overhead or prices are guaranteed to be competitive with all other insured and licensed contractors.
You never have to worry when using Hometown, we stand behind every project. If you are not 100% satisfied with the work then you dont pay a penny.
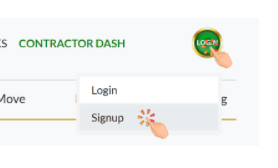
STEP 1- Signup by clicking the green “Login” button top right, then clicking “Signup”
STEP 2- Create a consumer account by filling out the form
OPTIONAL: Include your phone number and check the opt-in box to receive SMS text-based project status updates.
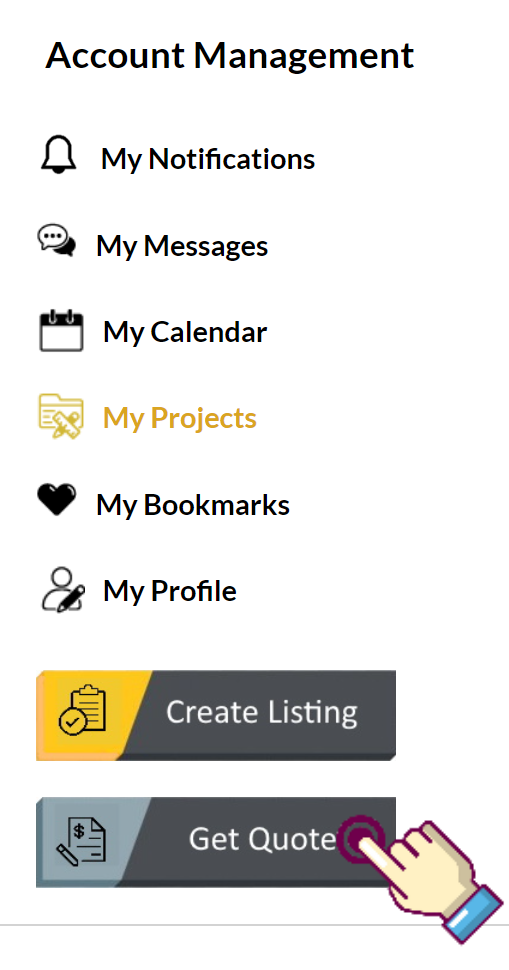
STEP 3- Click the “Get Quote” button on the left sidebar
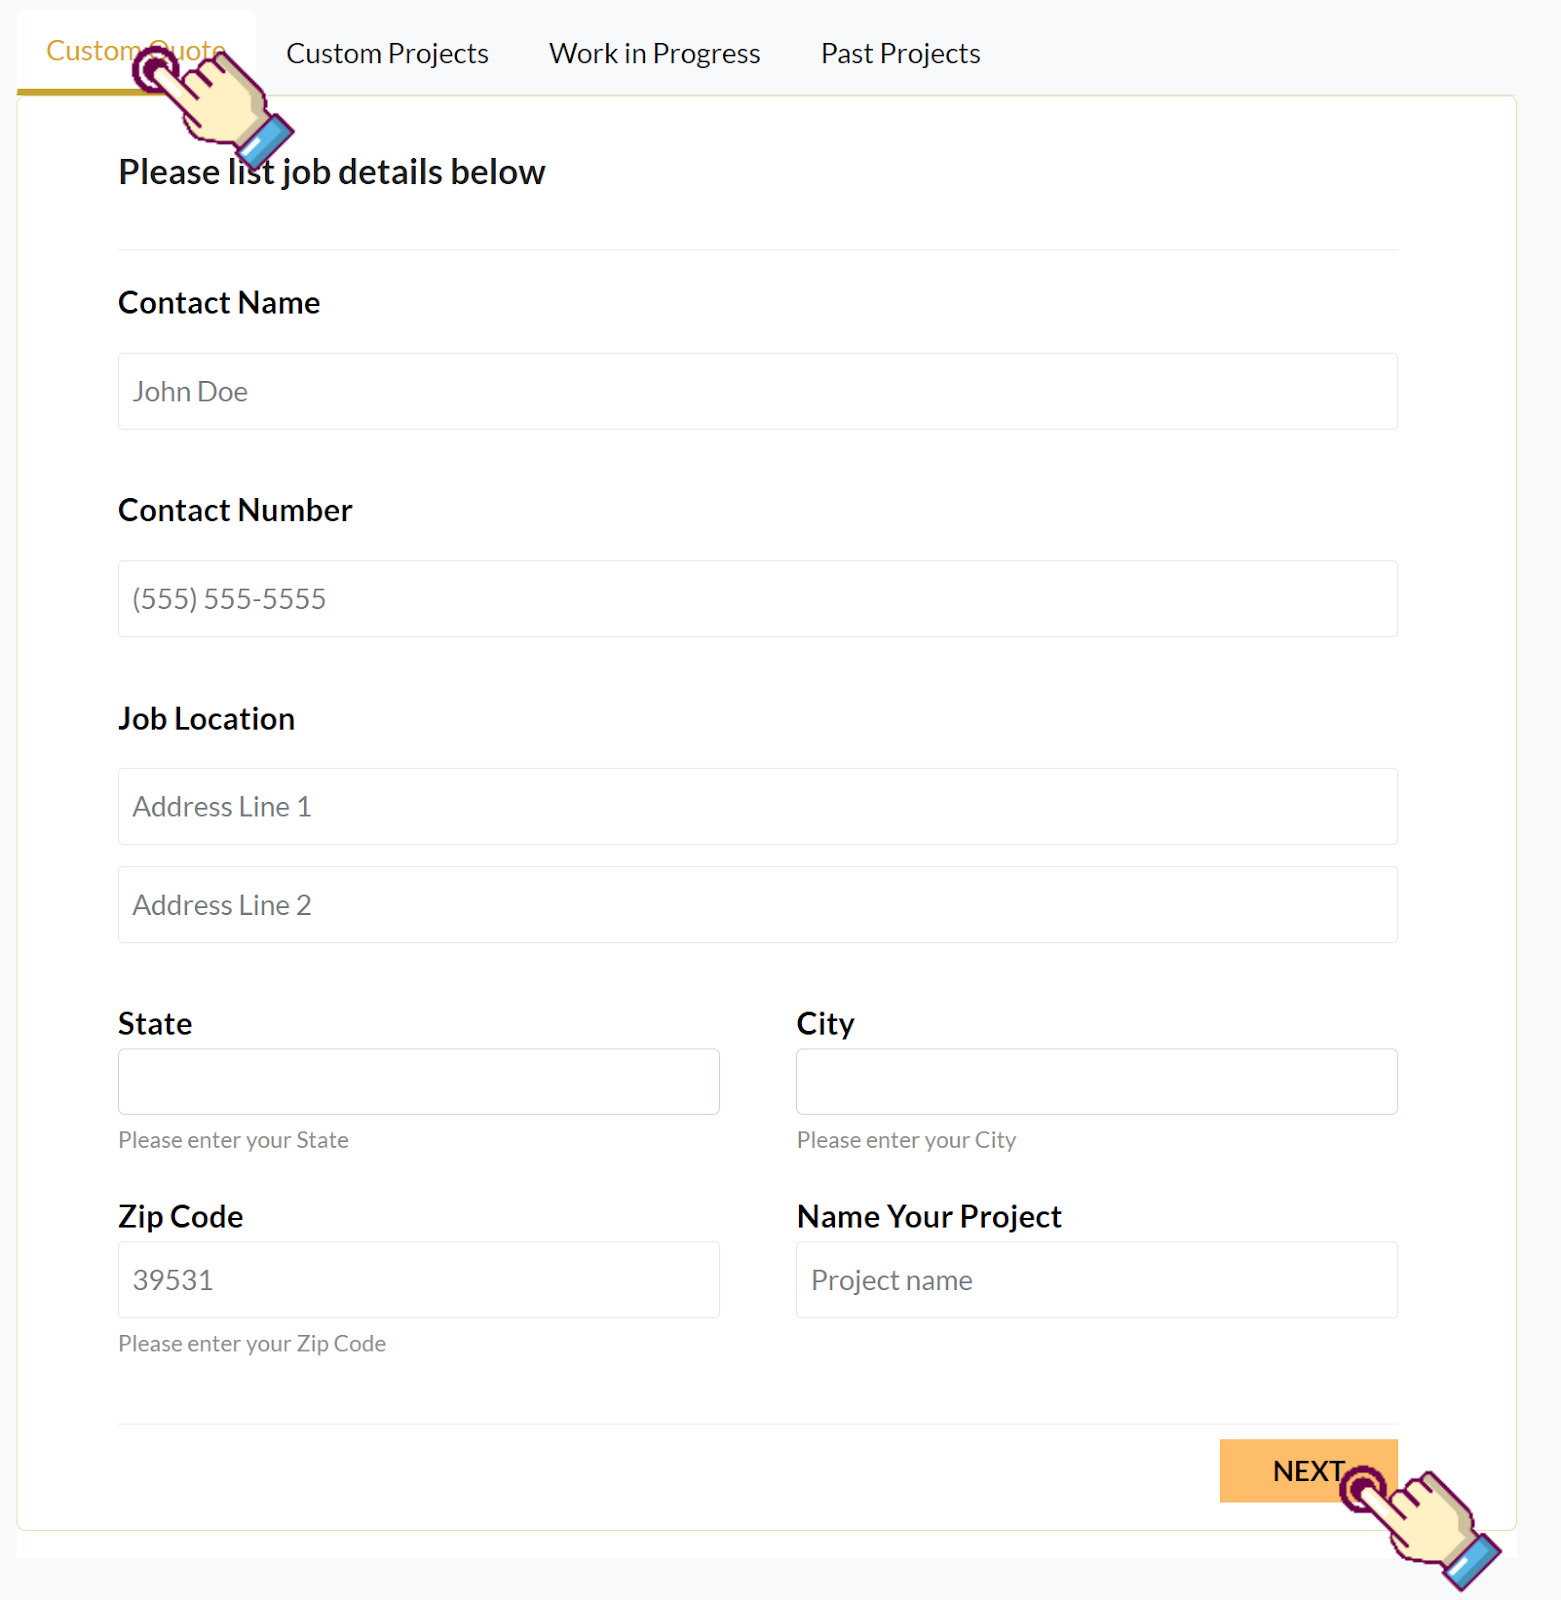
STEP 4- Click the “Custom Quote” tab at the top of the project management page
STEP 5- Fill out the job details form
NOTE: Every field is important. We need this info to coordinate the project with you.
NOTE: Be sure to add a “Project Name” in the final text field, this will be used to reference your job going forward.
STEP 6- Click the “NEXT” button at the bottom of the form
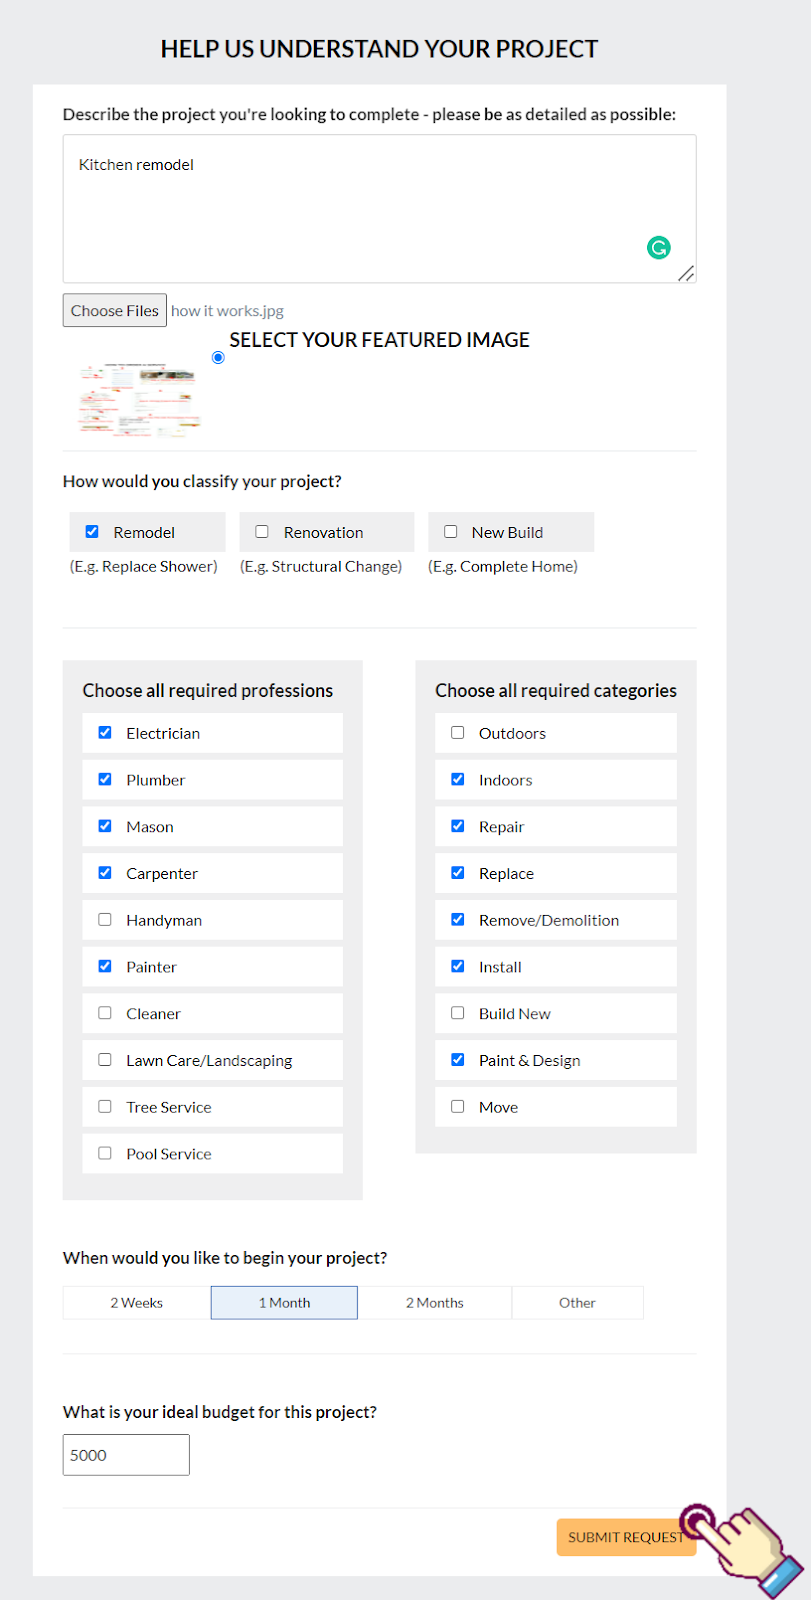
STEP 7- Use the following form to describe your project in detail
NOTE: The more details you provide the more accurate and quickly you will receive your quote.
NOTE: You can upload reference pictures, blueprints and plans for your project by clicking the “Choose File” button.
NOTE: When choosing the required Professions and Work Categories feel free to select as many as apply.
STEP 8- Click the “SUBMIT REQUEST” button at the bottom of the form to submit your project for review.
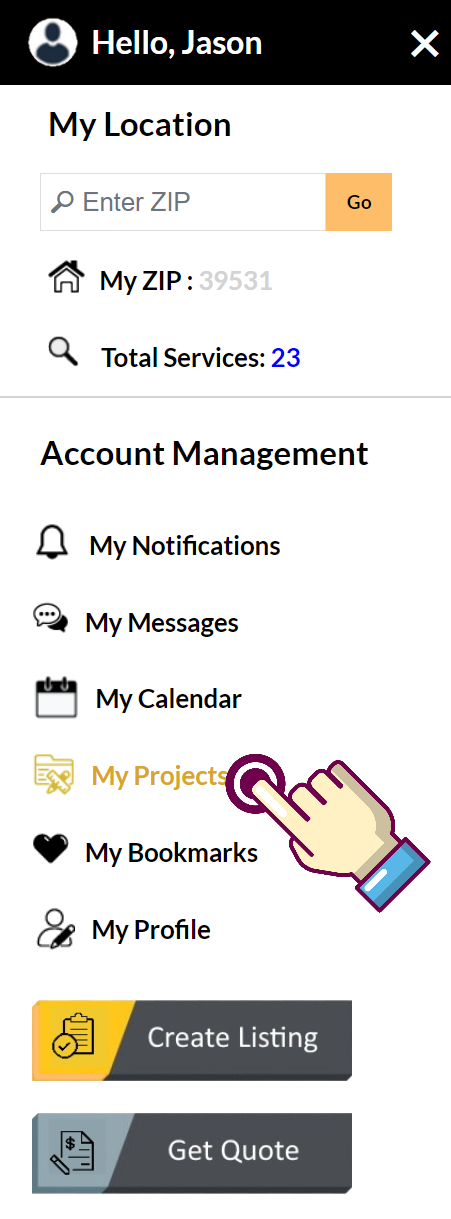
STEP 9- After submitting your project you will be redirected to the Project Management page. From here you can monitor the status of your Custom Project

NOTE: To get back to your Custom Projects click on the “My Projects” link on the home page sidebar.
STEP 10- From the Custom Projects tab you can monitor the 6 phases of your project

NOTE: The 6 phases of a project are as follows.
Design Phase - This is where we will coordinate with you or your designer on the blueprints of the project.
Estimation Phase - This is where our expert estimators will nail down the final price of your project.
NOTE: After the final price is determined it will replace Pending below the PRICE field on your Custom Project as seen above.
Accept or Decline - The next phase is to “Accept” or “Decline” the price received.
Final Prep - If the project is accepted our procurement team will pull permits, gather material and schedule our subcontractors to begin work.
Job Started - The next phase is the actual work.
Job Complete - After the job is finished it will update to Job Complete.
HOW TO MANAGE A CONSUMER PROJECT
Beyond an easy way to book services we also provide all the tools you need to manage those services.
STEP 1- Access your project dashboard by clicking “Projects” on the left side menu
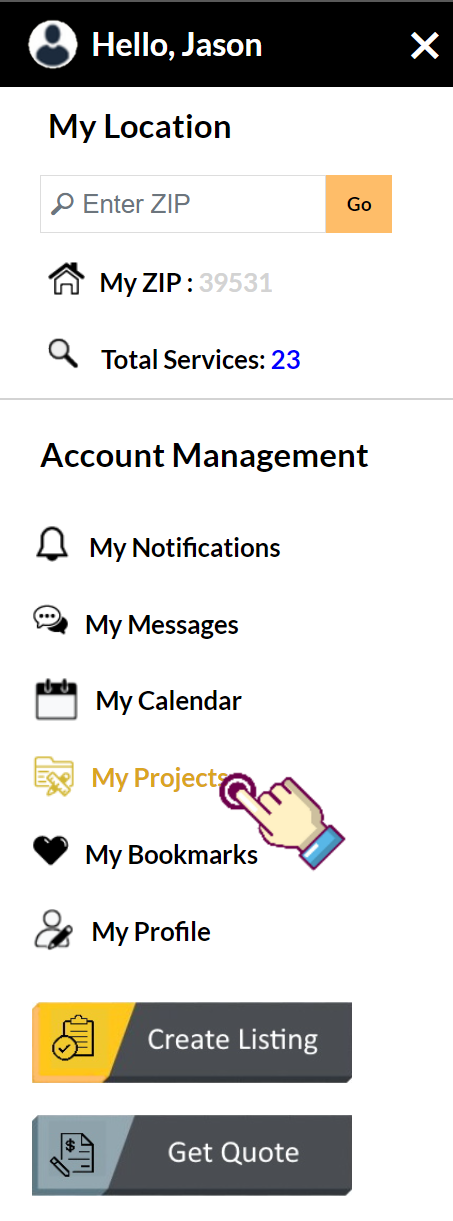
STEP 2- Select the project you would like to manage by clicking the corresponding blue link
NOTE: Unless you have a contractor account the Project Management page will automatically load to the Work In Progress tab which is where you manage individual projects. But if for some reason it doesn't you can click the “Work In Progress” tab at the top of the project management panel.
NOTE: For a quick status reference you can check the gold “Status” button on the right. (Clicking this button will also take you to the project manager dash)

STEP 3- Manage your project (Project Manager Dash)
NOTE: You can message your contractor by clicking the “Message” button at the top.
NOTE: To the right, you can track your project status as your contractor sends updates.
NOTE: You can use the “Create Task” form below to add additional tasks or tip your contractor for a job well done.
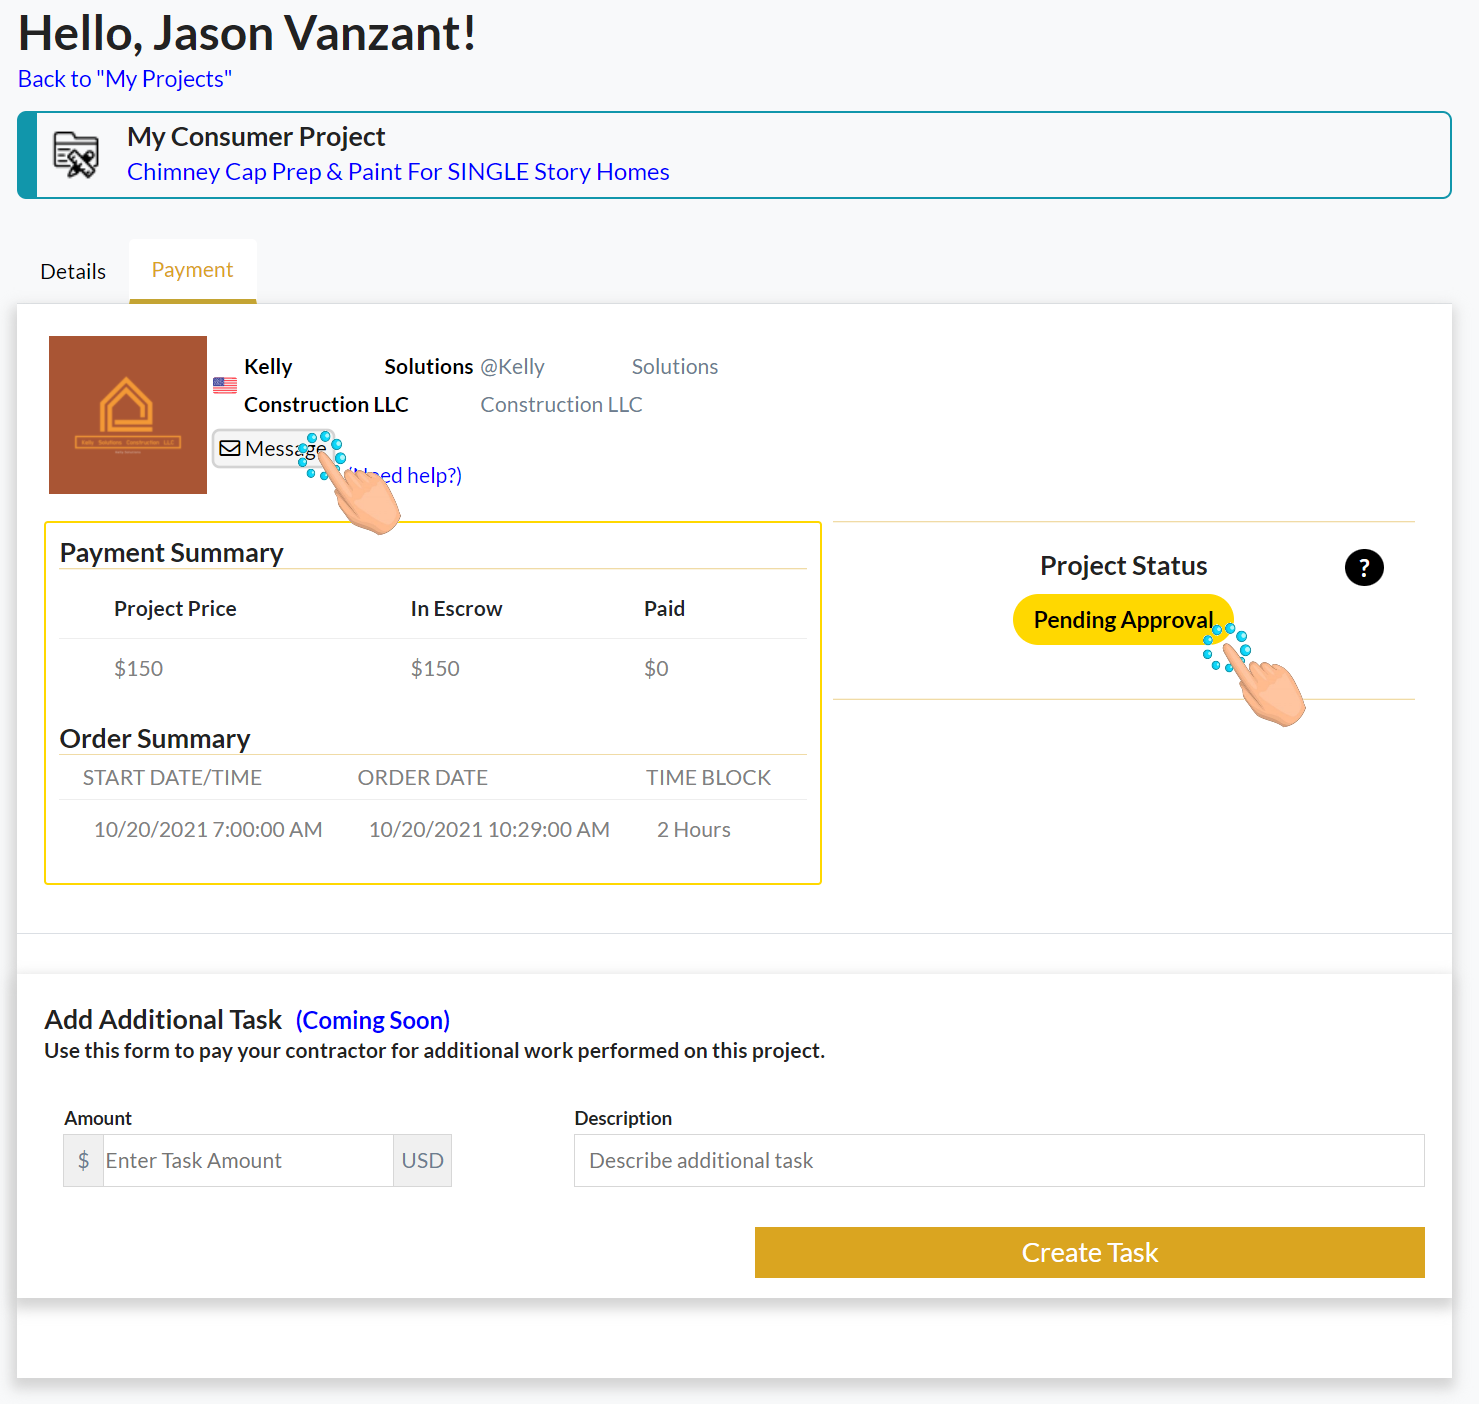
Below you will find all possible Status Updates.
HOW TO ADD AN ADDITIONAL TASKS TO AN EXISTING PROJECT
We make it easy to add additional tasks or tip your contractor for a job well done.
STEP 1- Access your project dashboard by clicking “Projects” on the left side menu
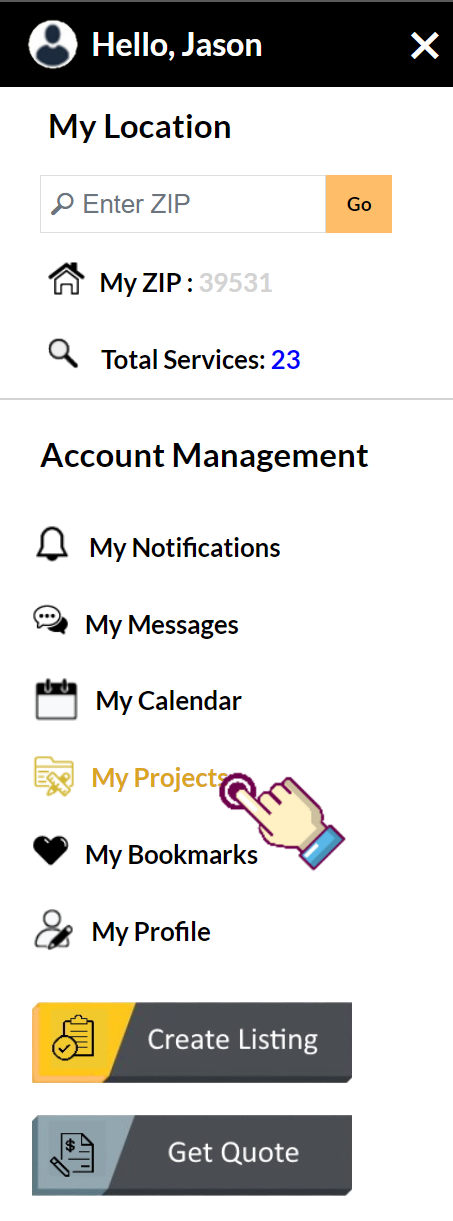
STEP 2- From the Project Dashboard select the project you would like to manage by clicking the corresponding blue link

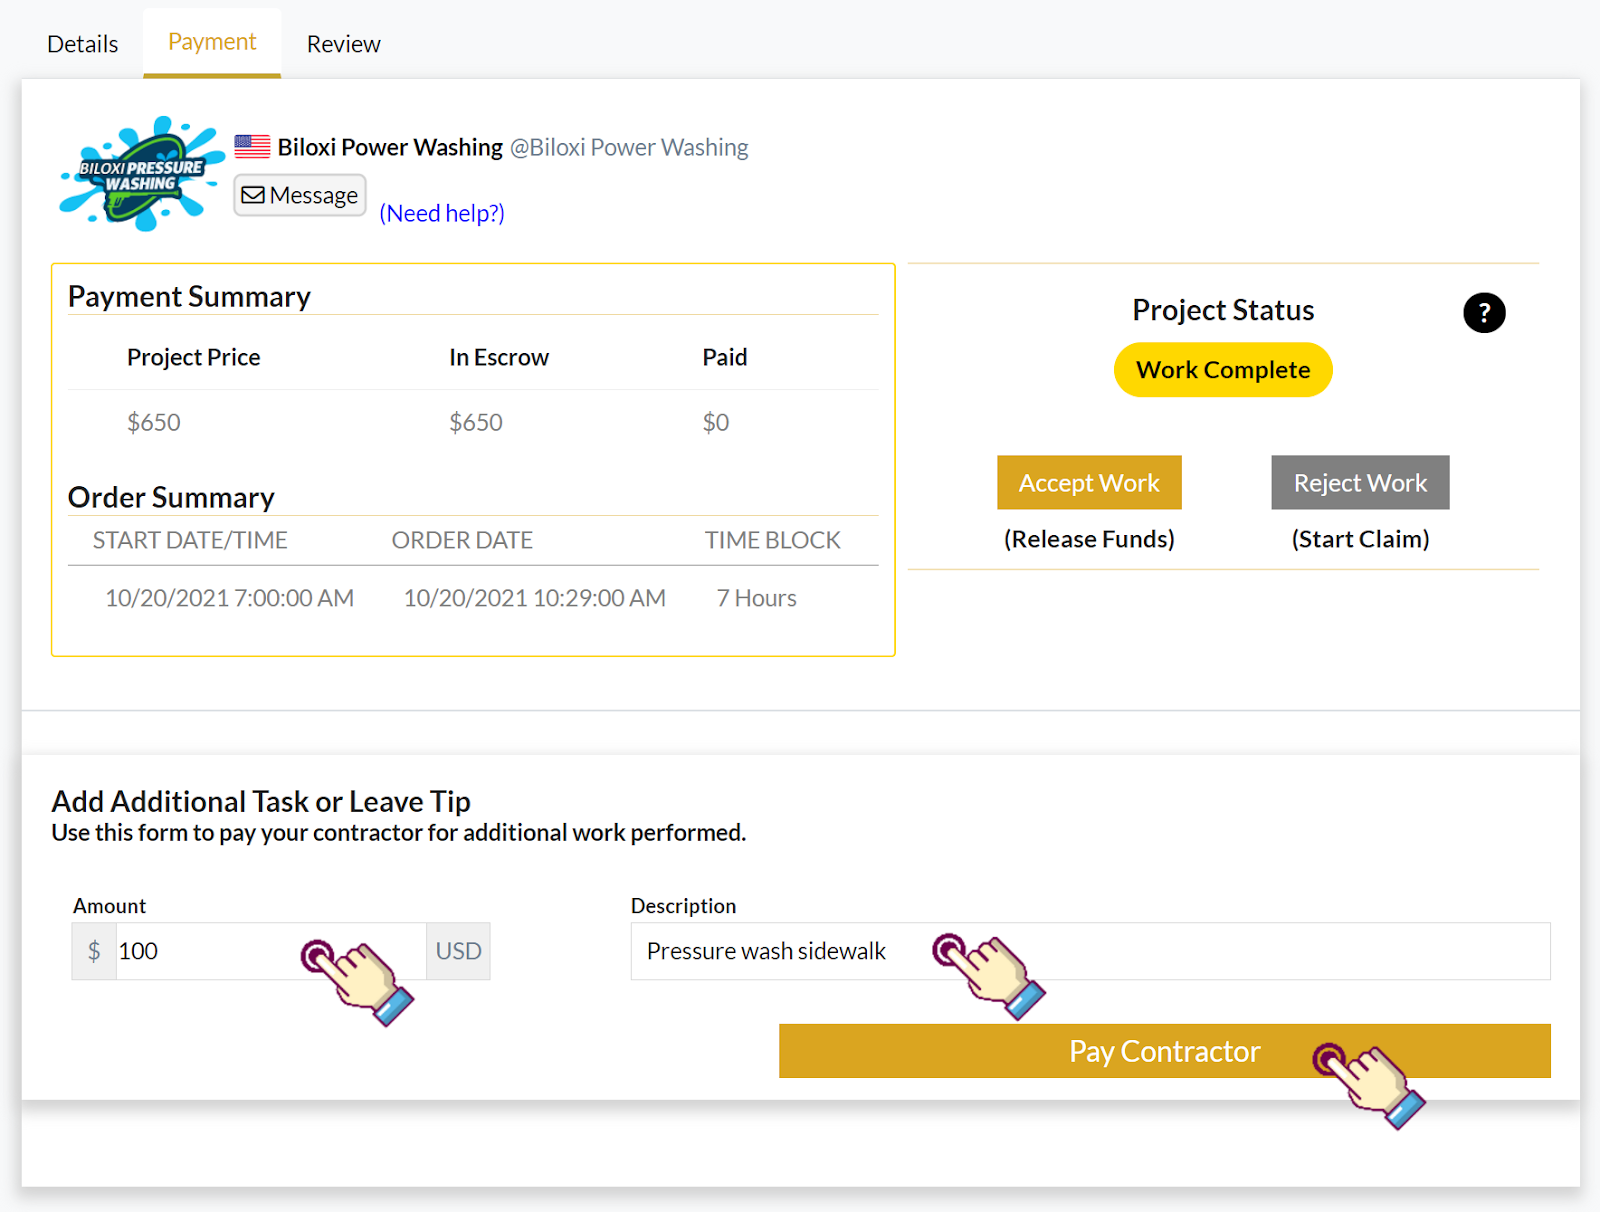
STEP 3- Add an additional task or leave a tip
NOTE: Use the form at the bottom of your project manager to add an additional task or leave a tip.
NOTE: Coordinate the price with your contractor then add the agreed-upon price in the Amount field.
NOTE: Be sure to briefly describe the additional task in the Description box. If your adding a tip just type “Tip”
STEP 4- Click the “Pay Contractor” button to complete the transaction.
HOW TO LEAVE A CONTRACTOR REVIEW
Reviews are the backbone of any marketplace. Be sure to inform the next person about your experience with the contractor.
Reviews can be seen on the contractor's Profile Module visible at the bottom of each listing page.
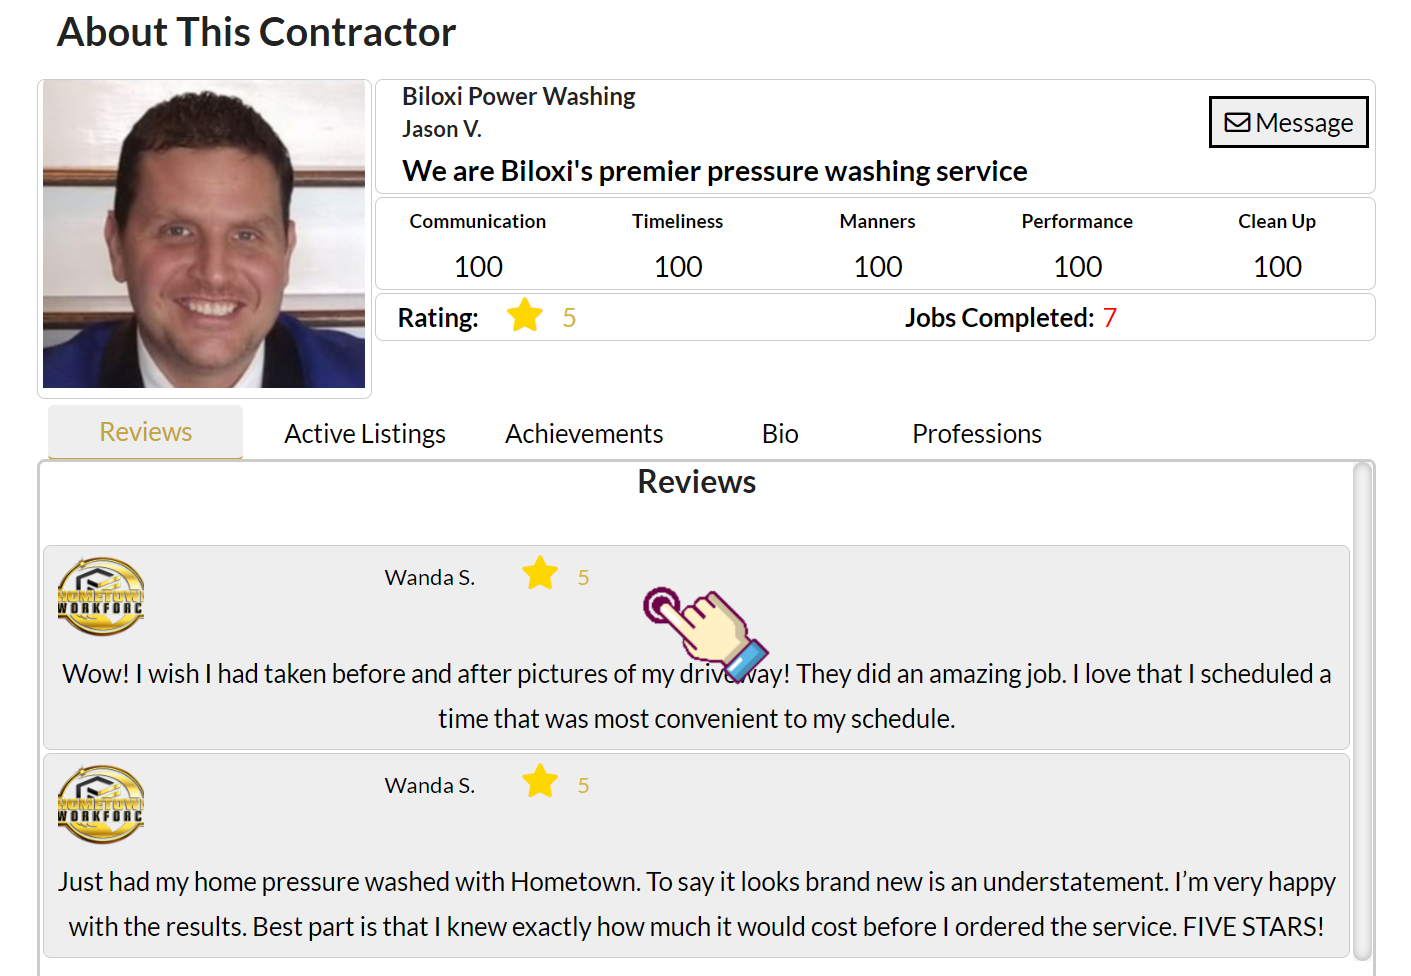
STEP 1- Access your project dashboard by clicking “Projects” on the left side menu
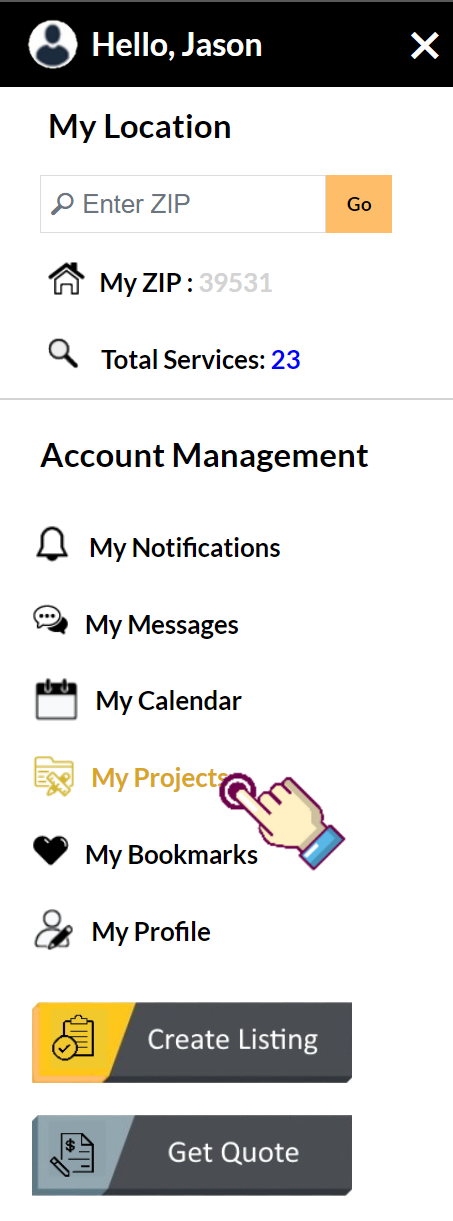
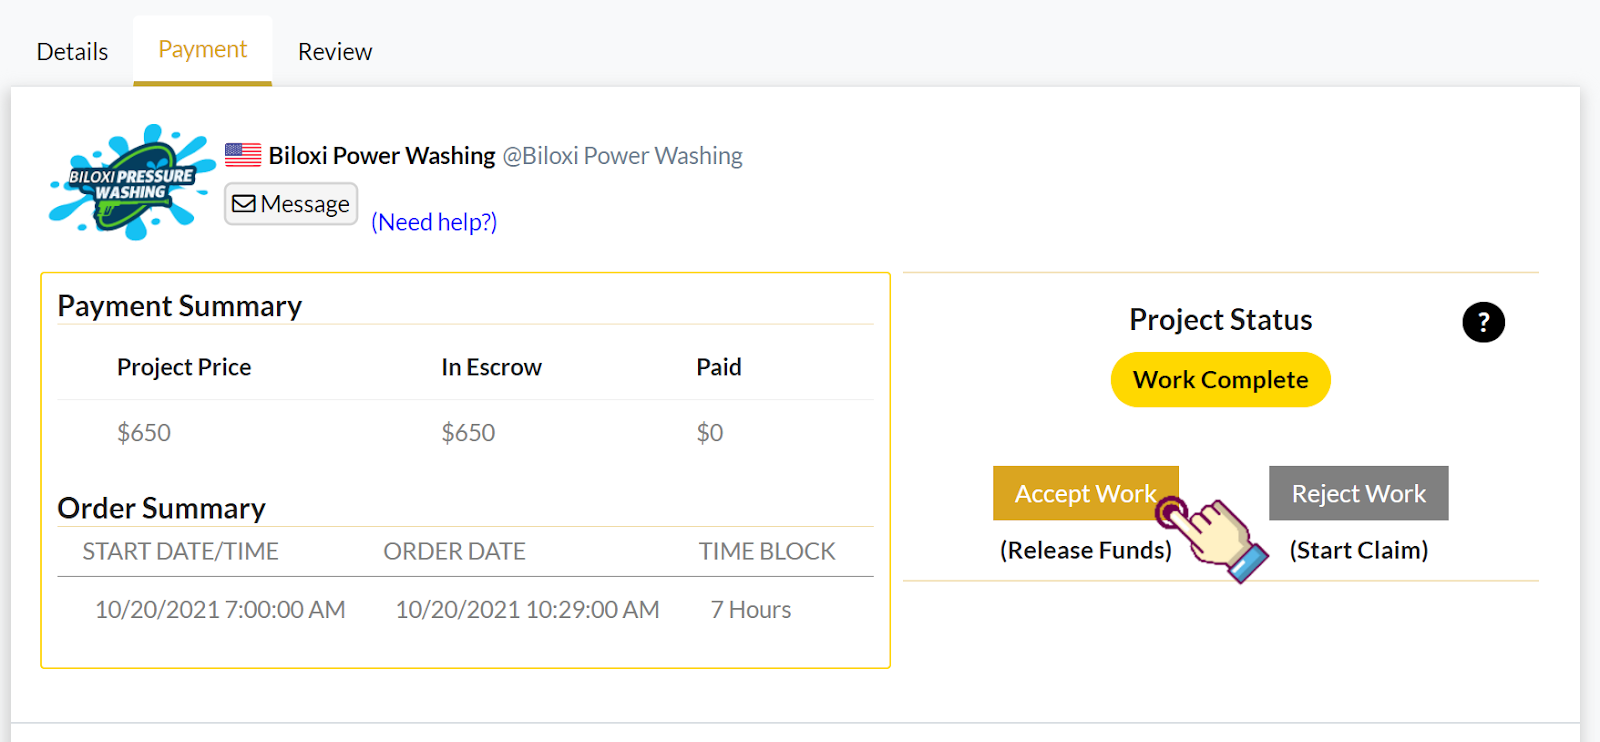
STEP 2- Select the project you would like to leave a review on

STEP 3- After you click “Accept Work” you will be redirected to the Review tab
NOTE: You can not access the Review tab until you accept or reject the work.
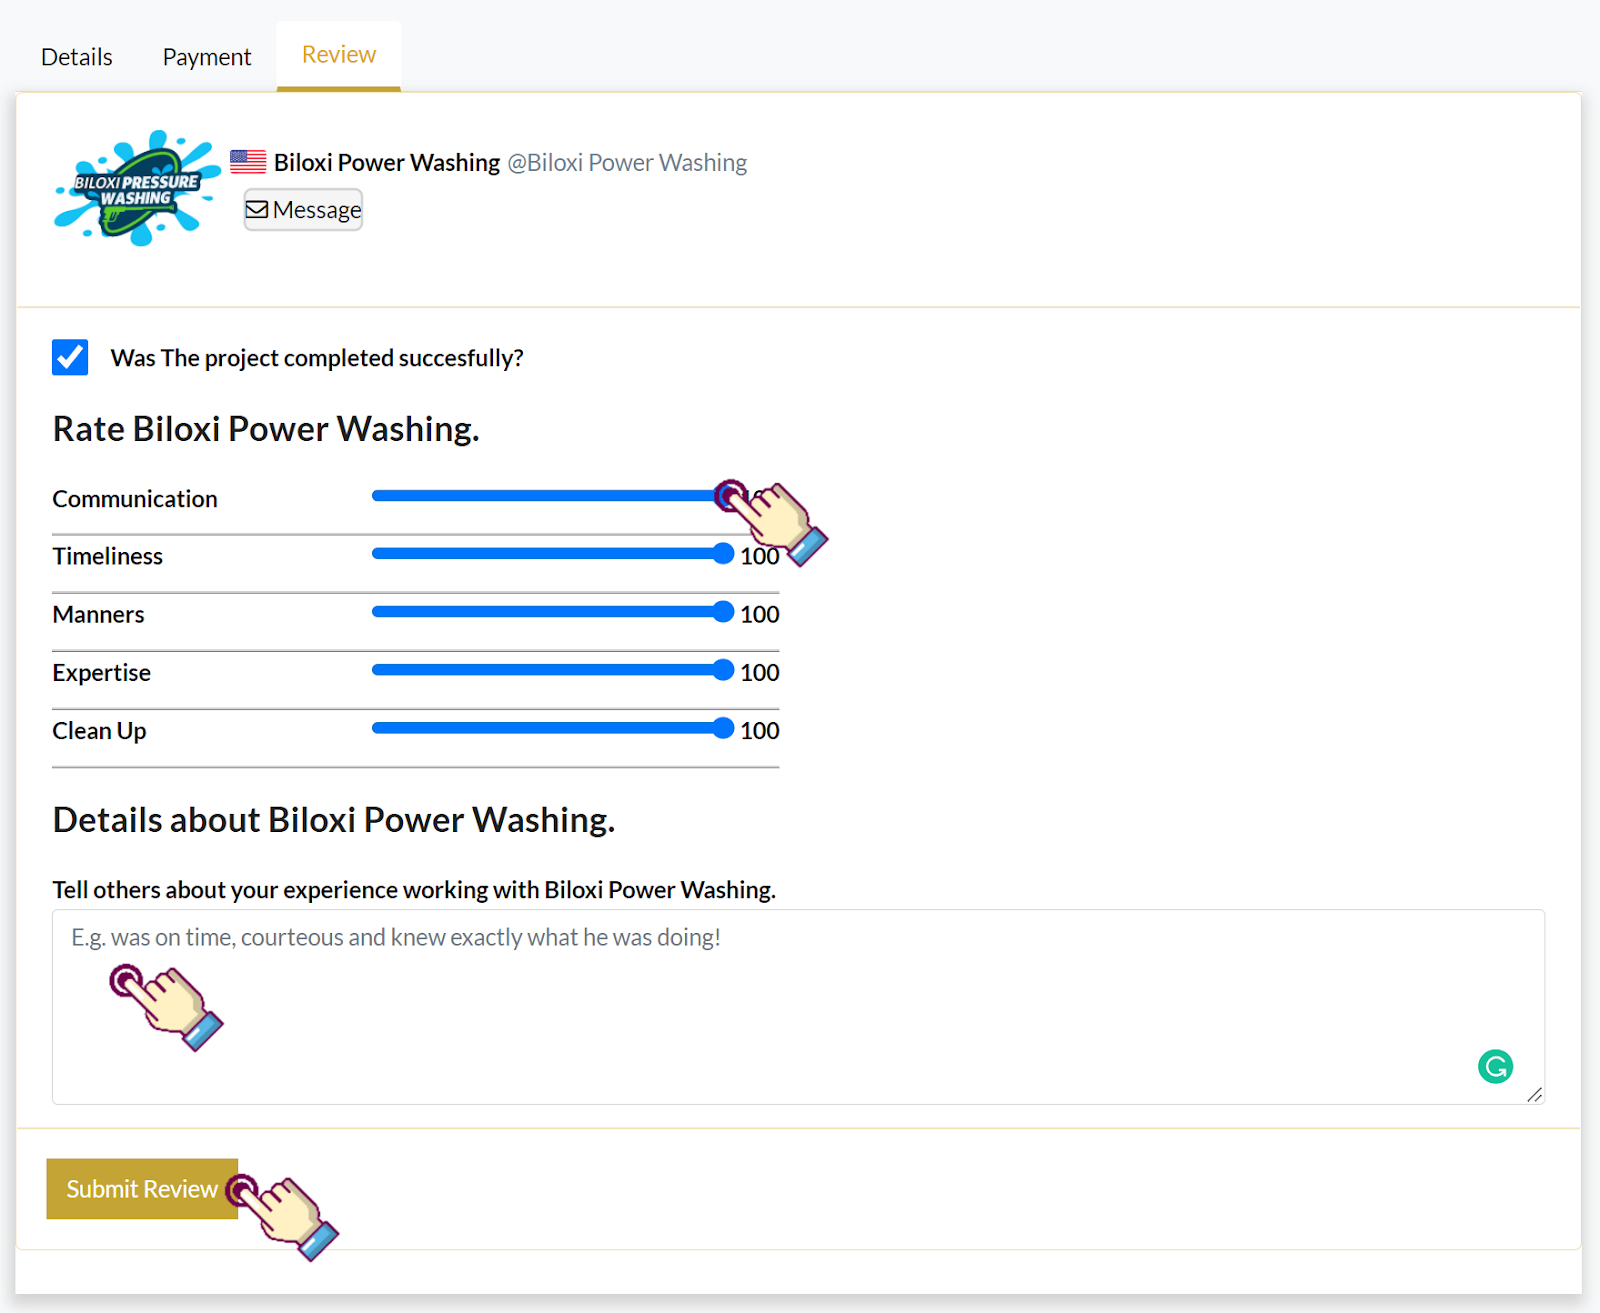
STEP 4- Use the sliders to rate each category of the contractor's performance from 0 to 100. These ratings will aggregate into a star rating which can be seen on the contractor's profile.
STEP 5- Be sure to describe your experience for the next person.
STEP 6- Click “Submit Review” to finalize your evaluation
HOW TO MESSAGE A CONTRACTOR
A big part of Hometown's interface is providing easy-to-use communication for the client and contractor.
NOTE: There are 2 ways to message a contractor through the Hometown platform.
The first way is through a service listing
STEP 1- Click the service listing you would like to discuss
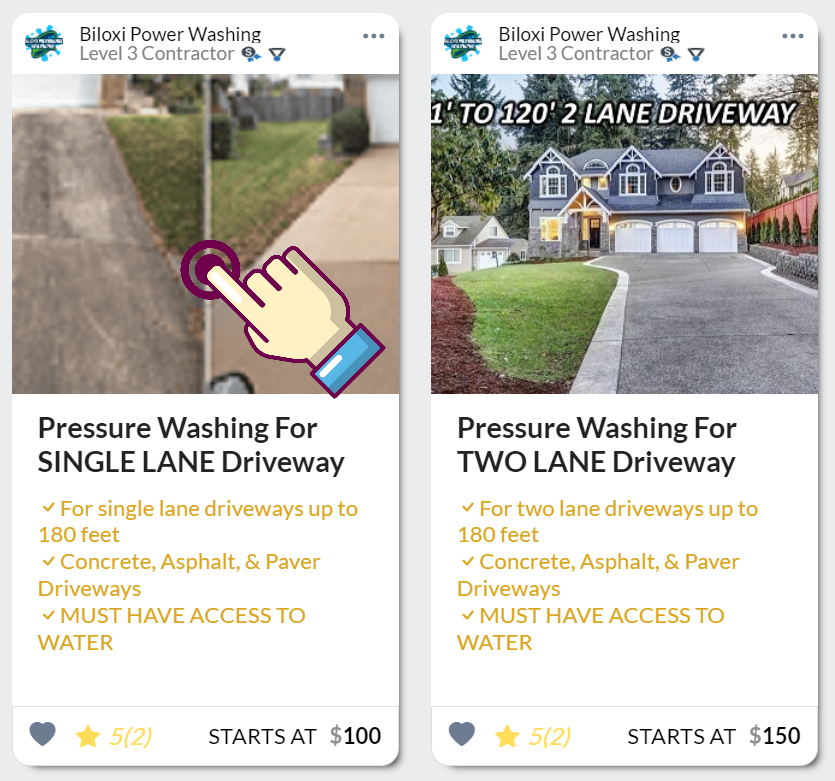
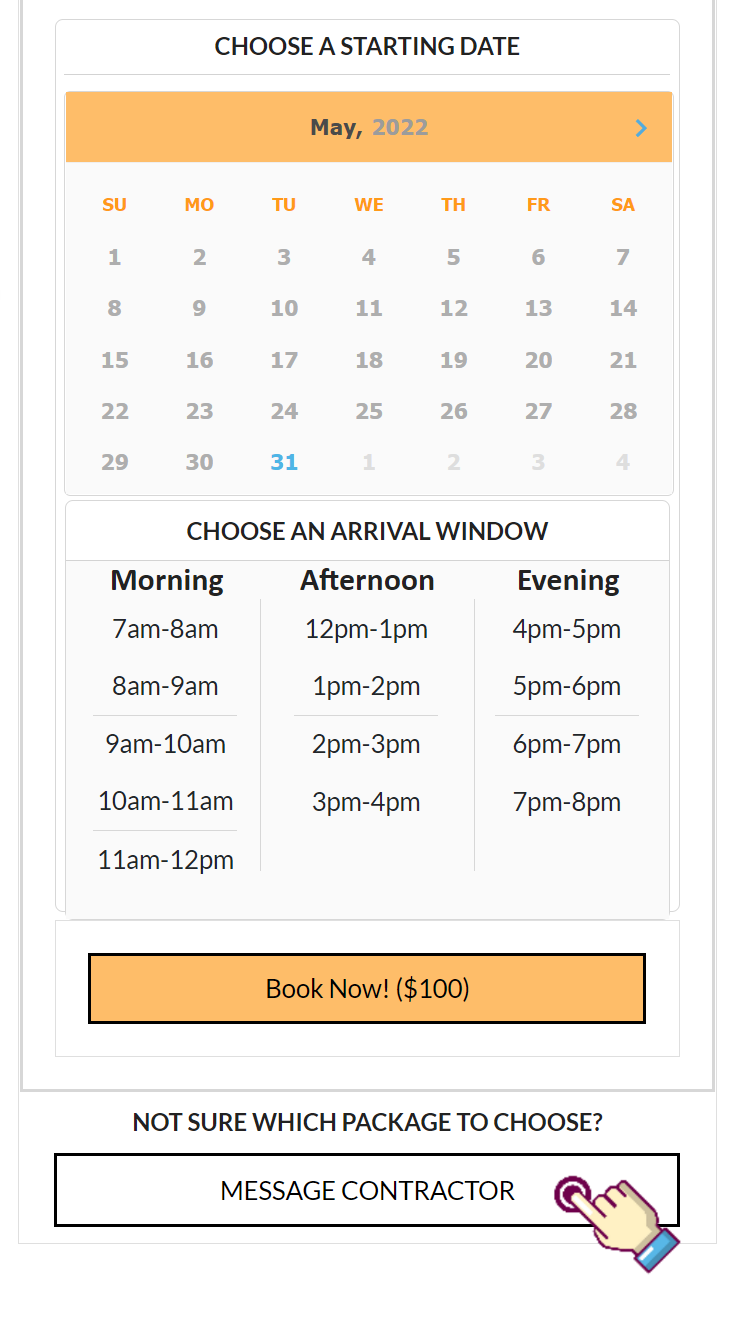
STEP 2- Click the “Message Contractor” button at the bottom of the booking form
The second way to message a contractor is through your project dashboard
STEP 1- Click the “My Project’ link on the homepage sidebar
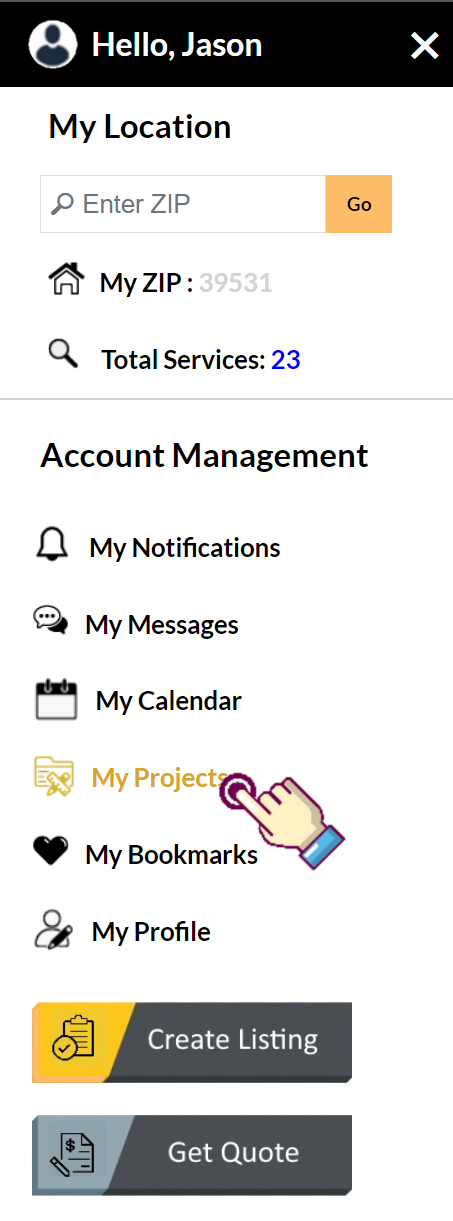
STEP 2- Fro the Work In Progress tab select the project you would like to discuss

STEP 3- Click the “Message” button at the top of the project manager
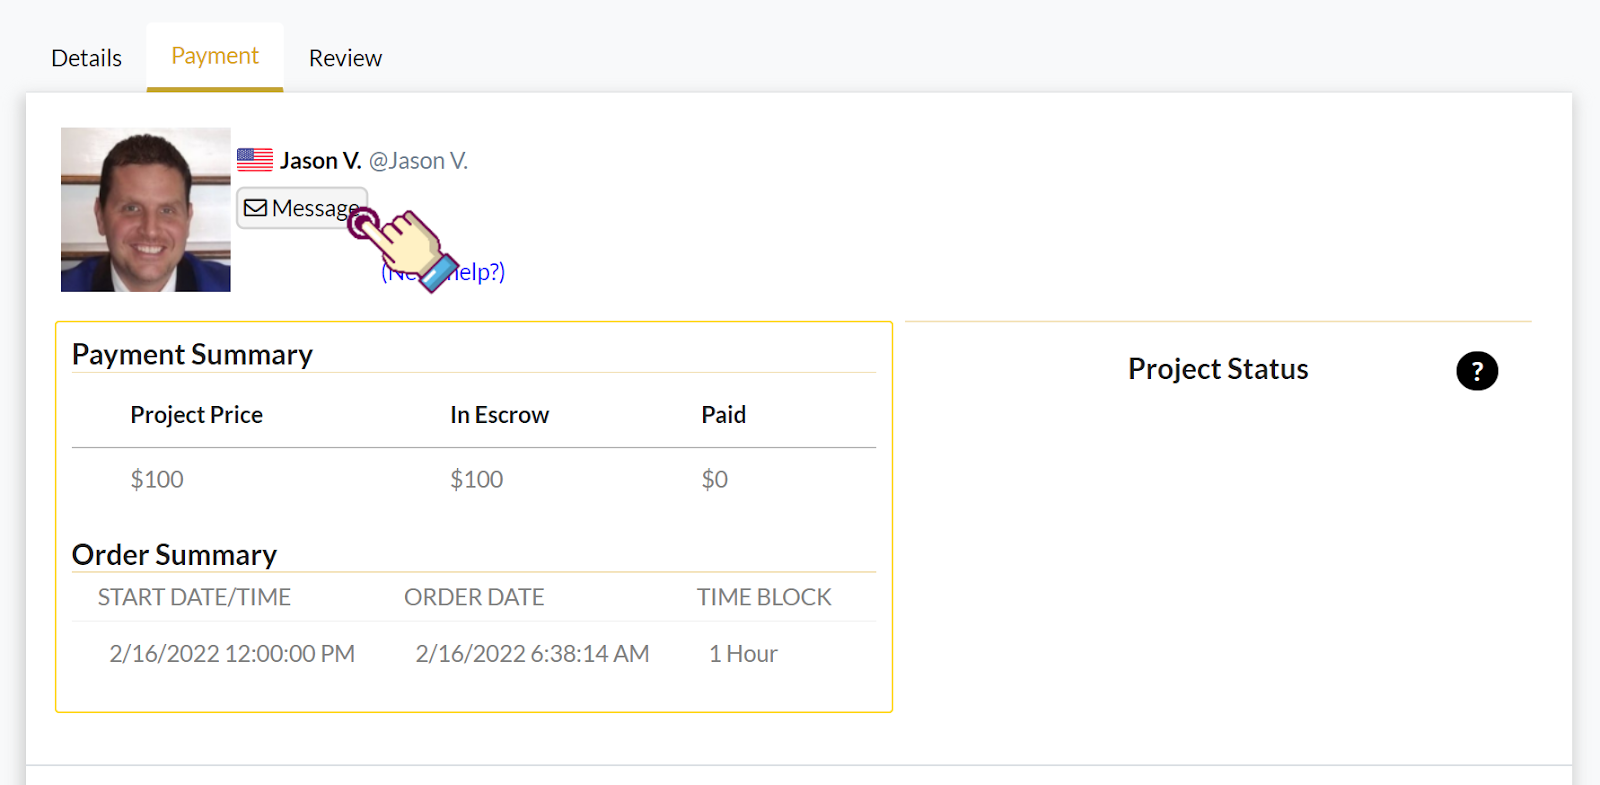
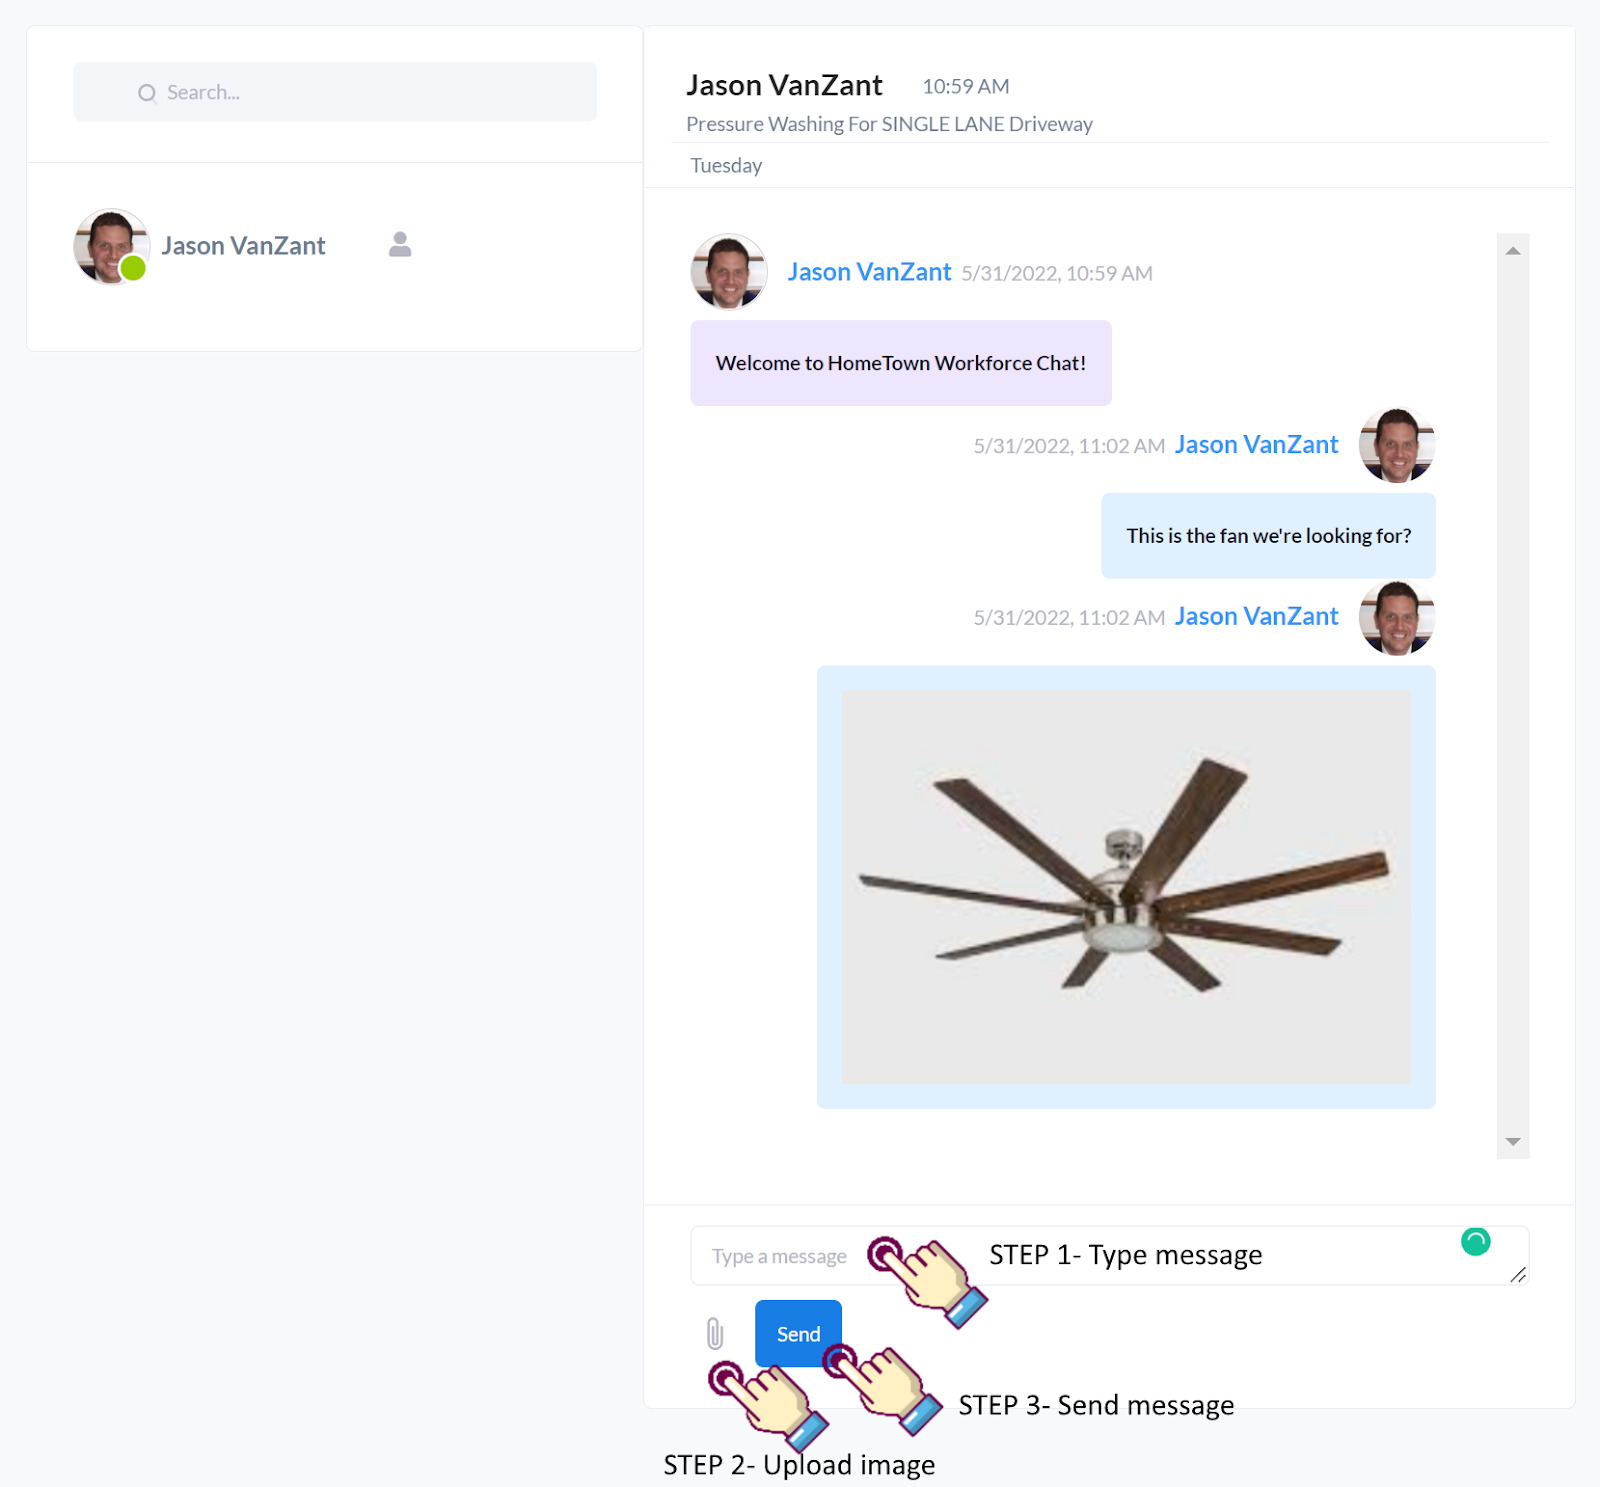
STEP 4- Use the integrated messenger to communicate with your contractor.
NOTE: Beyond direct communication, you can also upload images to help coordinate project requirements.
HOW TO BOOKMARK A LISTING
We understand that some projects are more complicated than others so we have added an easy bookmark feature to help manage all the individual services required to streamline your job.
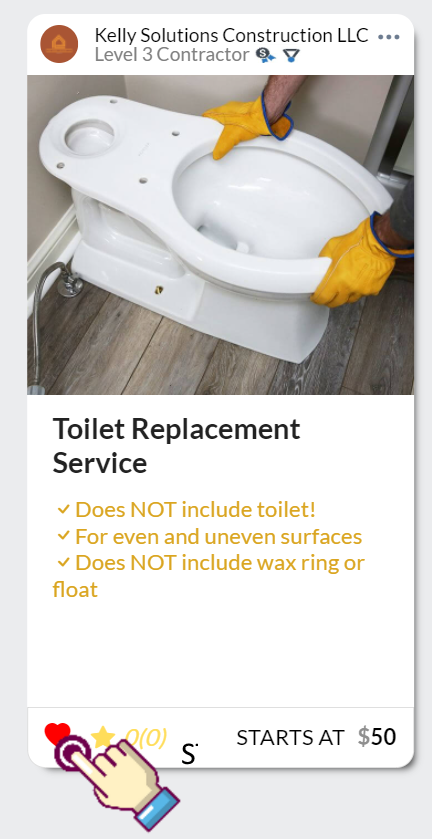
STEP 1- Click the heart at the bottom left corner of your designed service listing card to turn it red.
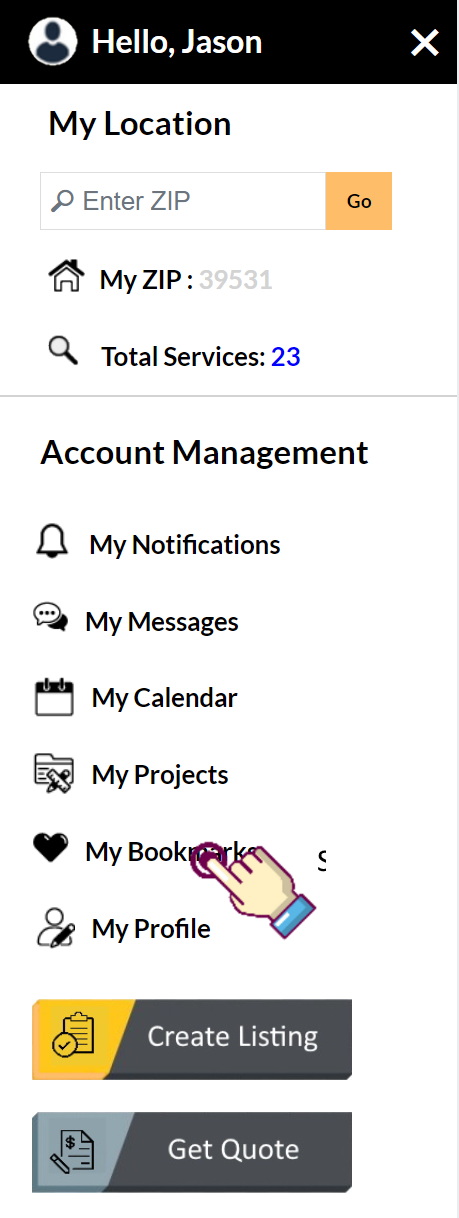
STEP 2- Click the “Bookmarks” link on the left sidebar.
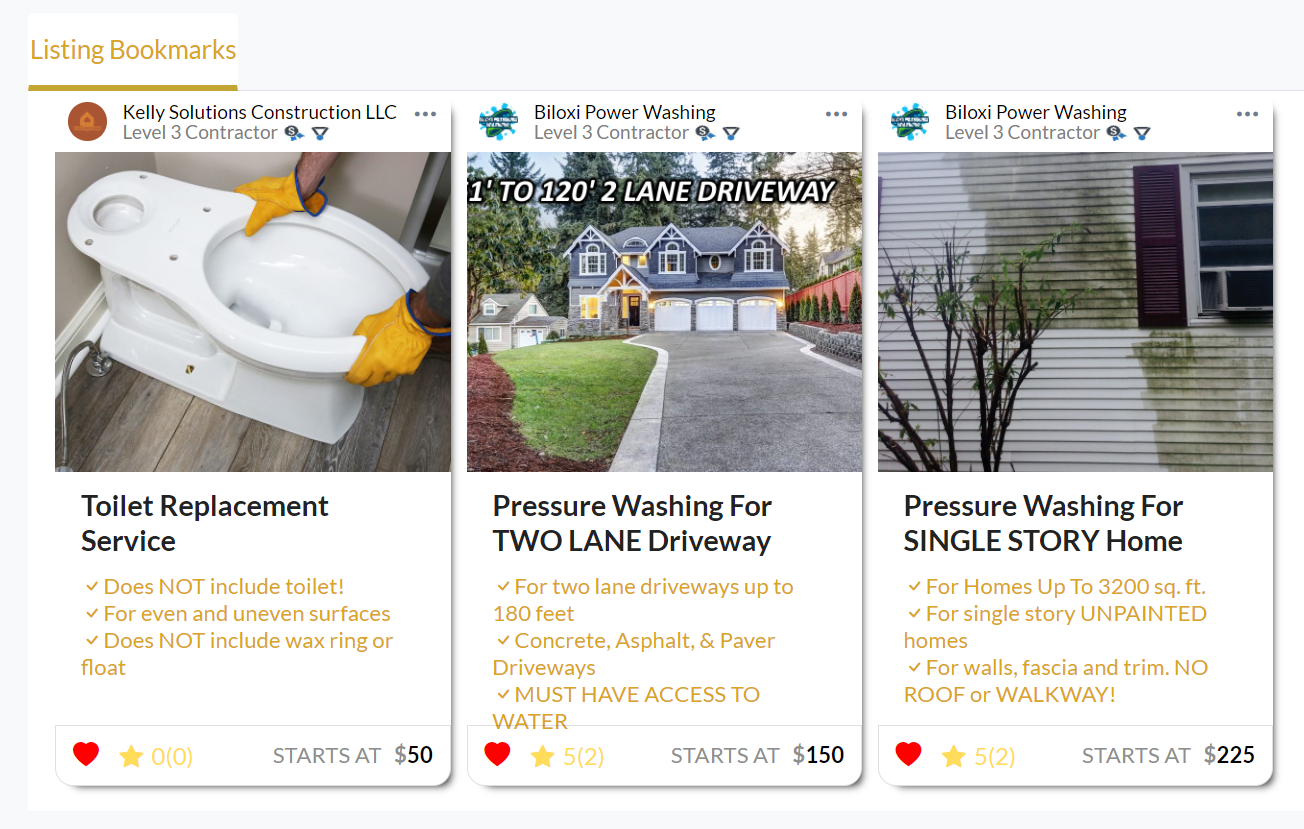
STEP 3- Manage each Bookmarked Listing individually
HOW TO VIEW A CONTRACTORS PROFILE
For your peace of mind, we have integrated a contractor profile at the bottom of each listing page. With this, you have a transparent look into the background of each individual contractor before booking their service.
STEP 1- To view a contractor profile all you have to do is click on the listing in question.
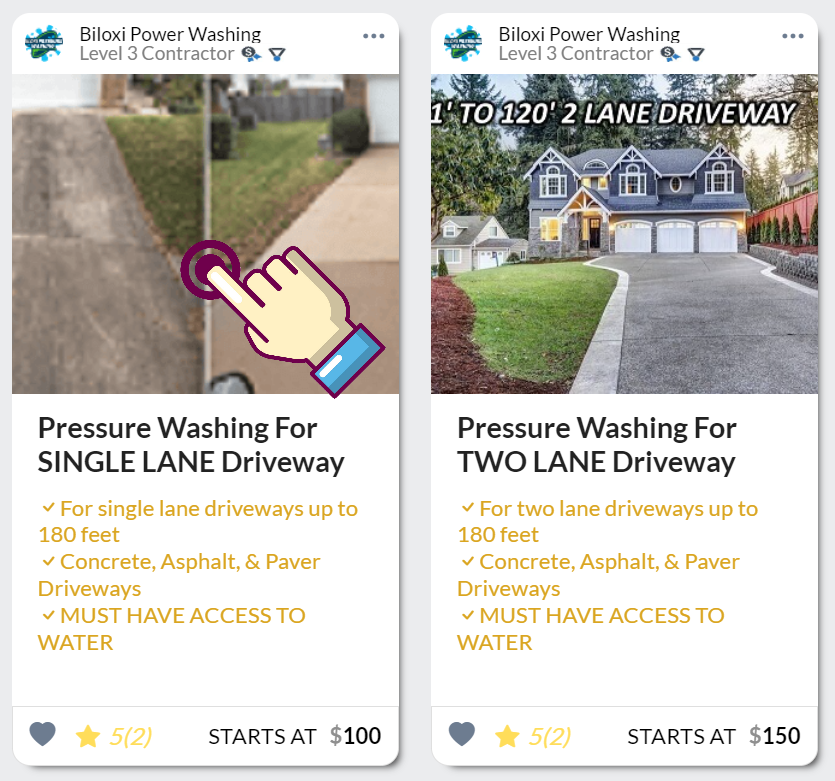
After that scroll to the bottom of the listing page to see the contractor's profile module.
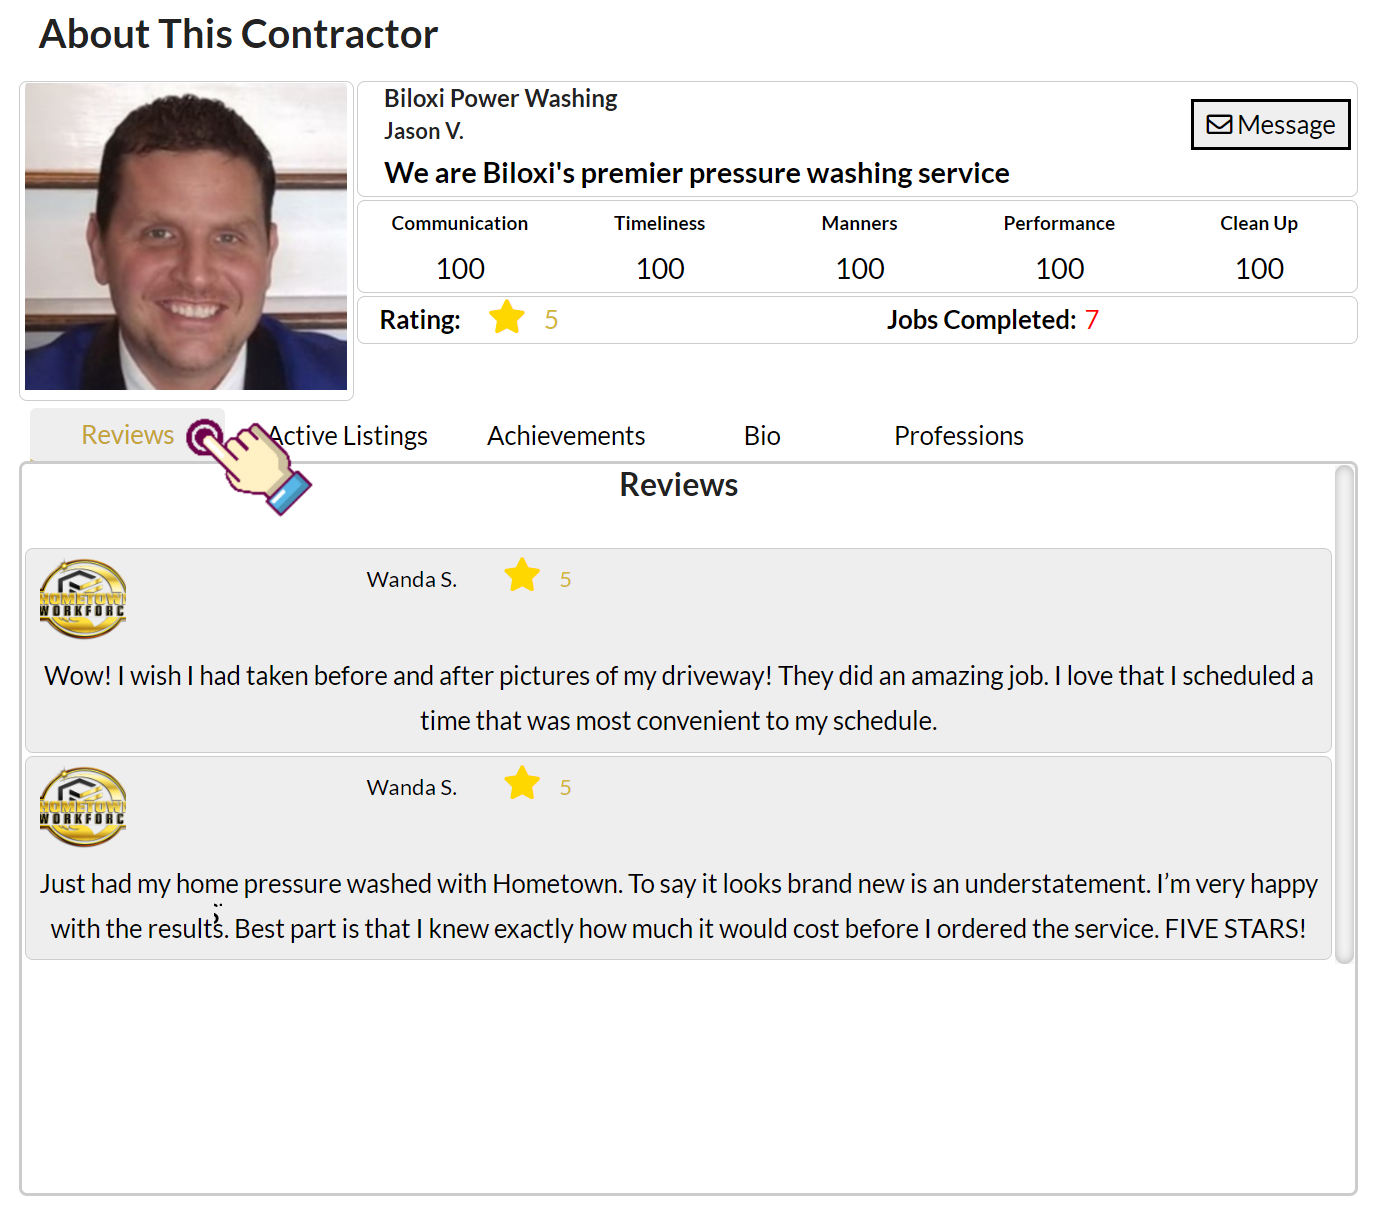
STEP 1- The first tab selected is the Reviews Tab
NOTE: This shows reviews left by the consumers who have booked one of their services.
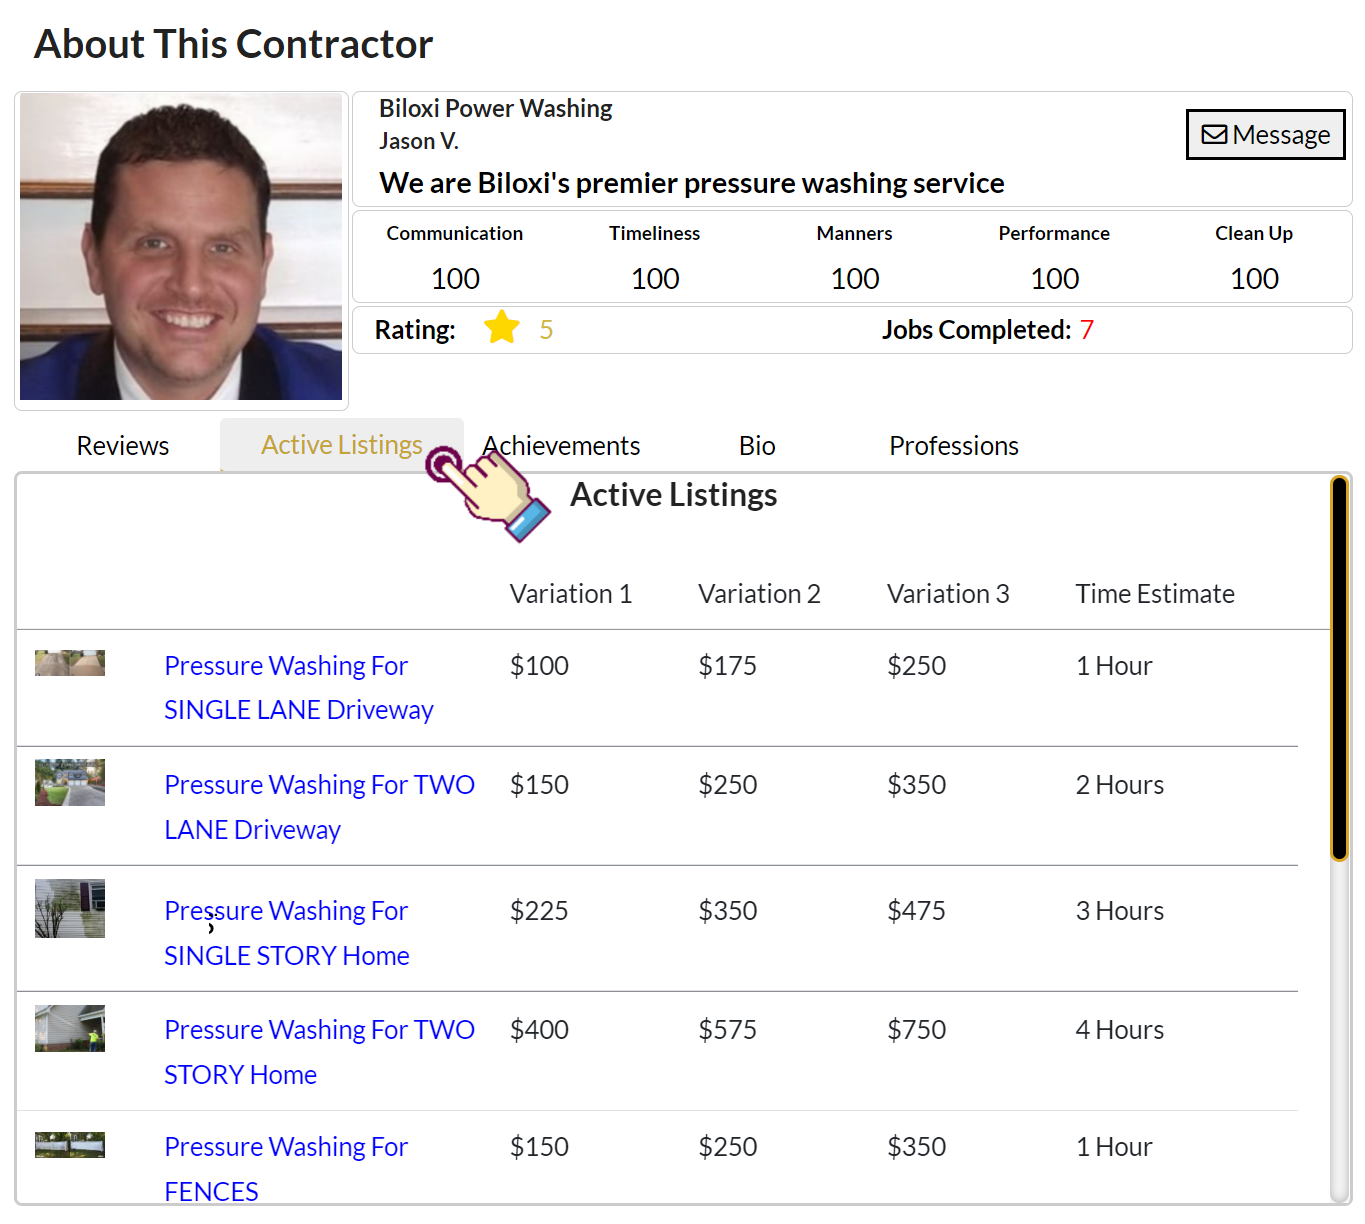
STEP 2- The second tab is the Active Listings tab. NOTE: This shows all the services currently being offered by this contractor.
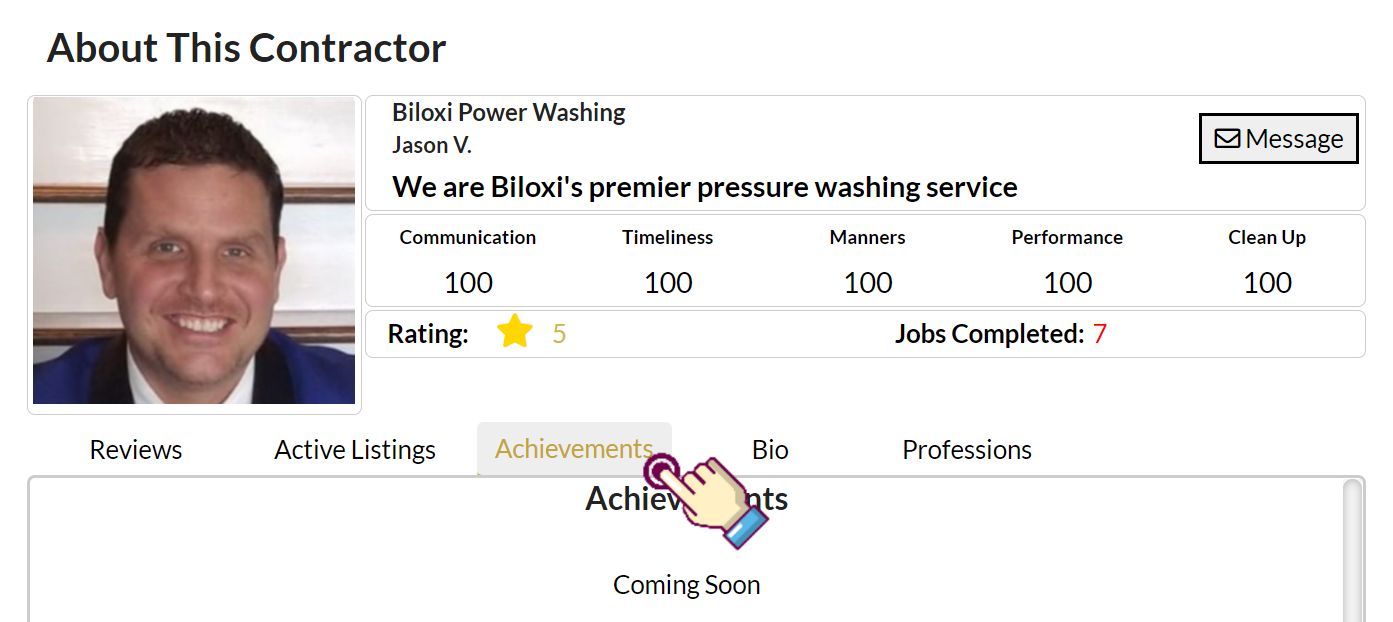
STEP 3- The third tab is the Achievements tab
NOTE (Coming Soon): This shows all the accomplishments acquired during this contractor's participation in the Hometown Contractor Academy.
NOTE: This is one of our hallmark features as it shows an unparalleled glimpse into the background of each individual contractor on the Hometown platform.
STEP 4- The fourth tab is the contractor's bio
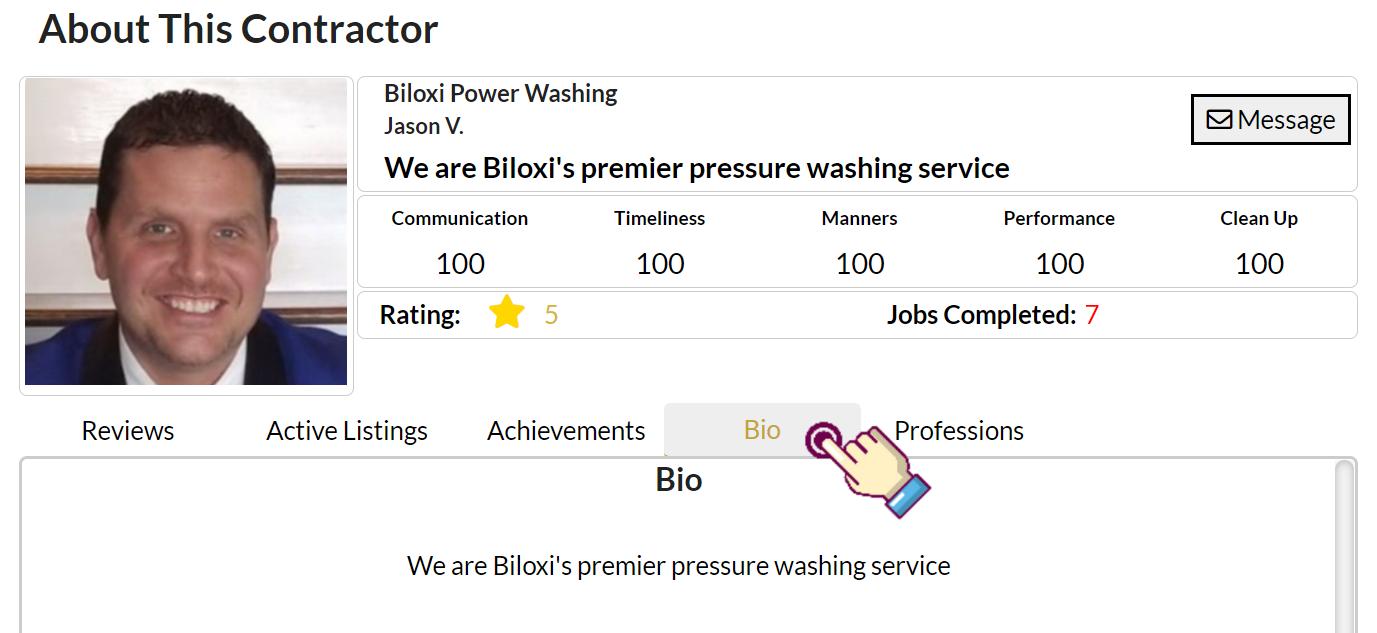
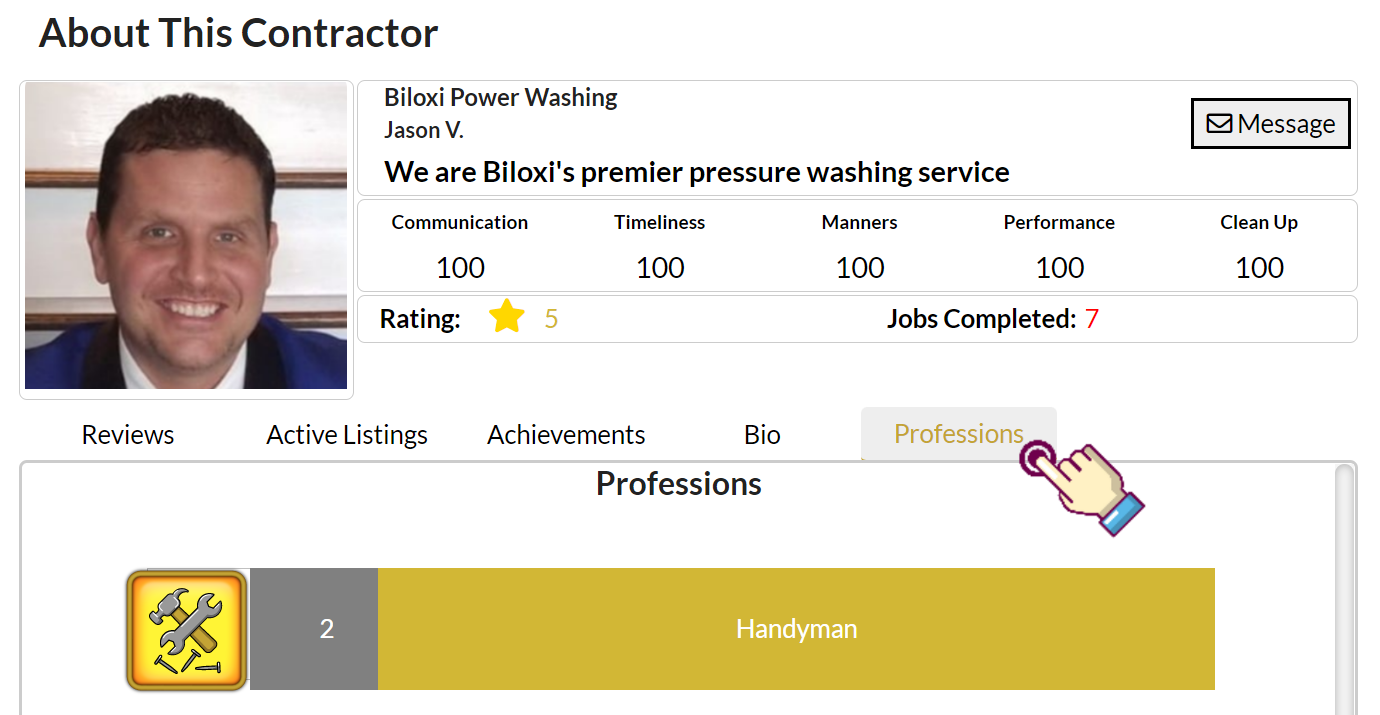
STEP 5- The fifth tab is the professions tab
NOTE: This shows the professional experience of the contractor in question.
NOTE: For each level acquired the contractor must successfully accomplish 25 projects with a 4.8-star rating or better in any given profession.
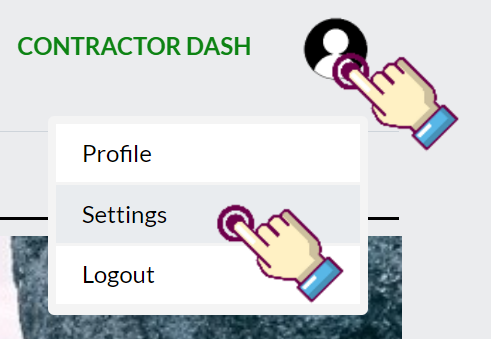
HOW TO MANAGE YOUR SETTING
STEP 1- Click the User icon at the top right corner of the page. Then click Settings in the dropdown.
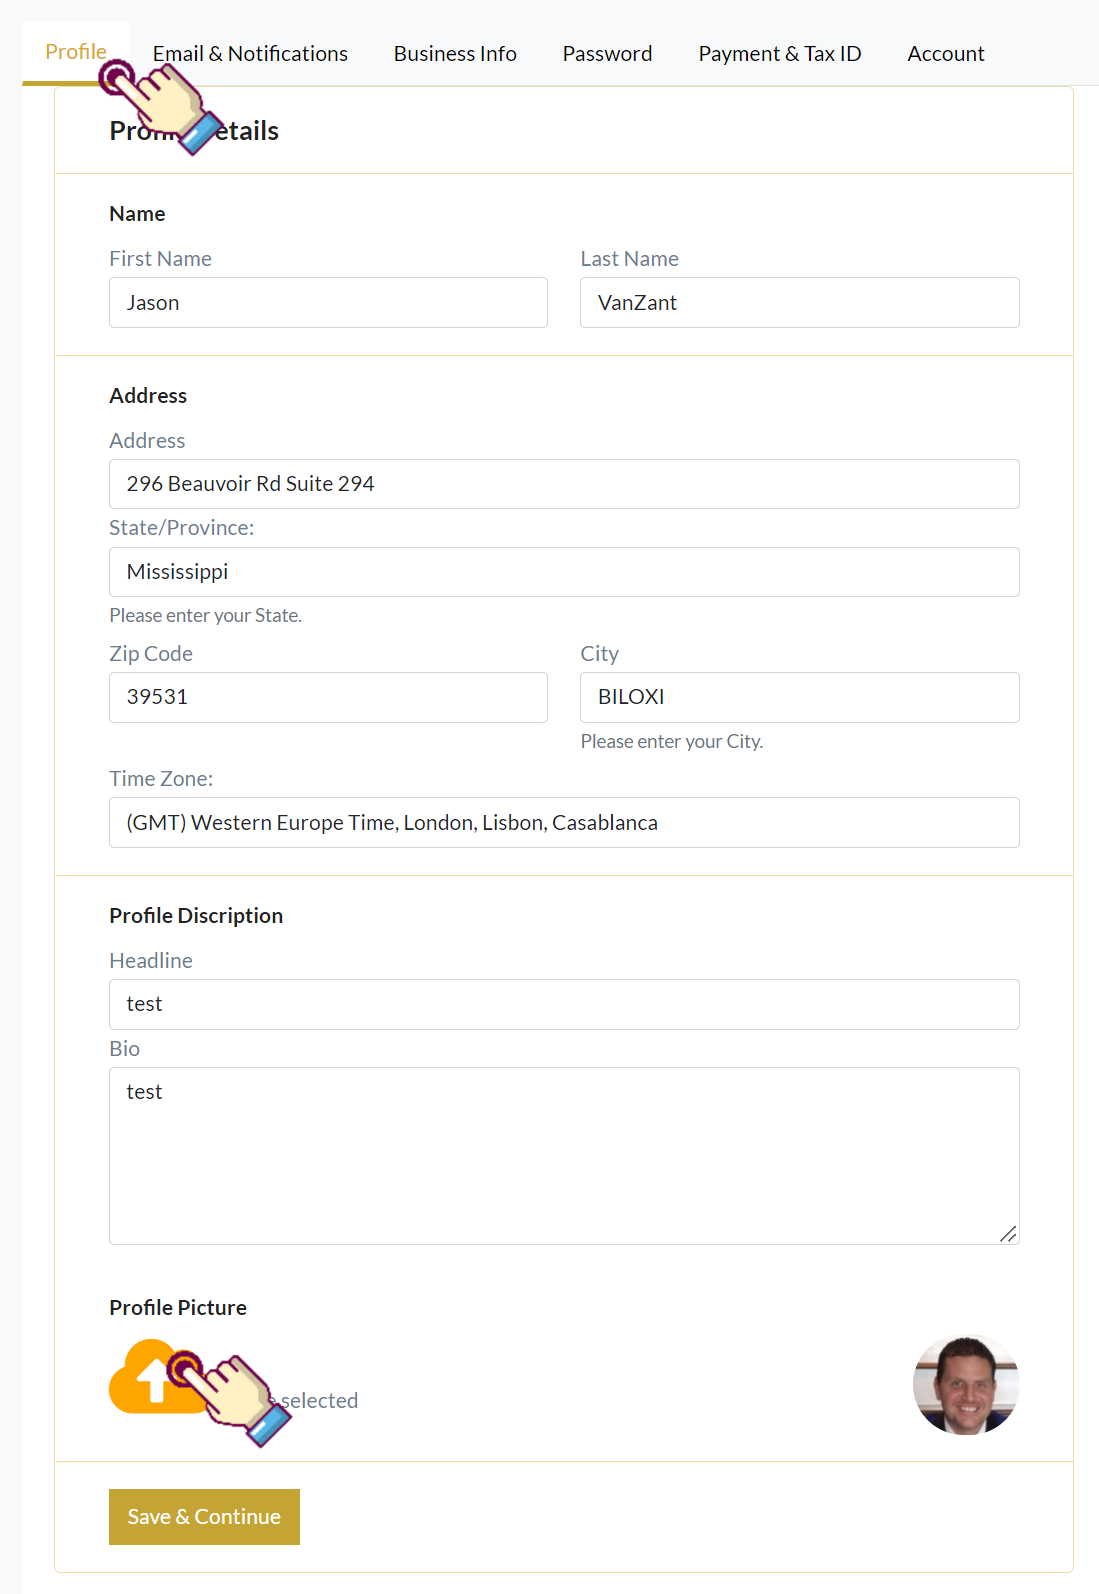
STEP 2- Click the “Profile” tab to manage your client and contractor information
NOTE: You can also upload your client/contractor profile picture by clicking the orange cloud icon at the bottom of the page.
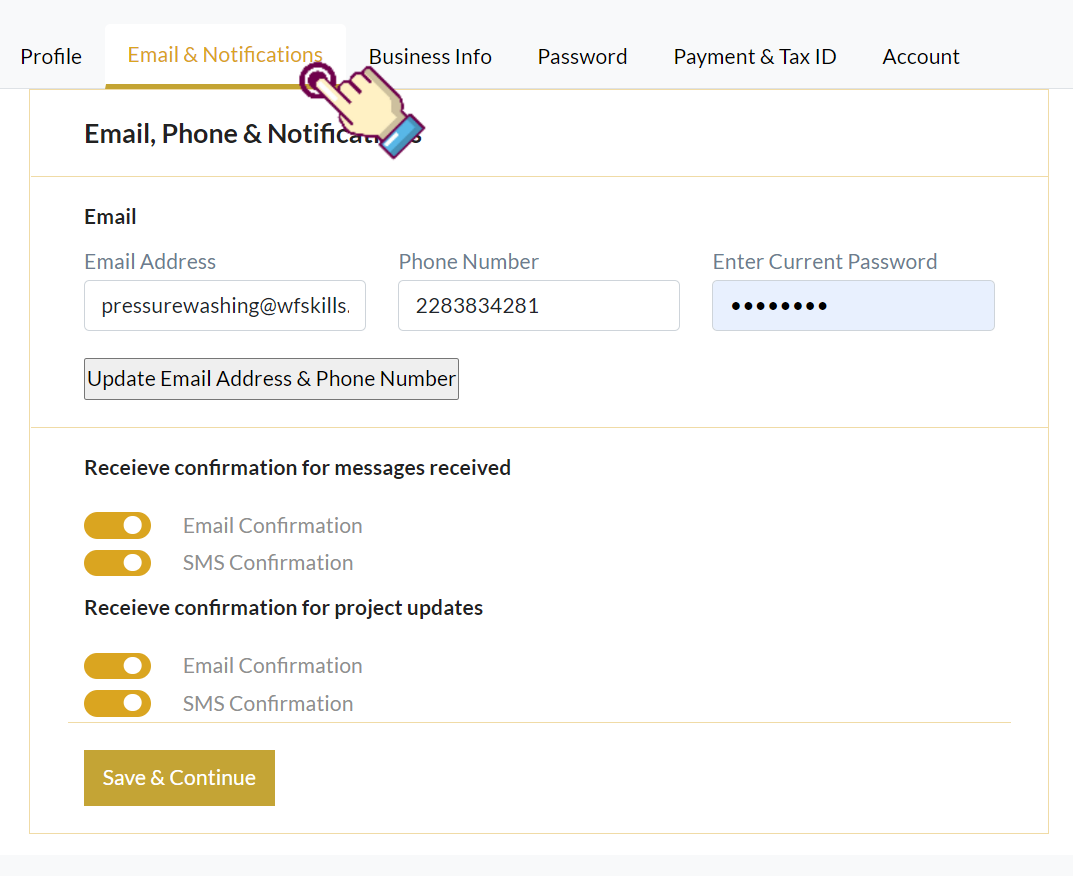
STEP 2- Click the “Email and Notifications” Tab to manage your Email and Notifications
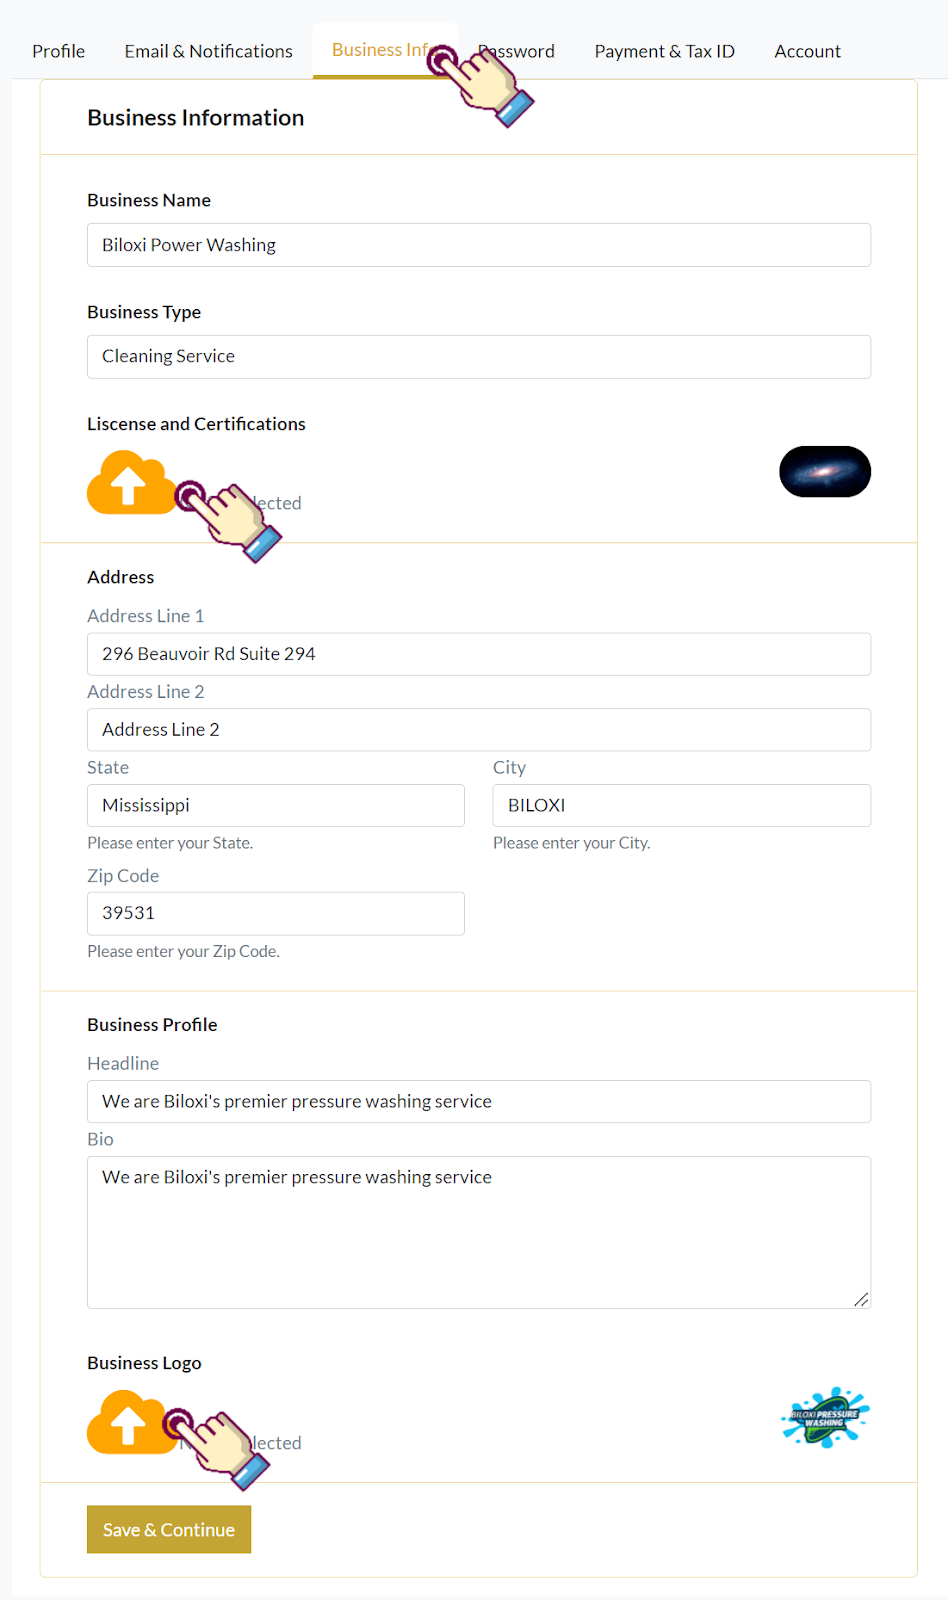
STEP 2- Click the “Business Info” Tab to manage your business details
NOTE: You can click the orange could halfway down the page to upload your licenses and certifications.
NOTE: You can upload your business logo by clicking on the orange cloud at the bottom of the page.
HOW TO CONTACT US OR LEAVE FEEDBACK
We're always looking for ways to improve our platform. If you have any questions or comments please dont hesitate to call us at 1-(228)-300-8010.
Beyond phone-based support, we offer 2 other methods of communication.
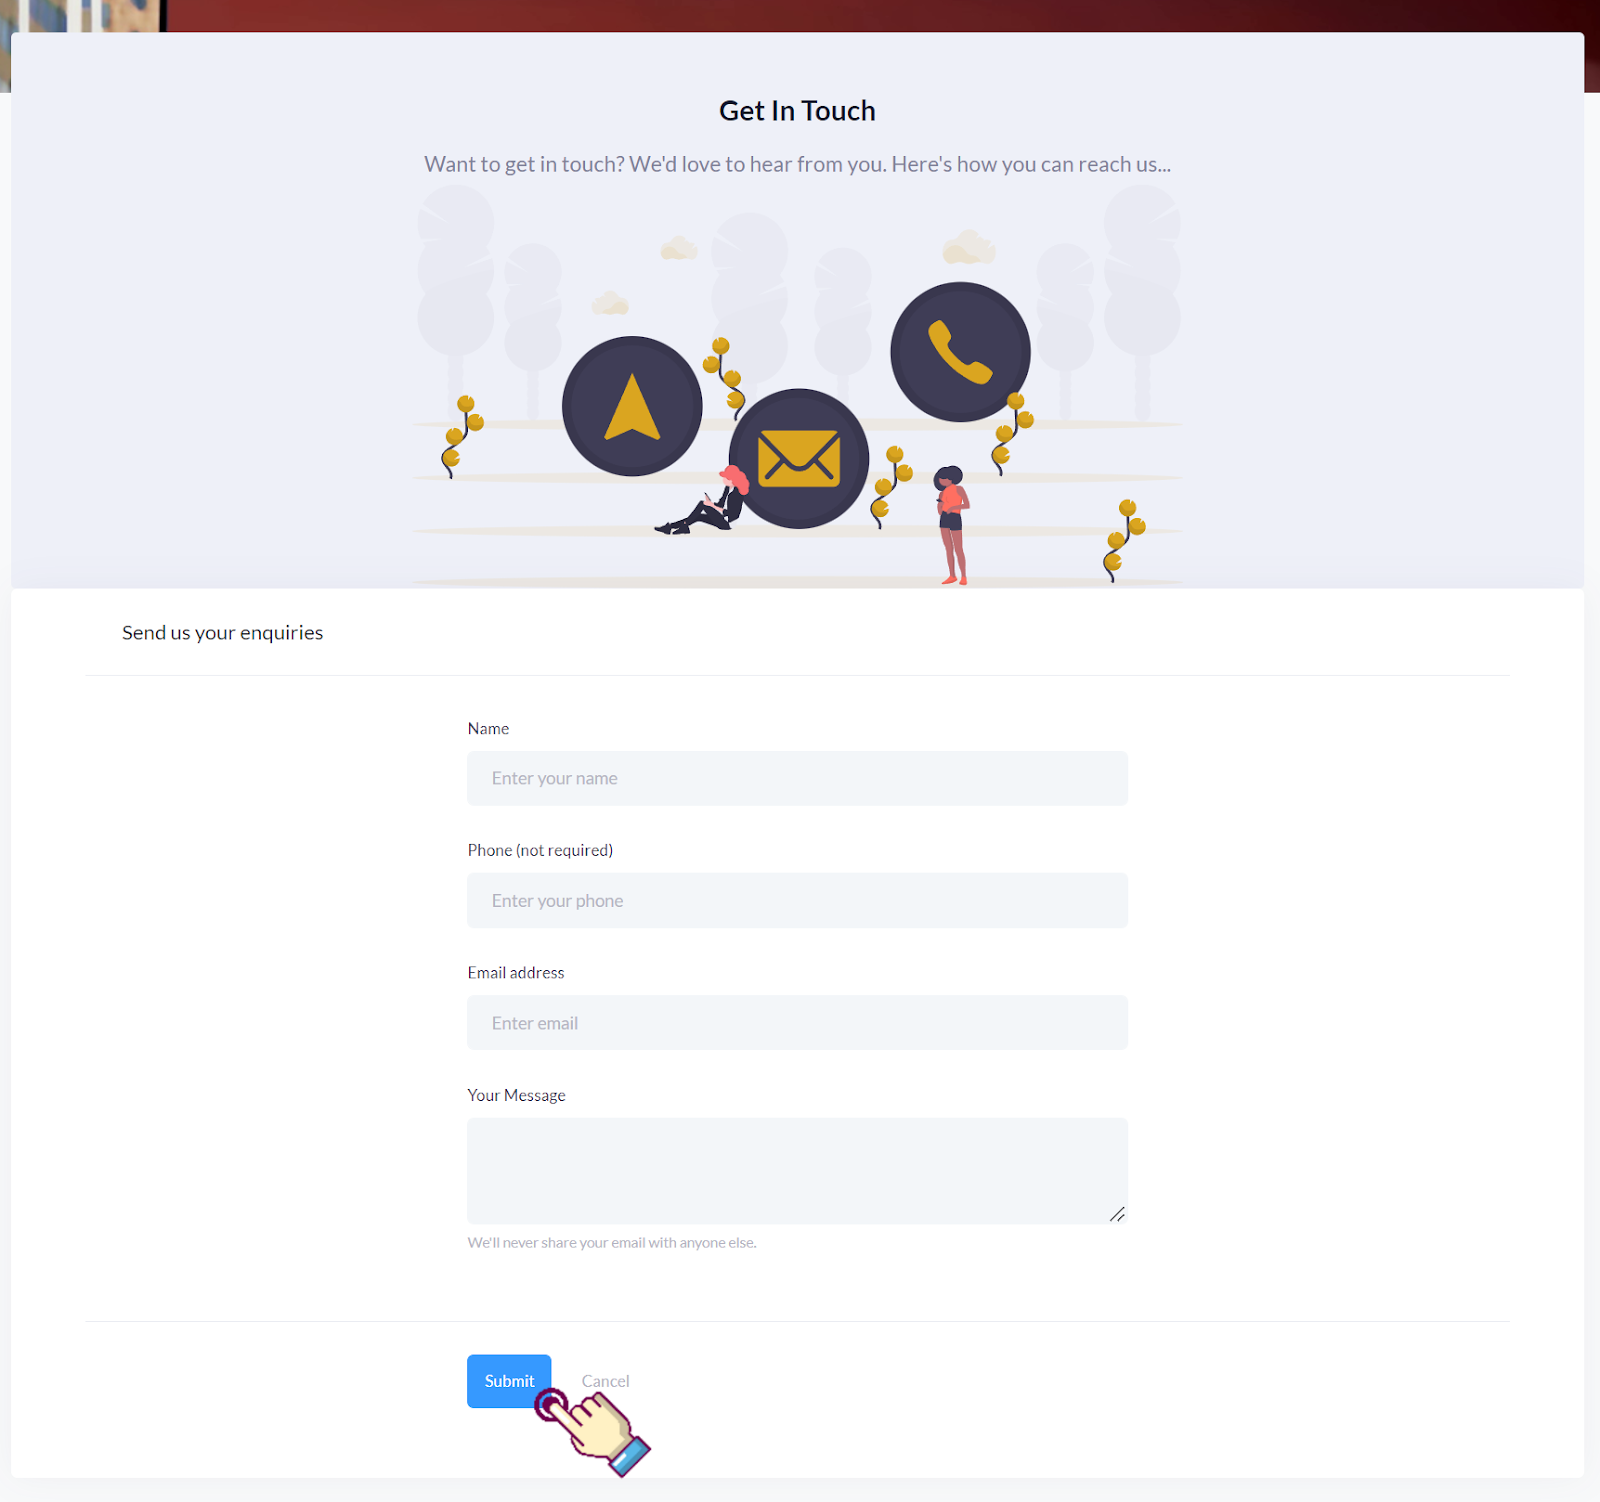
For low-priority issues, you can send a message to our support staff.
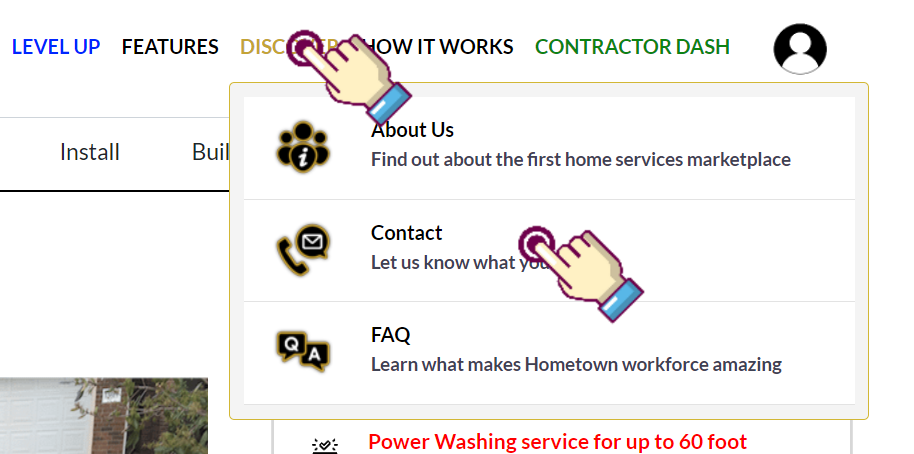
STEP 1- Click the “Discover” link on the header menu, then click “Contact” in the dropdown
STEP 2- Fill out the contact us form then click “Submit” to send a message to our staff
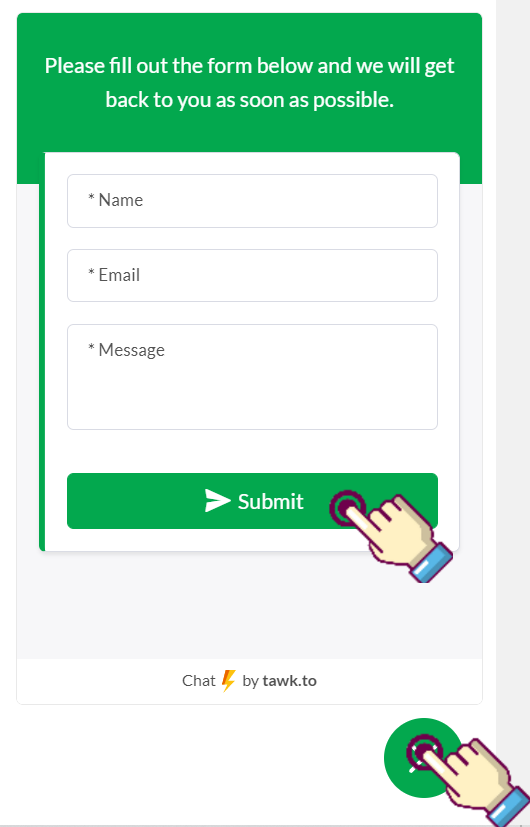
For high priority issues, you can use the integrated chat at the bottom right corner of the page to communicate directly with a support specialist
STEP 1- Fill out the form
STEP 2- Click the “SUBMIT” button
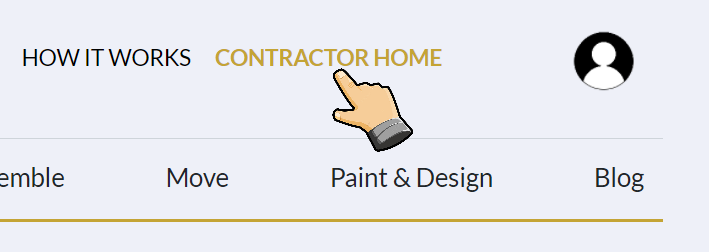
HOW TO CREATE A CONTRACTOR ACCOUNT
STEP 1- On the Home page click CONTRACTOR HOME to create a new contractor’s account
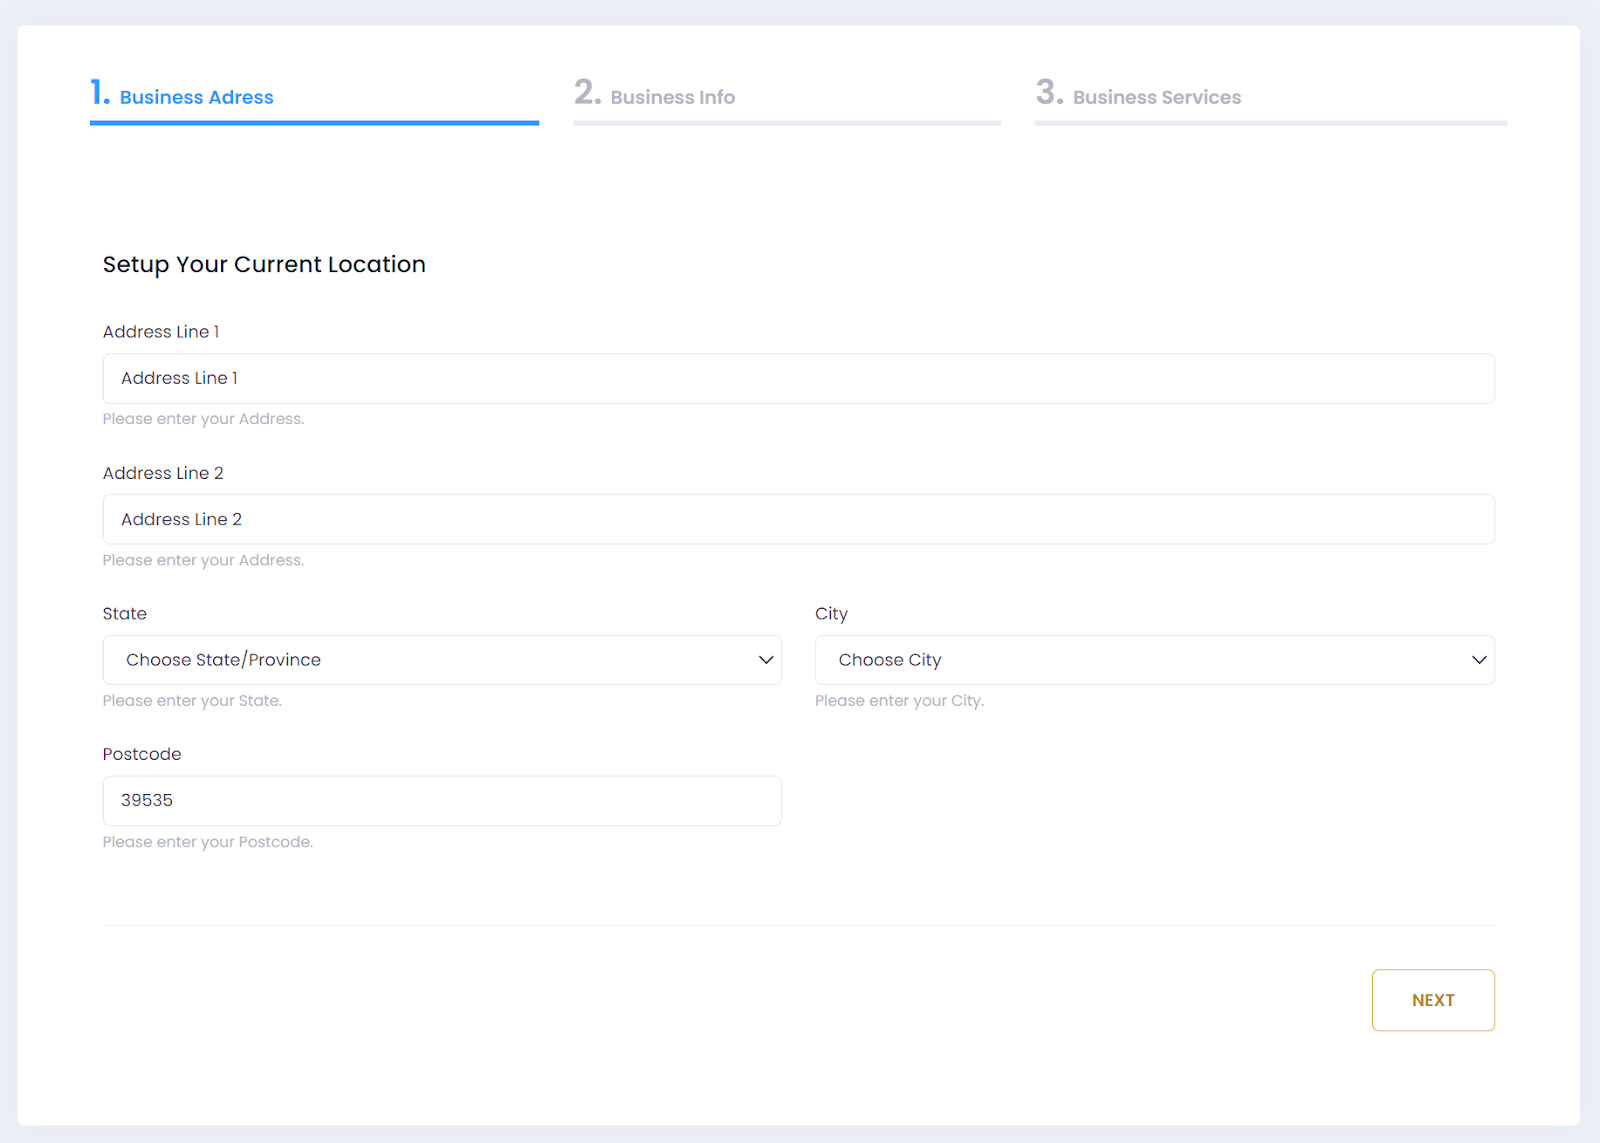
STEP 2- Proceed through the Business Address form
STEP 3- Enter your Business Info
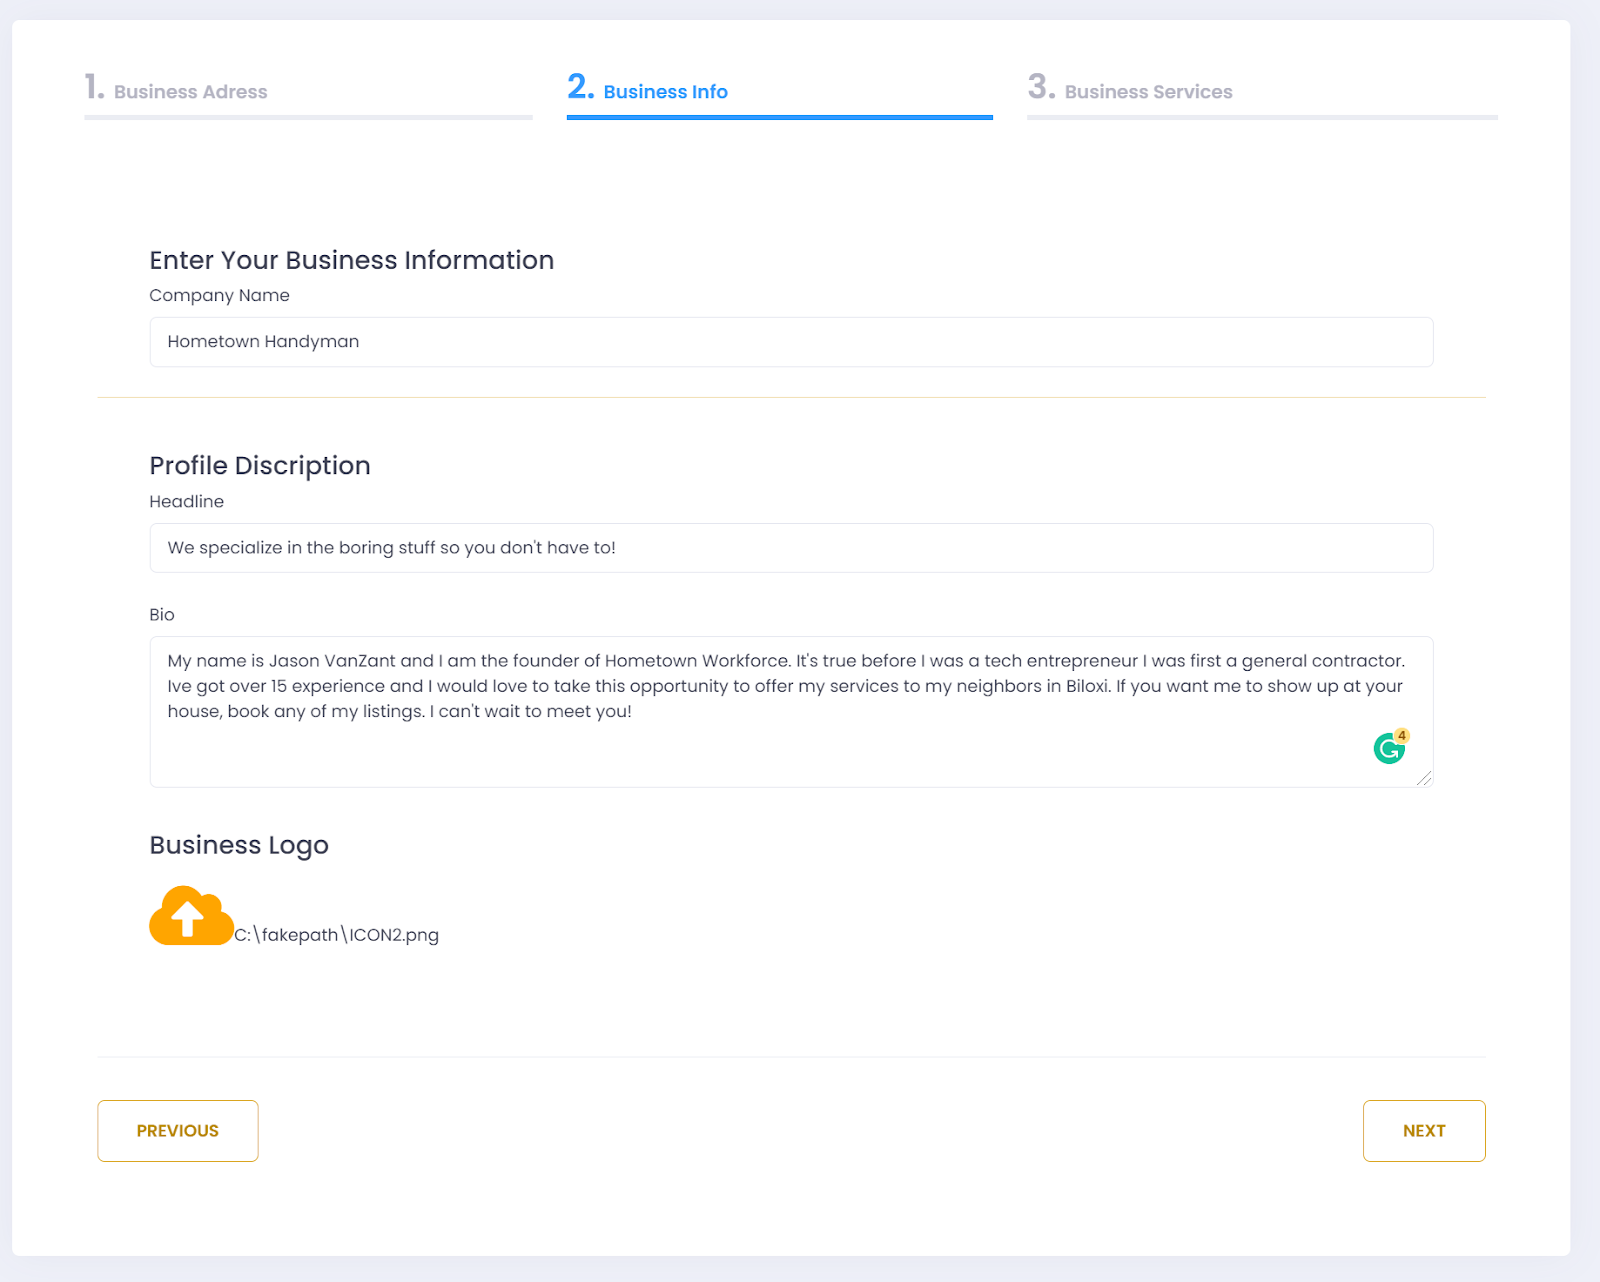
NOTE: Start with a Company Name. This is the name you would like to show up on your service listings.
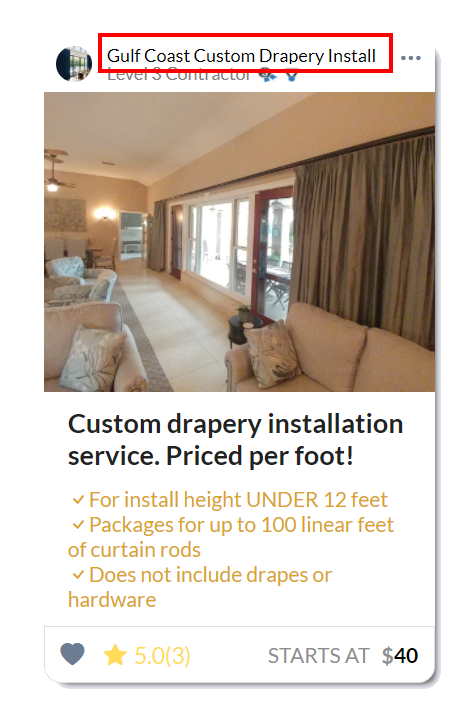
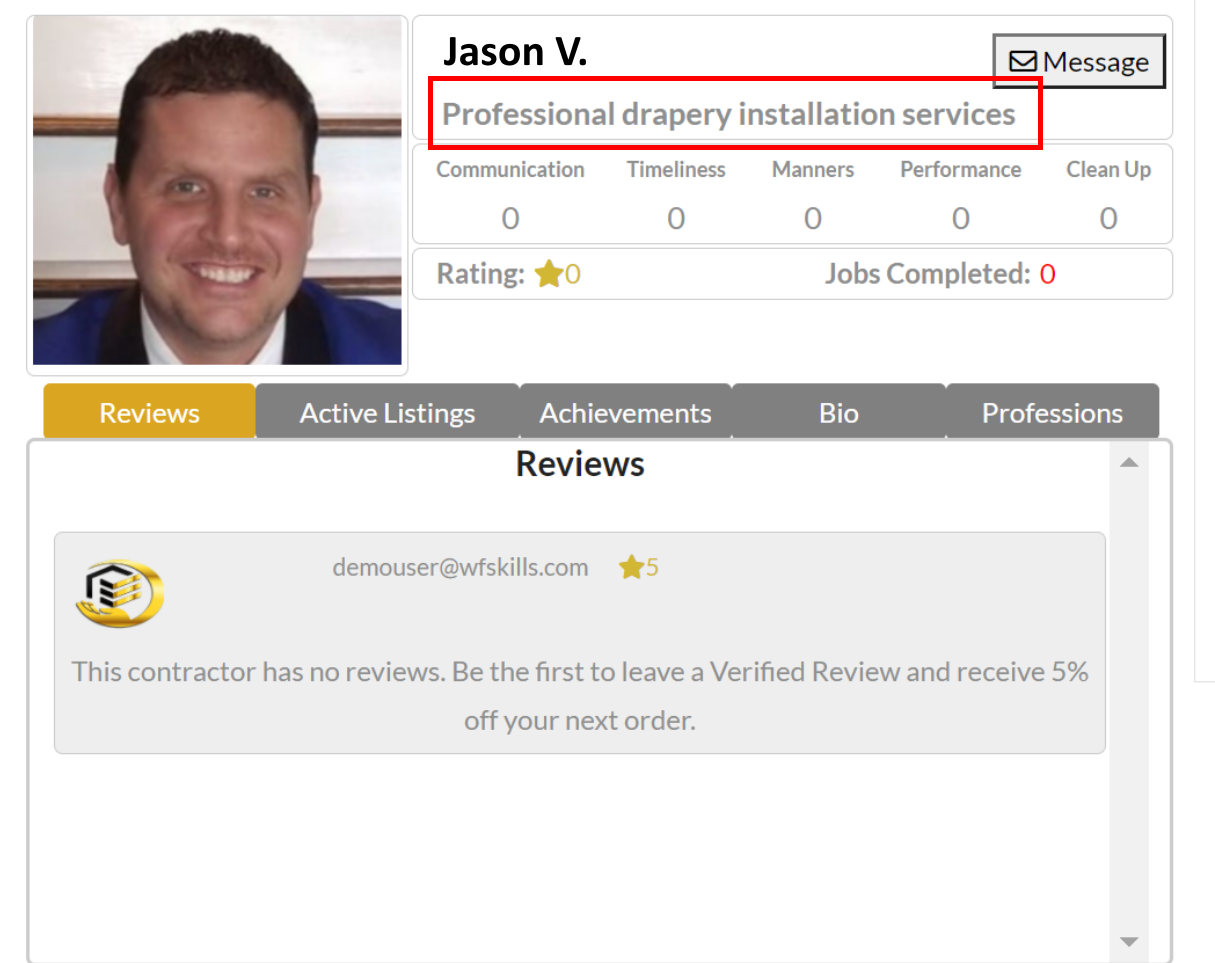
NOTE: Next add your headline- This is the title of your profile. It’s the first thing people will read when viewing your profile.
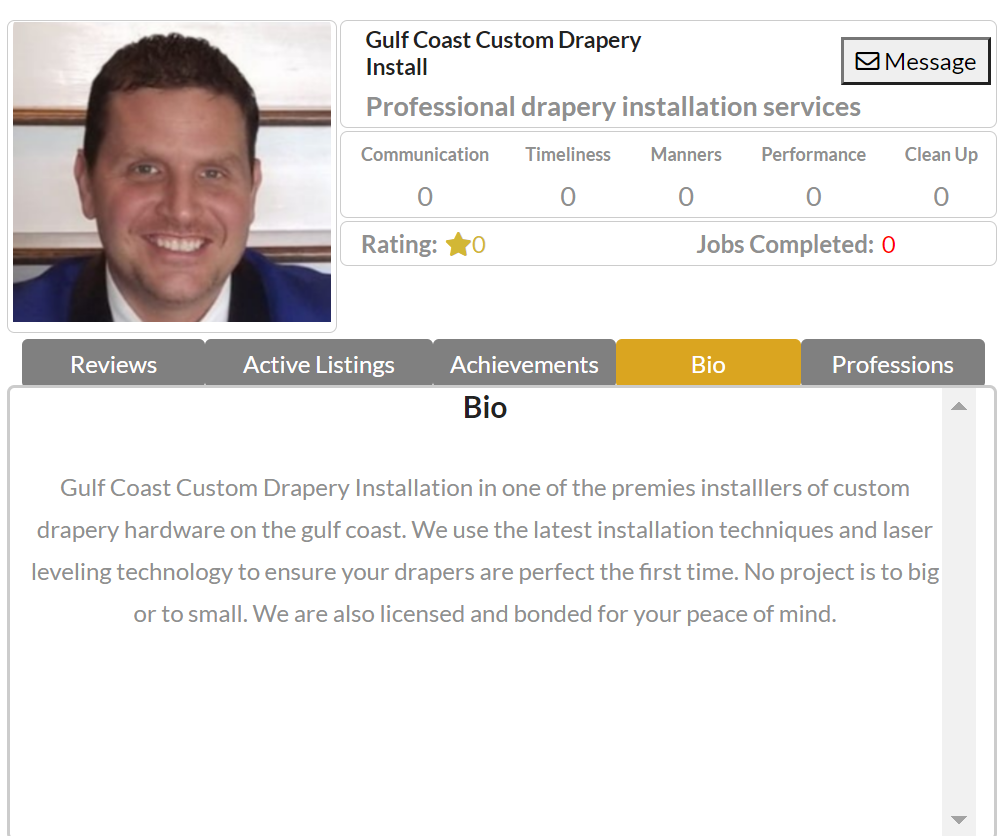
NOTE: Bio- This is your public bio. Make sure to give details of experience, specialties, awards, or any other worthwhile accomplishment you would like a potential client to know.
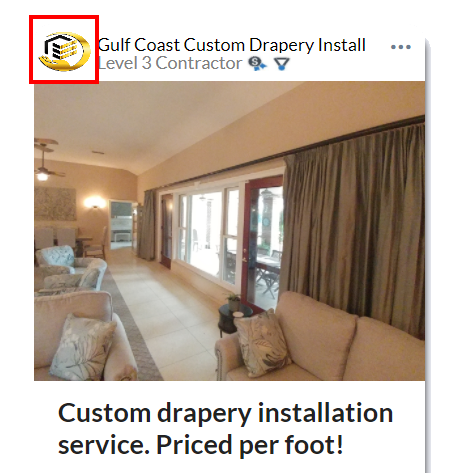
NOTE: Business Logo- This is the logo that appears on each of your listings. TEMPORARILY YOU NEED TO USE A REAL PROFILE PICTURE BECAUSE THE IMAGE YOU UPLOAD HERE ALSO POPULATES THE PROFILE IMAGE OF YOUR PROFILE.
STEP 4- Chose your desired profession
NOTE: Choose Your Profession- This is where you choose up to 4 of the 11 available professions and the associated trade skills you wish to offer the community. Remember you can mix and match up to 4 professions and any trade skill you want. Access to more skills is available.
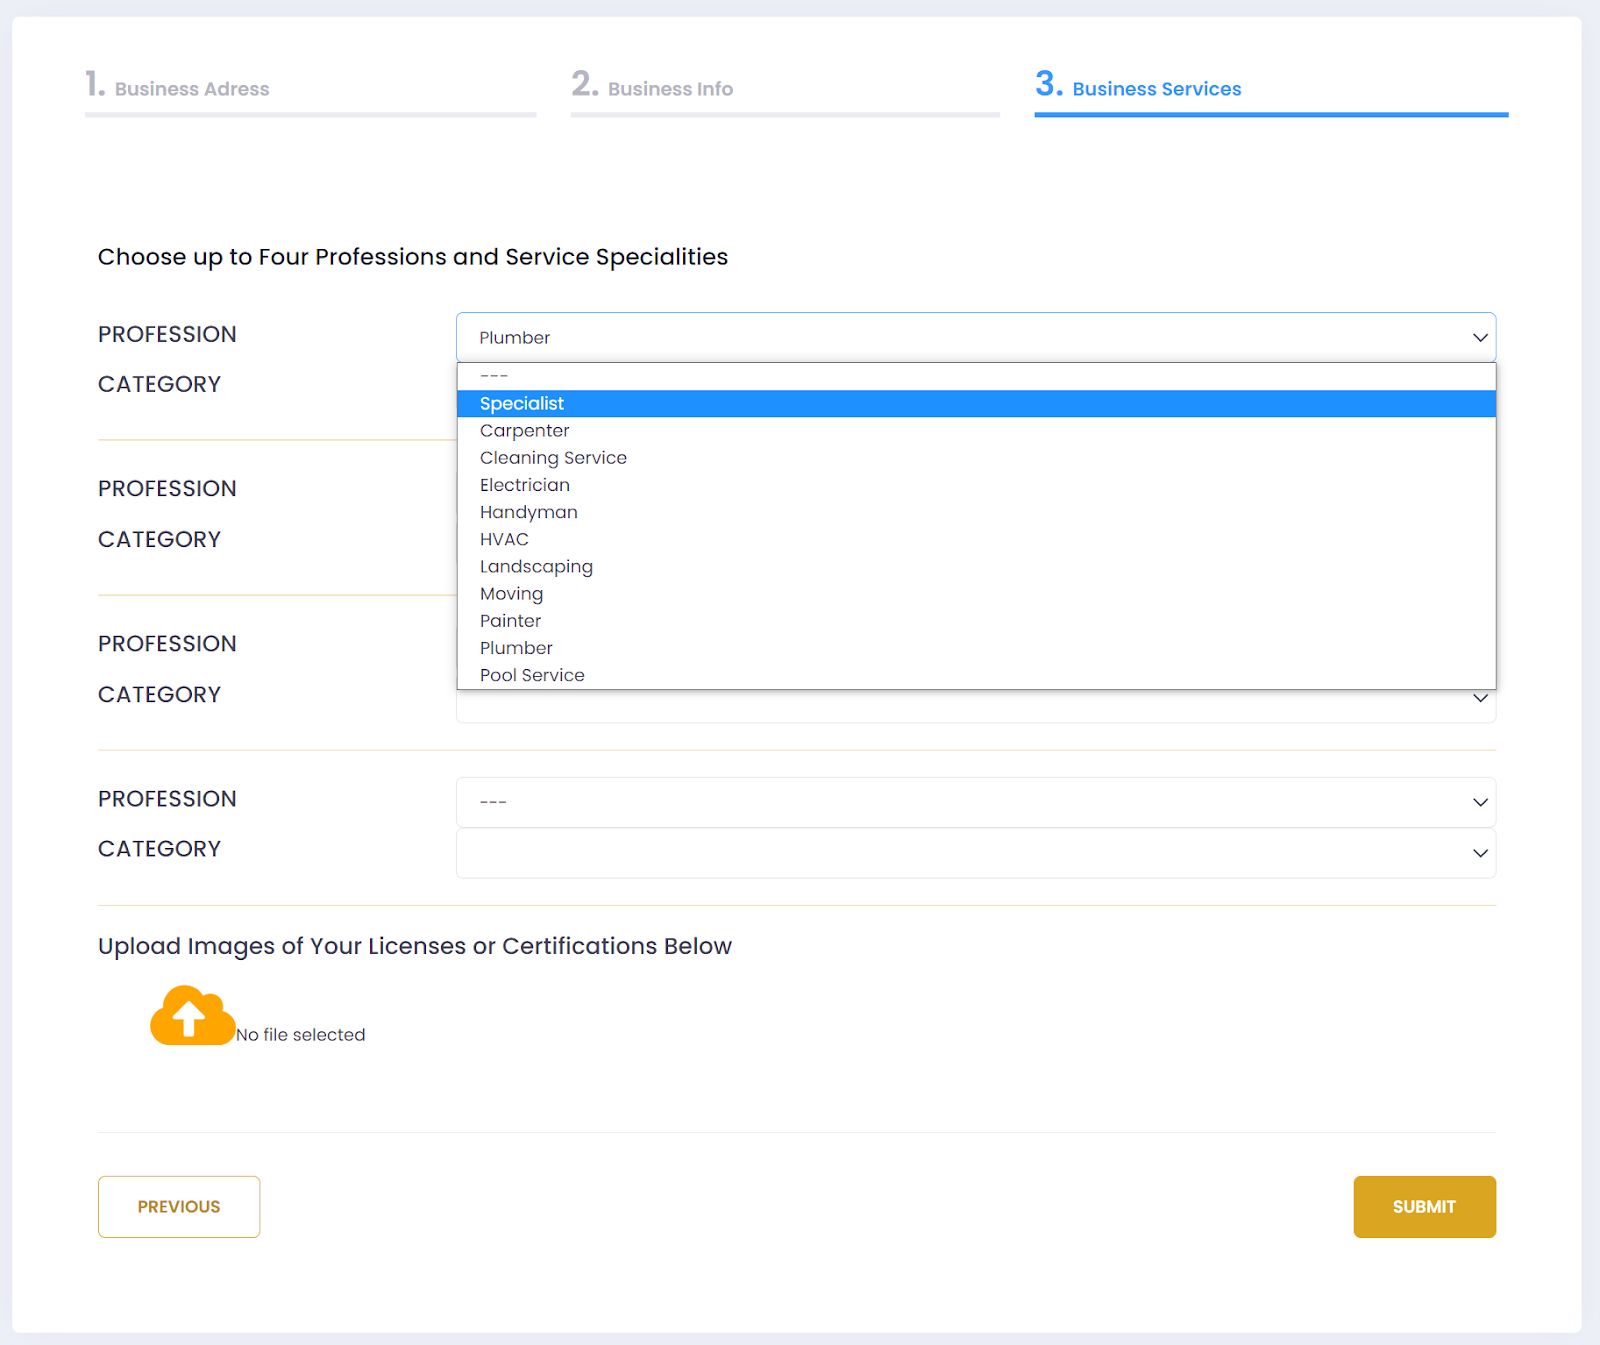
NOTE: Choose Your Category- This is the trade skill associated with the profession you choose. These are the services you would like to create listings around.
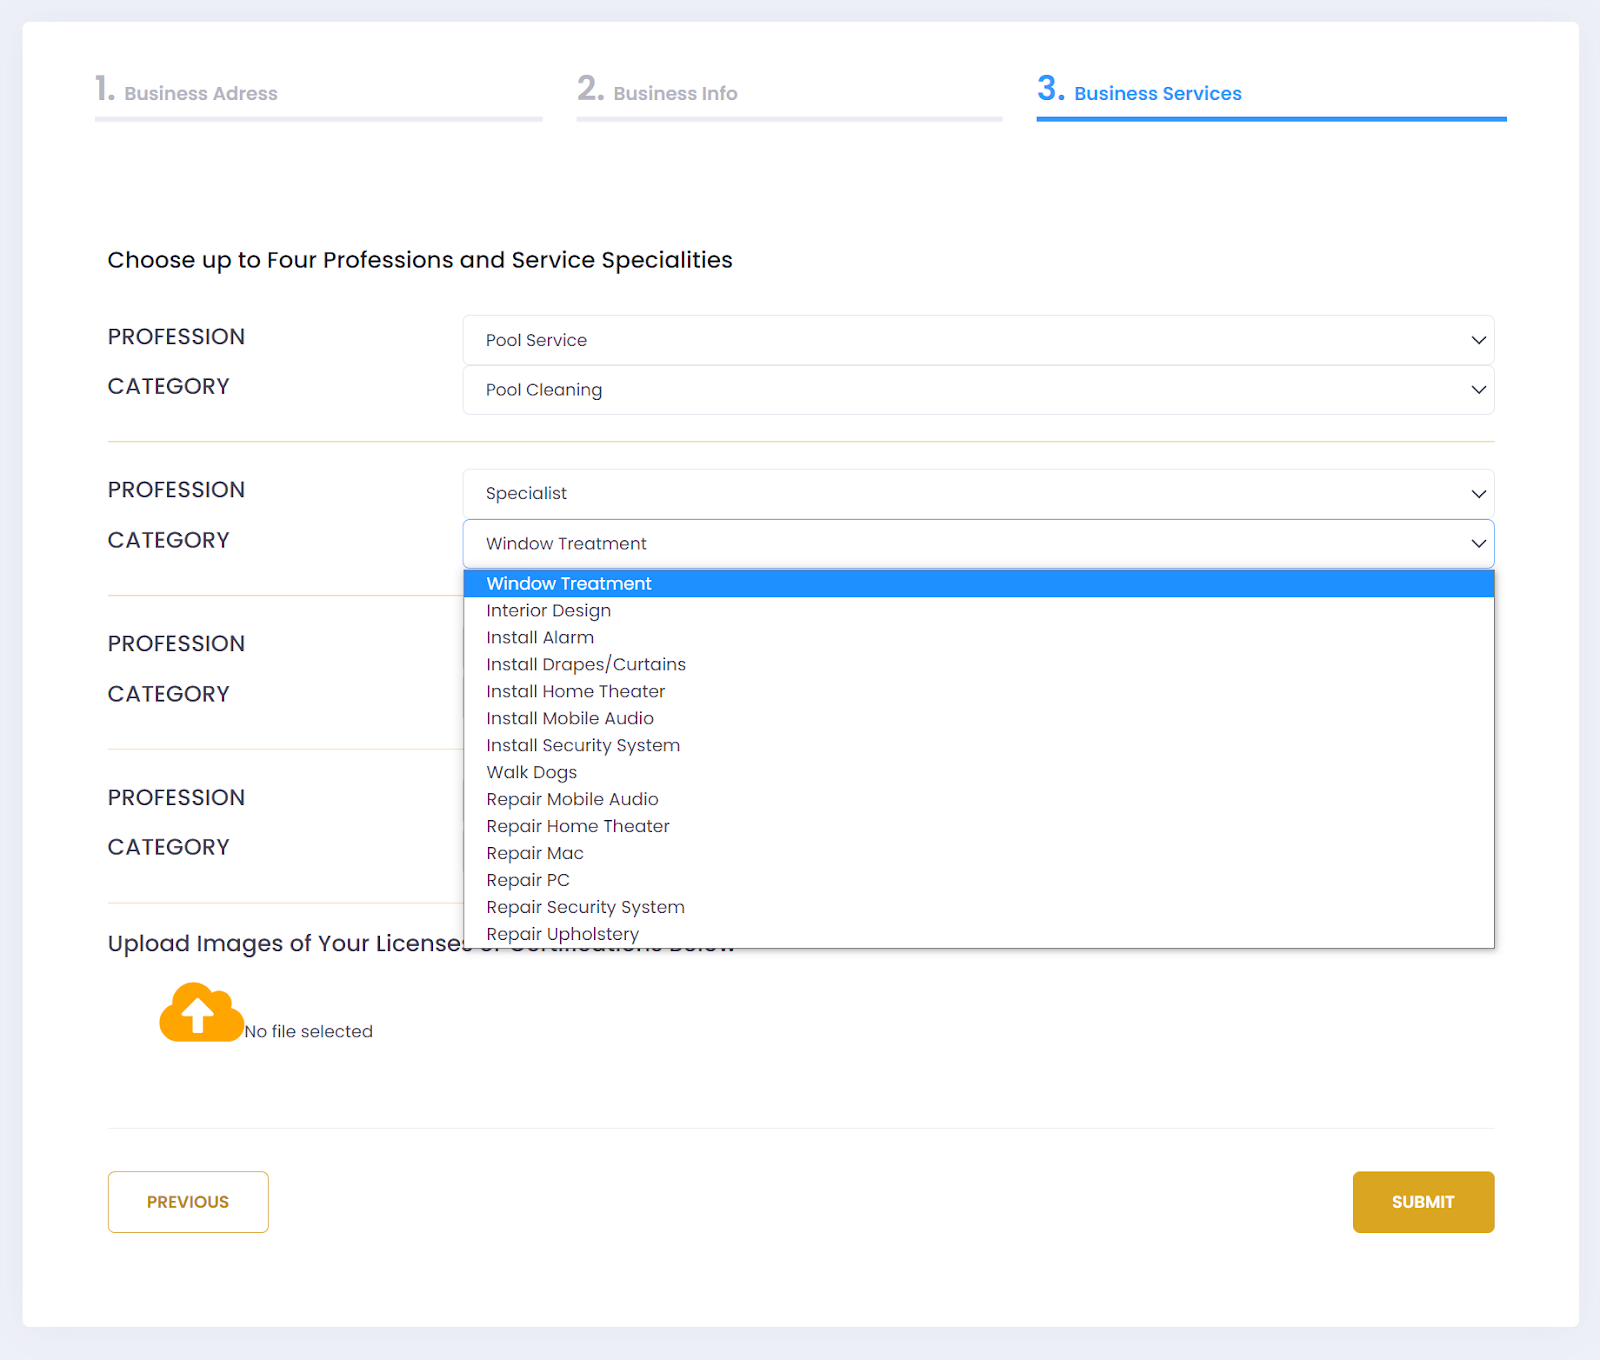
NOTE: Upload Images of Certifications or Licenses- This is where you upload images of your legal documentation. Licenses, Certifications, Insurance and a felony background check are required to create listings on the Wfskills platform. If you dont have all your documentation then contact us about enrolling at your local Hometown Training Center.

UPDATING PROFILE PICTURE
After creating your business account navigate from the homepage sidebar page and click
“My Profile”
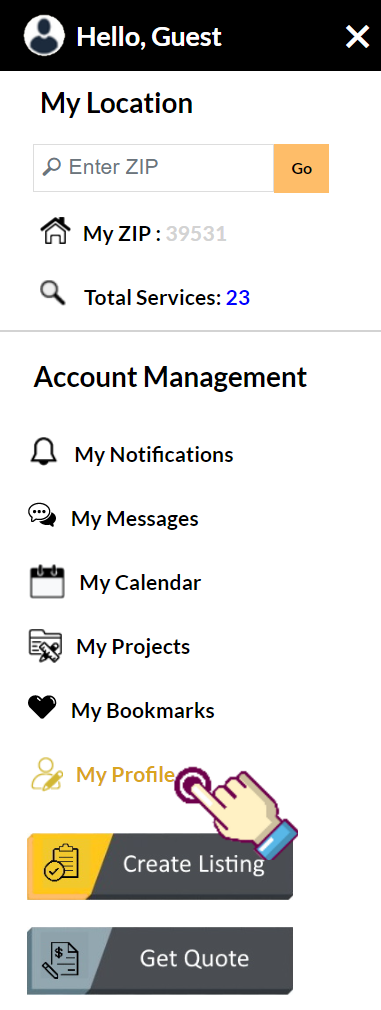
NOTE: After clicking “My Profile” on the left sidebar, click the Profile tab at the top of the Setting page
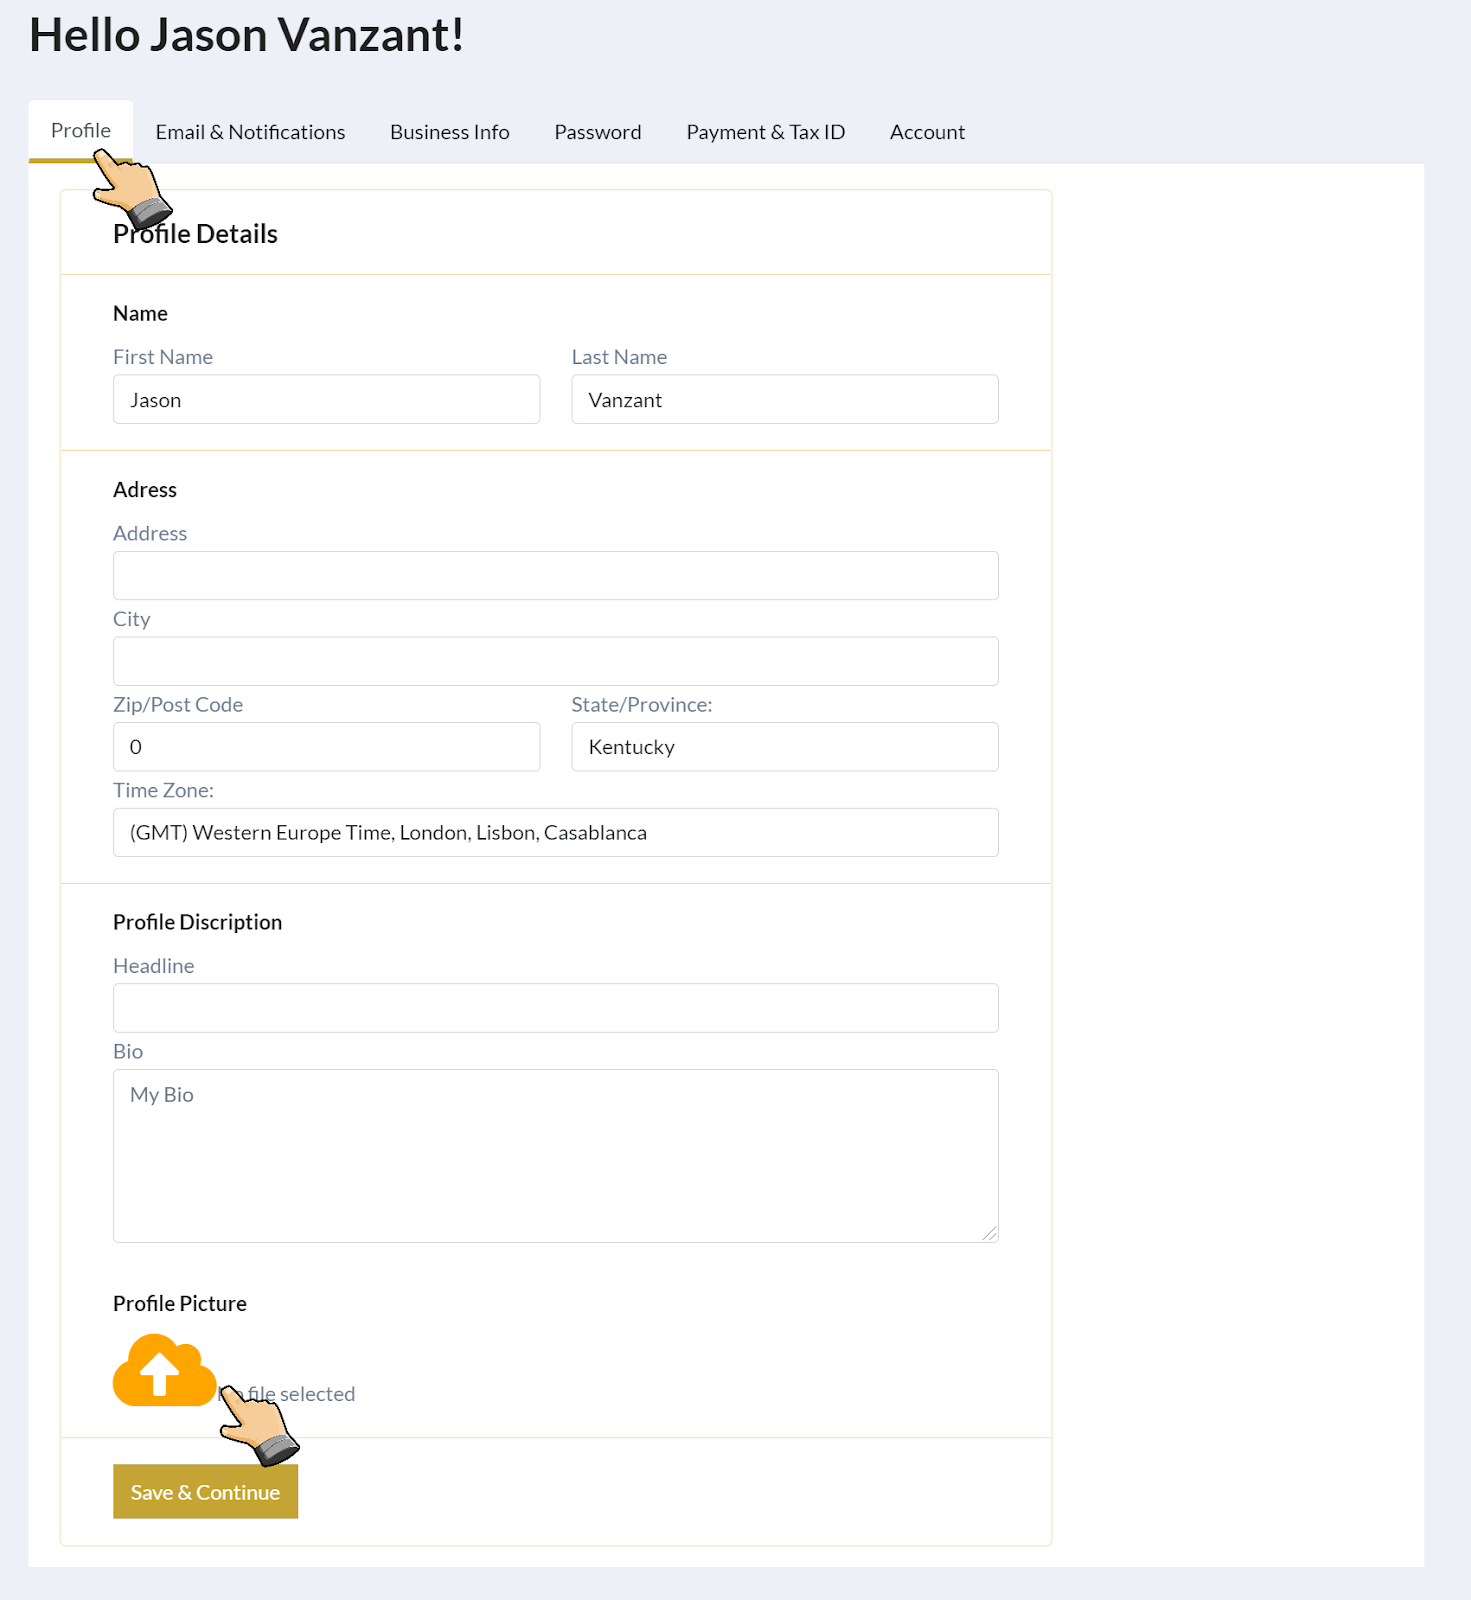
NOTE: This is where you select the photo for your profile.

HOW TO CREATE A SERVICE LISTING
CREATE LISTING- Navigate to the Create Listing button on the left sidebar.
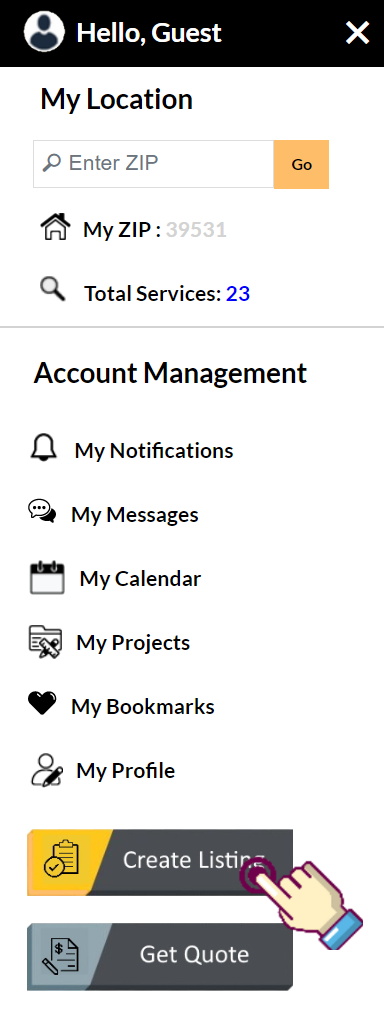
Our goal with each Service Listing is to provide the client with 3 fundamental pieces of information. In fact, our entire business model revolves around the WHAT, WHEN, and HOW MUCH methodology. Moreover, each listing needs to address those 3 questions in detail. The WHEN is simple, that part is taken care of by the Workforce booking software. When a client books a Contract Package, the time estimated for the specific Contract Package is deducted from the contractor's Work Calendar. In addition, the contractor is required to assign what days and what hours of those days their crew is available to perform work dedicated to the Work Business Calendar.
These Service Listings are paramount to the Workforce Skills Marketplace (or simply Wfskills) In fact, no other website can offer their clients the WHEN, WHAT, and HOW MUCH for Off-Line services. Once you fully understand how this works, you will understand Wfskills’ real power to change the world. Wfskills solves all three fundamental problems with contractor acquisition. Combine those three solutions with a competitive open market plus customer reviews on the back end, and you have a formula that forces compliance on an unprecedented scale. Our end goal is to eliminate scams from the home service industry.
A Service Listing begins with 1 of 11 distinct Professions:
We will also have one instructor specific to each of the above trades.
Beyond the primary 12 Professions, we will be able to accommodate any Specialty service we deem appropriate, from Dumpster Delivery to On-Site Yoga instructor, or any service that can be accurately priced in three variations.
Each of these 12 Professions is further broken down into over 200 Trade Skills or “Service Categories.”
Here are two examples of the “Electrical Profession, Service Categories.”
Once a contractor is approved to create a listing in a specific Service Category, there are few limitations to what listings can be created within that realm.
After approval of my hypothetical company, we select our PROFESSION and SERVICE CATEGORY. We need to name our Service Listing using a unique Service Headline. Our SERVICE HEADLINE will be “Fan replacement up to 16 ft by Jason Co.”
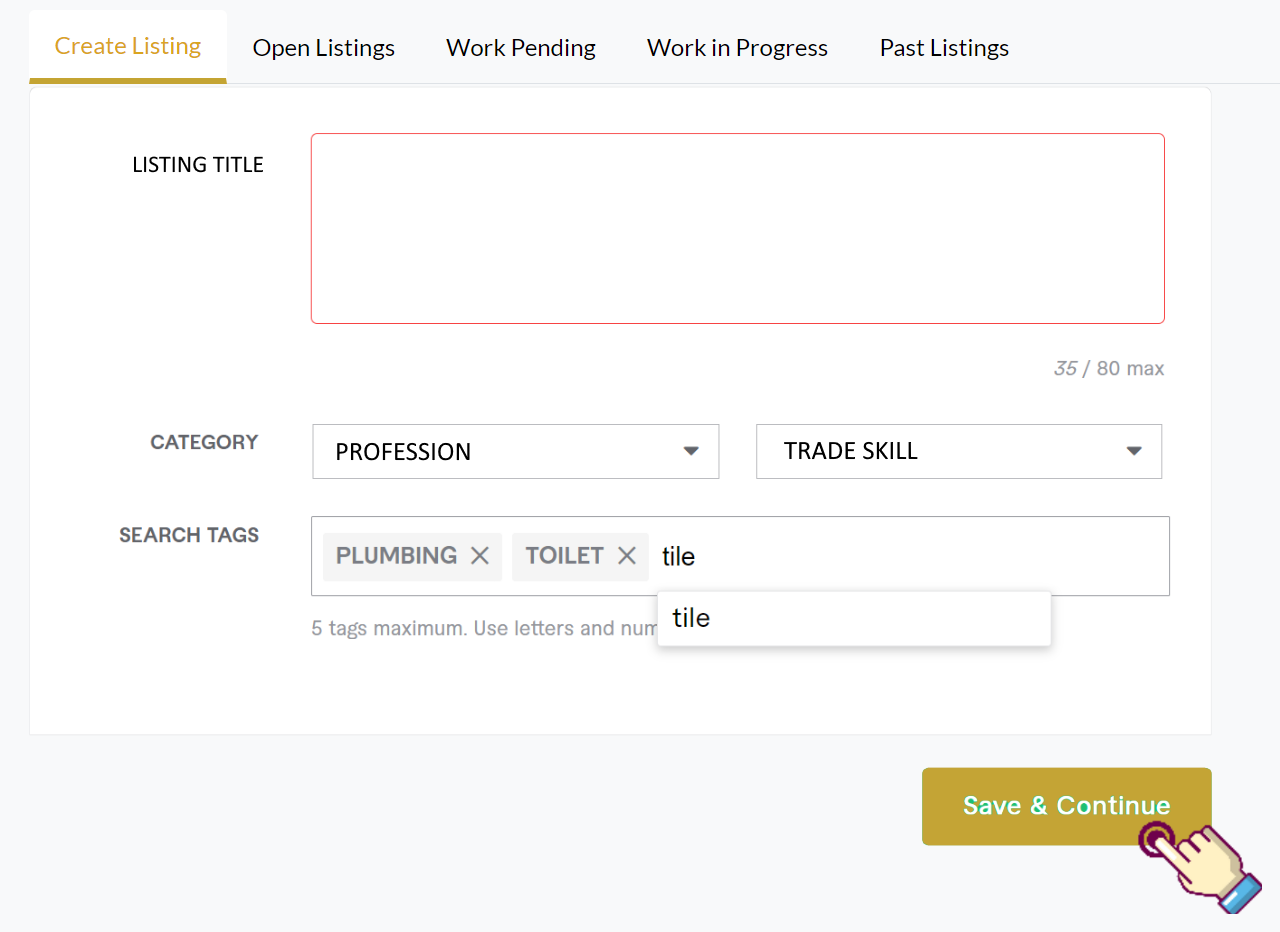
The true Wfskills flexibility comes by way of each Service Listing’s 3 Variations or Contract Packages. Below are a few different Service Headlines in the “Fan Replacement Service Category.” These listings allow you to understand how a business would need to ensure that each Service Listing unique. It's important to note that a single contractor may specialize in all 4 Service Headlines below, although they would still need to create a different Service Listing for each to accommodate enough variations.
Notice the subtle differences in Service Headlines . Each is acceptable. but some are easier to understand than others. It’s important to be specific when naming your Service Listing. Consequently, you do not confuse a client when they attempt to match the Service Listing to their project requirements.
The main point to consider when creating your service listings is diversification. The Workforce Skills Marketplace is just that: an Open Market where any contractor who qualifies to post listings in a specific Service Category has the flexibility to offer ANY specialty service within that Service Category. Therefore, the more specific you can formulate your Service Listings, the more accurately you can price your services. This is positive for you since you can plan ahead, and helpful to the client because they aren't paying for unnecessary items and tasks.
In the “Ceiling Fan Replacement” Service Category, my hypothetical company specializes in the replacement of large industrial fans between 8’ and 16” feet in diameter. These fans require a special lift, a hefty workforce, and specialty training to replace. This addresses the WHAT .
Now I need to start breaking my listing into 3 distinct Variations or “Contract Packages” for the client to select from. It further defines the specific variations of “Fan replacement up to 16 ft by Jason Co.”
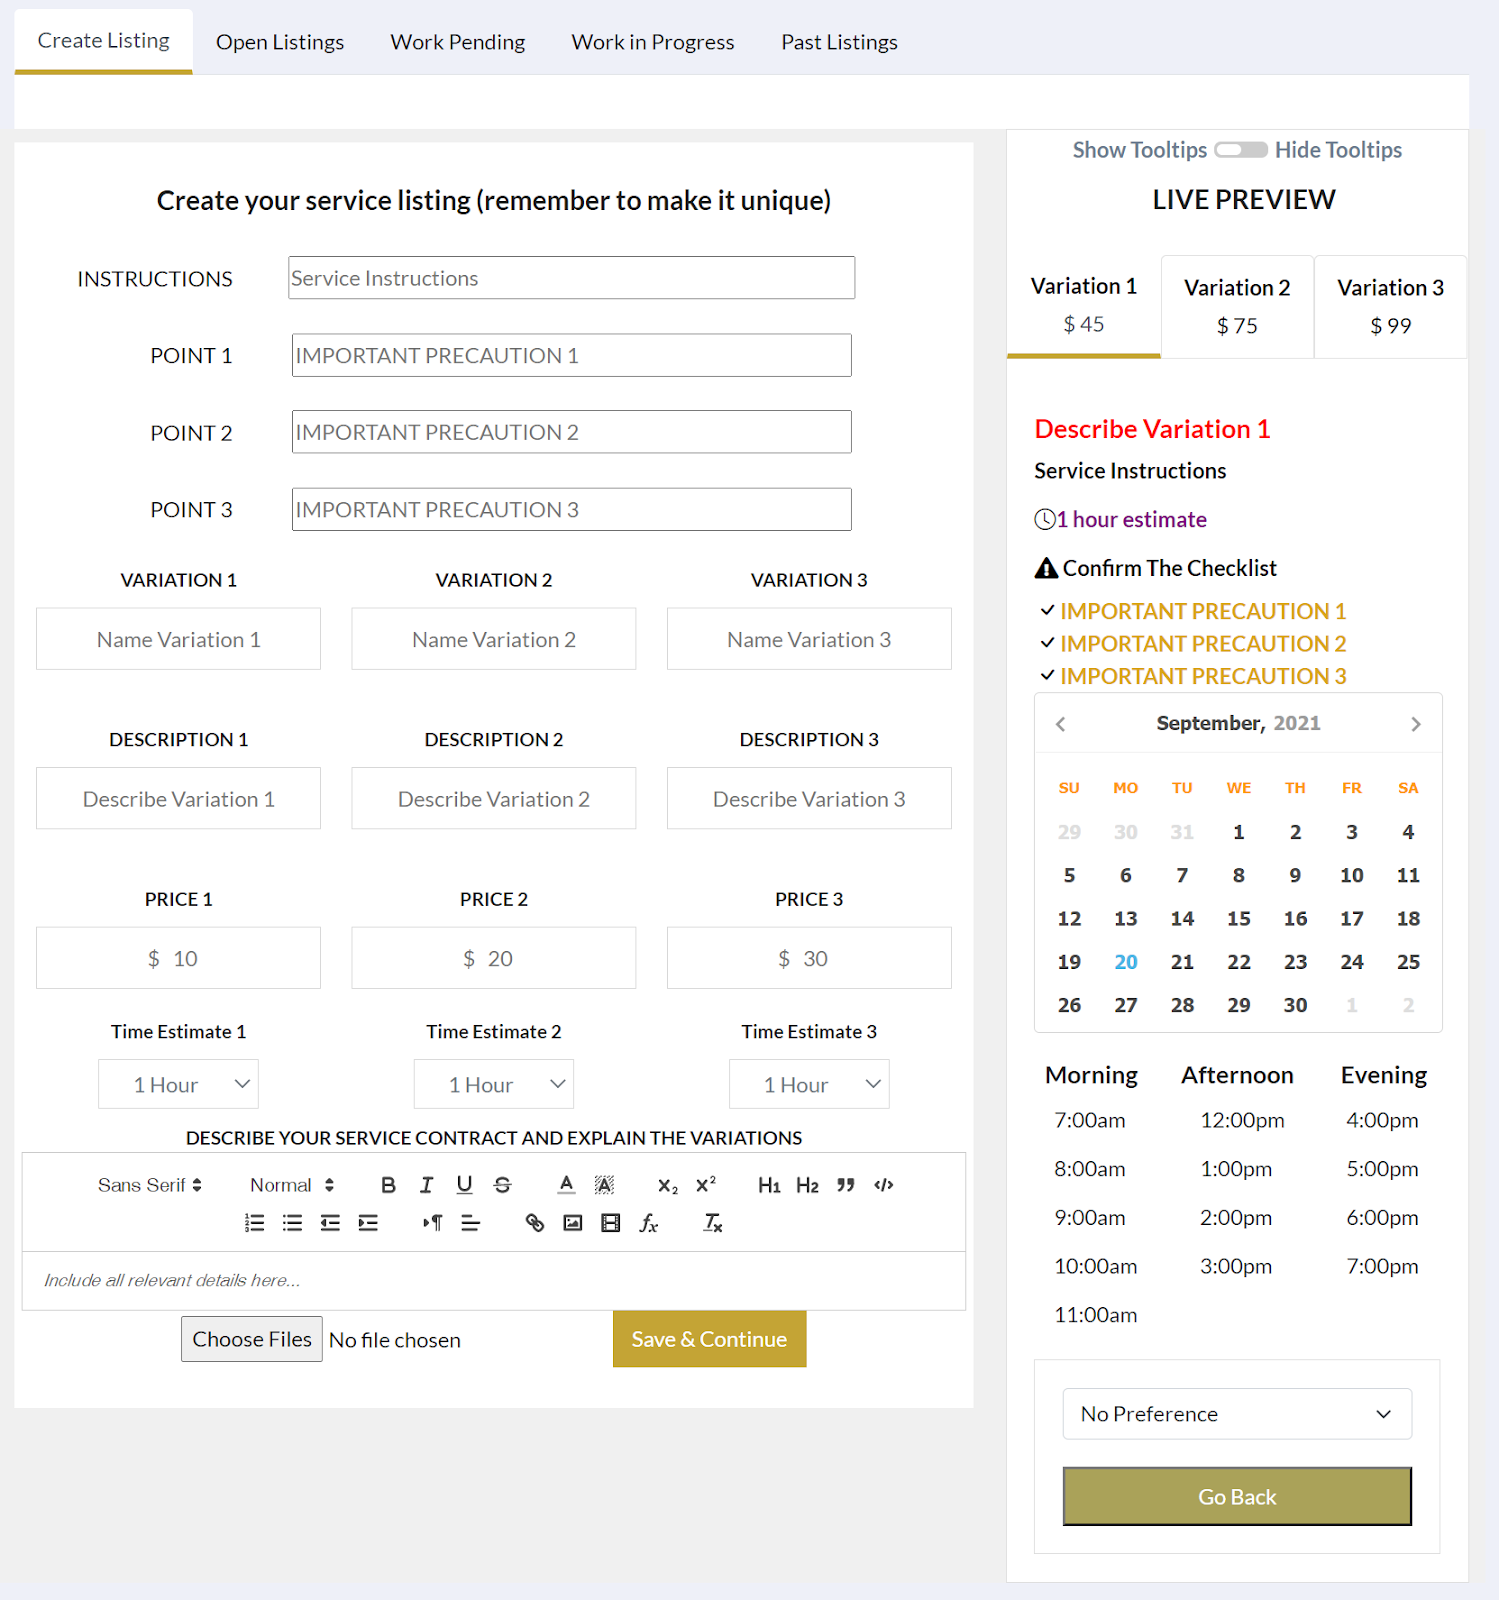
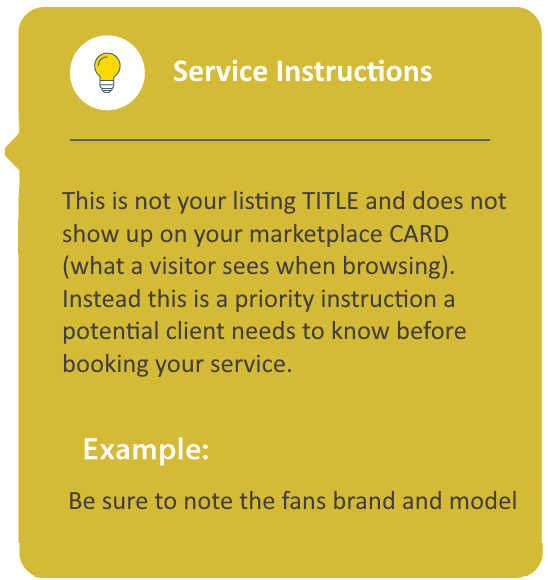
INSTRUCTIONS
Starting at the top, we have the SERVICE INSTRUCTIONS . This is where the main comment I would like a potential customer to know about the Service Listing. In this case, I want to ensure that the Client uploads a picture of their existing fan, so I put “Be sure to note the fans brand and model!” in the Service Description text box.
IMPORTANT PRECAUTIONS
Next, we must address our 3 key points or IMPORTANT PRECAUTIONS . These 3 key points will appear on the customer-facing Service Listing. These are the ONLY items beyond the Service Headline that a potential client will view to determine if this Service Listing is right for their project.
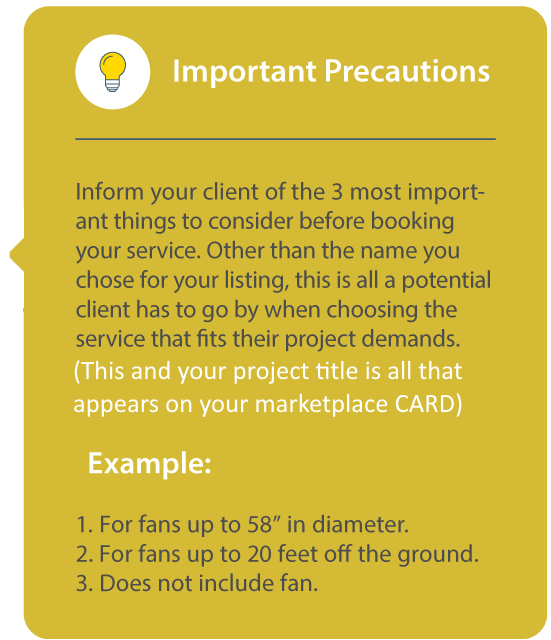
Here is an example of an existing Fan Replacement Service Listing. As the listing demonstrates, the 3 main points are:
Again, to emphasize, these are the 3 essential possibilities I need my potential clients to consider when browsing the site for Fan Replacement Service Listings. Notice the example above is for much smaller fans than the ones Jason Co. specializes in installing. Consequently, the three key points will be similar but differ just enough to inform the client what this specific
VARIATION NAMES
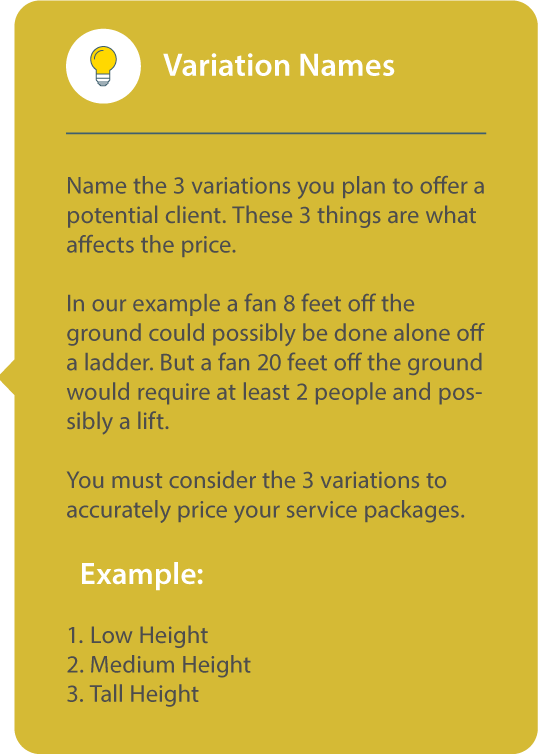
Next, we need to figure out our 3 VARIATIONS . These 3 Variations further diversify the Service Listing we are creating. We do this so the client doesn't pay the same price to replace a 16-foot fan as they do an 8-foot fan since the costs are different.
Remember, there could be other approved contractors who specialize in Large Industrial Fan Replacement, therefore, the more accurate and competitively priced your Variations are, the more likely the client is to book one of your Service Listings. One way to organize our 3 new Variations are:
VARIATION DESCRIPTIONS
Now we need to describe the 3 Variations.
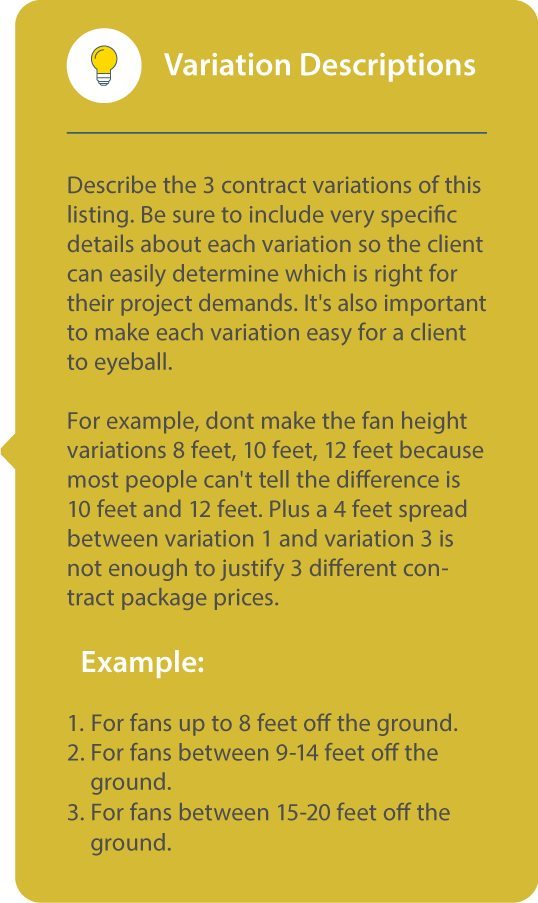
Also, since this is in the “Fan Replacement Service Category” and not “Fan Installation” I need to consider the extra time it'll take to finish the Service Contract. This brings us to the final piece of the puzzle, the HOW MUCH .
PRICES
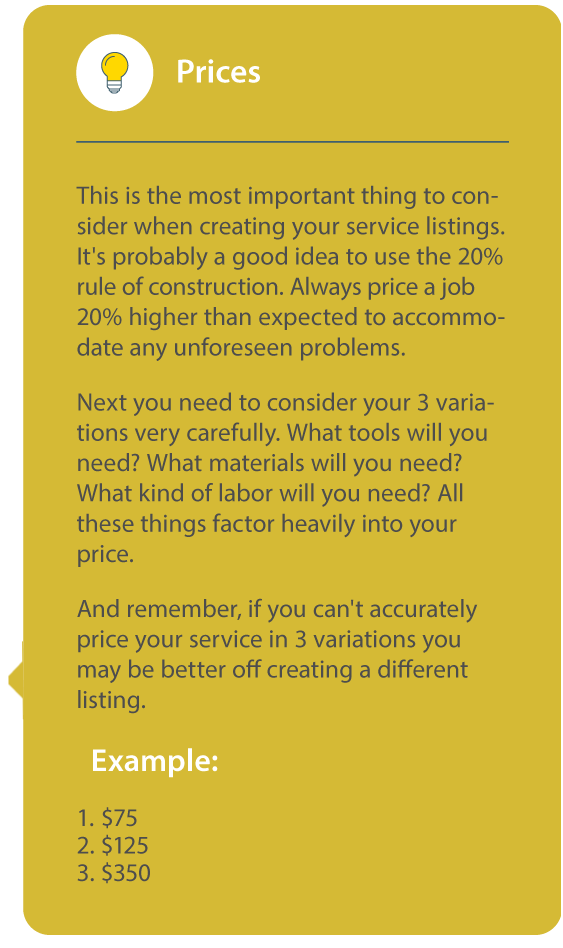
Now we need to assign a price for each variation. You need to consider the materials, equipment, time, and workforce required to successfully accomplish each Contract Package Variation. It's standard practice to add an additional 10-20% above the expected cost to cover any unexpected situations. But again the open market nature of the Workforce platform demands competitive prices. So it's a balancing act. Here are my example prices:
TIME ESTIMATE
We wrap up the dynamic elements of our Service Listing creation by assigning a Time Estimate for each Variation. Each Contractor has 12-hour blocks available per day on their Central Calendar. As a result, these 12 hours will be consumed by all the listings booked. In this hypothetical case, Jason Co. also does Industrial Heater replacement. That is a completely different Service Listing with different variations and different times in each Contract Package. Fortunately, when a client books to have a Large Industrial heater installed, that will deduct those hours from the central calendar. Consequently, those hours will no longer be available for any other bookings. In this example, I assign the following Time Estimates:
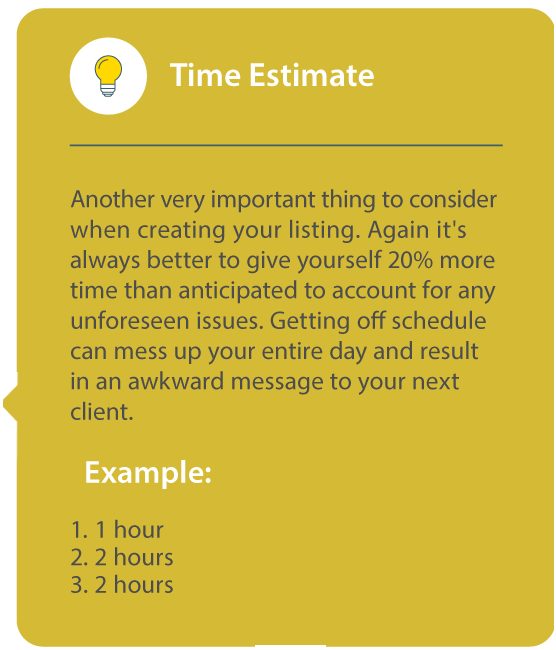
Finally, we have the Service Description. This will be where you address any additional points describing your Service Listing. This can be whatever you need the client to know, but more importantly, the items and tasks you need the Client to provide comments about on the next page after booking. For example, you may want to point out this Service Listing “Does Not Include The Fan” as it's always important to mention any issue that could become a problem after the project begins.
As a result, the Workforce platform is designed to provide nearly infinite variations of each Service Category so the client can accurately choose the Service Listing specific to their project demands. Again, this is the WHAT part of the equation.
Another issue to consider is that after you are approved to create a listing in a specific Service Category, you can create whichever specific Service Listings as you need to fully encompass your specialty. For example, you may actually have the trade skills and workforce to replace up to 24-foot industrial fans. However, above 16 feet requires completely different equipment, time estimates, and consequently, prices. Thus, you couldn't accurately estimate a 24-foot fan replacement price in the “Up To 16-foot fan replacement” Service Listing we just created. Instead, you would need a listing for 24-foot fan replacements.
Menu
 Replacement of electrical fixture
 Include pictures of outlet or switch
 1 Hour Estimated Completion Time
 Confirm The Checklist
 Replacement of electrical fixtures
 Include pictures of outlet or switch
 1 Hour Estimated Completion Time
 Confirm The Checklist
 Replacement of electrical fixture
 Include pictures of outlet or switch
 2 Hour Estimated Completion Time
 Confirm The Checklist
 DC Clarke
level 5 contractor
0(0)


Thank you for choosing DC Clarke a partner of Hometown Workforce. We appreciate
you trusting us with your service needs.
Hometown Workforce redefines how people have worked for thousands of years. The old paradigm says that people must do an on-site estimate. They have to show up, look around, and then give a price. The problem is they show up when or if they want, they charge whatever they want, and if there's an issue there is no one to call.
Our solution is the world's first home services marketplace, where you can hire a contractor at the push of a button!
If you’re interested in joining the Hometown family then give us a call: 228-300-8010
A-Z
Communication
0
Timeliness
0
Manners
0
Performance
0
Clean Up
0
Rating:0
Jobs Completed:0

demouser@wfskills.com5
This contractor has no reviews. Be the first to leave a Verified Review and receive 5% off your next order.
Coming Soon

Coastal Lawn Care
Level 5 Contractor
This is not for major storm cleanup
Packages for up to 1/2 acre (21,780 sq. ft.)
Includes bagging and placing by road!
23492589_ci_1042.jpeg)
Crooked Letter Pressure Washing & More LLC
Level 5 Contractor
For single lane driveways up to 180 feet
Concrete, Asphalt, & Paver Driveways
MUST HAVE ACCESS TO WATER
23492589_ci_1042.jpeg)
Crooked Letter Pressure Washing & More LLC
Level 5 Contractor
For Homes Up To 3000 sq. ft.
For SINGLE STORY homes
NO ROOF or WALKWAY!
23492589_ci_1042.jpeg)
Crooked Letter Pressure Washing & More LLC
Level 5 Contractor
Packages for up to 180 feet of fence
For fences UNDER 10 feet tall!
For painted and unpainted fences
23492589_ci_1042.jpeg)
Crooked Letter Pressure Washing & More LLC
Level 5 Contractor
For Single Story homes up to 3000 sq. ft.
Combo Includes Siding and Roof!
Does NOT include driveway or porch!

The Spotlighted Services
Level 5 Contractor
Includes downspout clearing!
Includes cleanout haul off!
For SINGLE STORY homes!

The Spotlighted Services
Level 5 Contractor
Includes downspout clearing!
Includes cleanout haul off!
For SINGLE STORY homes!

A Smart Clean LLC
Level 5 Contractor
For EMPTY homes!
Includes Cabinets, Fridge & Oven
Includes Walls & Windows!

Hometown Handyman Academy
Level 5 Contractor
Packages for TVs up to 75 inches
UNDER 10 foot mount height!
Does NOT include TV or mounting hardware!
 Replacement of electrical fixture
 Include pictures of outlet or switch
 1 Hour Estimated Completion Time
 Confirm The Checklist
 Replacement of electrical fixtures
 Include pictures of outlet or switch
 1 Hour Estimated Completion Time
 Confirm The Checklist
 Replacement of electrical fixture
 Include pictures of outlet or switch
 2 Hour Estimated Completion Time
 Confirm The Checklist